Configure MFA Methods for Admin
When you are considering authentication, the admin is the first person who needs to be authenticated. The primary reason for this is admin handles multiple user data. So along with admin(Self) users, security is also dependent upon the admin only.
The traditional authentication method (username and password) doesn't match the fast-paced vulnerabilities going on in the cyber world. So, to protect admin systems from such exposure, miniOrange helps you to set additional authentication methods, which will add an extra layer of security while logging into your admin system. This is done by configuring the two-factor authentication (2FA) method.
You can set 2FA methods differently for admins and users. Admin system will head up with higher security by configuring 2FA for the admin. miniOrange helps you to integrate 2FA for your admin system easily with 15+ 2FA methods. You can choose from any of the methods (KBA, OTP over SMS/email, Google authenticator, YubiKey, Push notifications, SMS, Email Links, etc) and secure your admin system.
Here are the methods you can enable for the second factor. Click an authenticator in the right column to jump to its setup steps.
Log in to the miniOrange Admin Console.
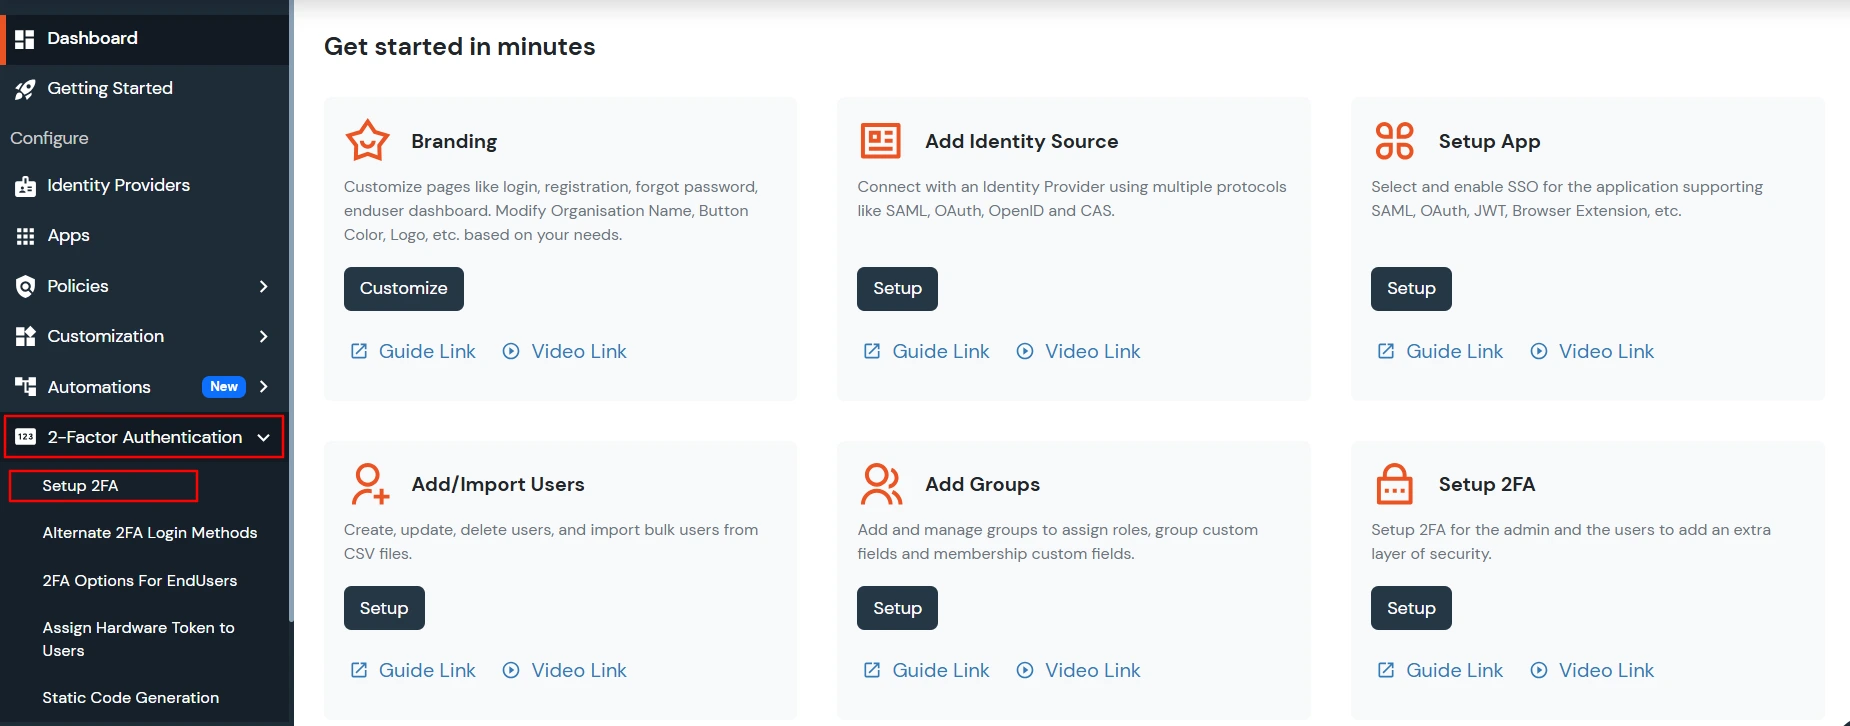
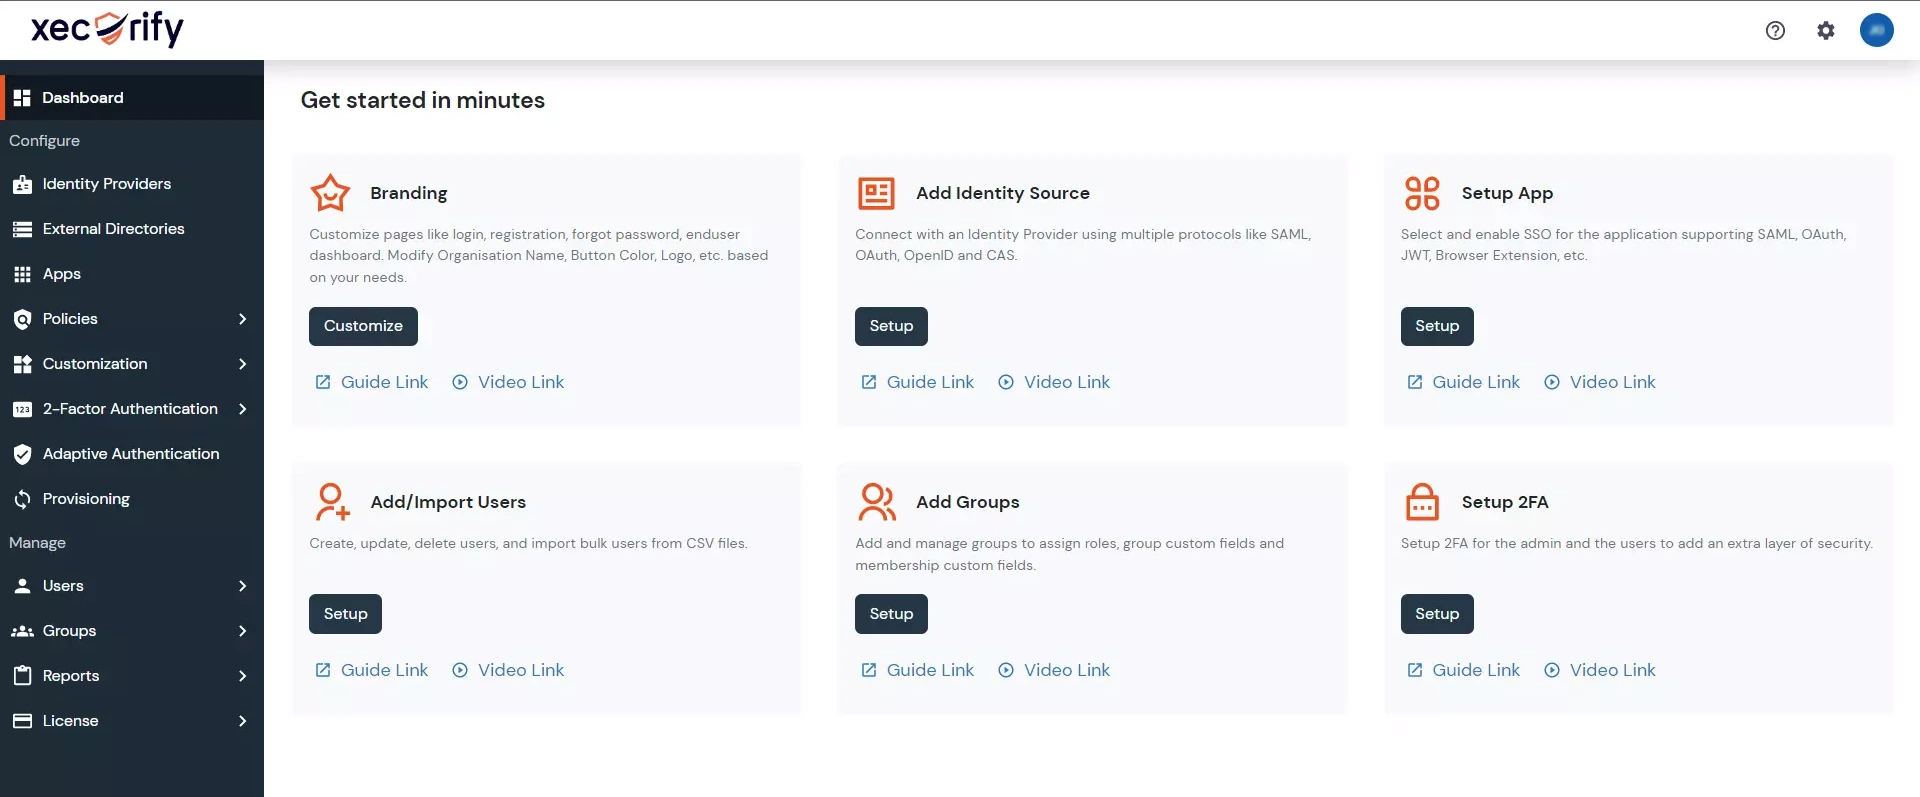
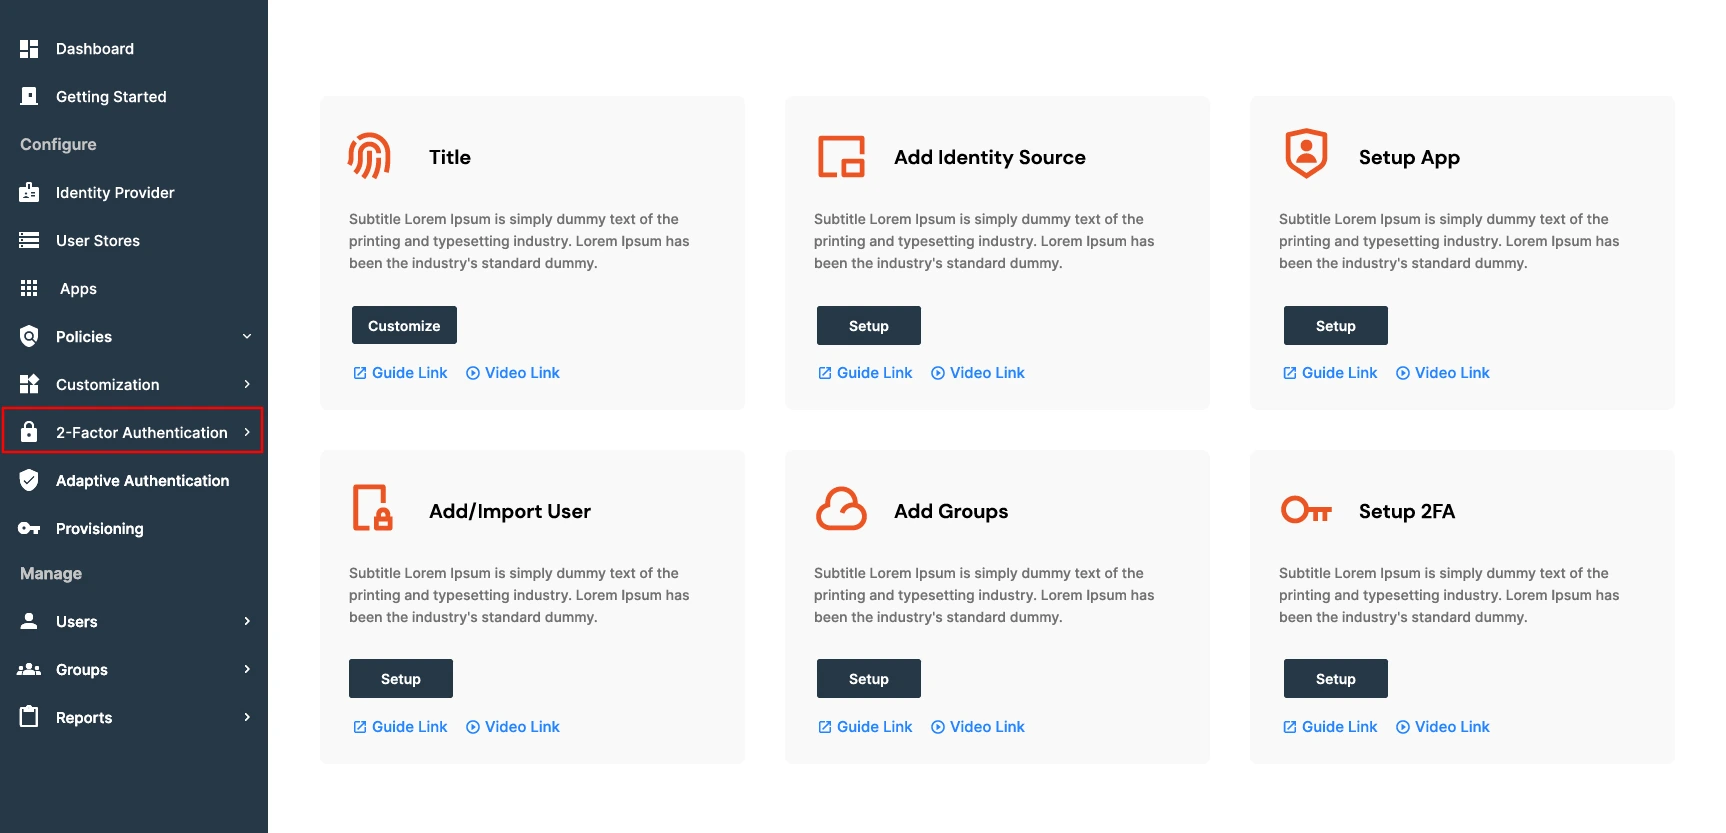
From your admin dashboard in the left navigation bar, select 2-Factor Authentication, and click on Setup 2FA for Admin.
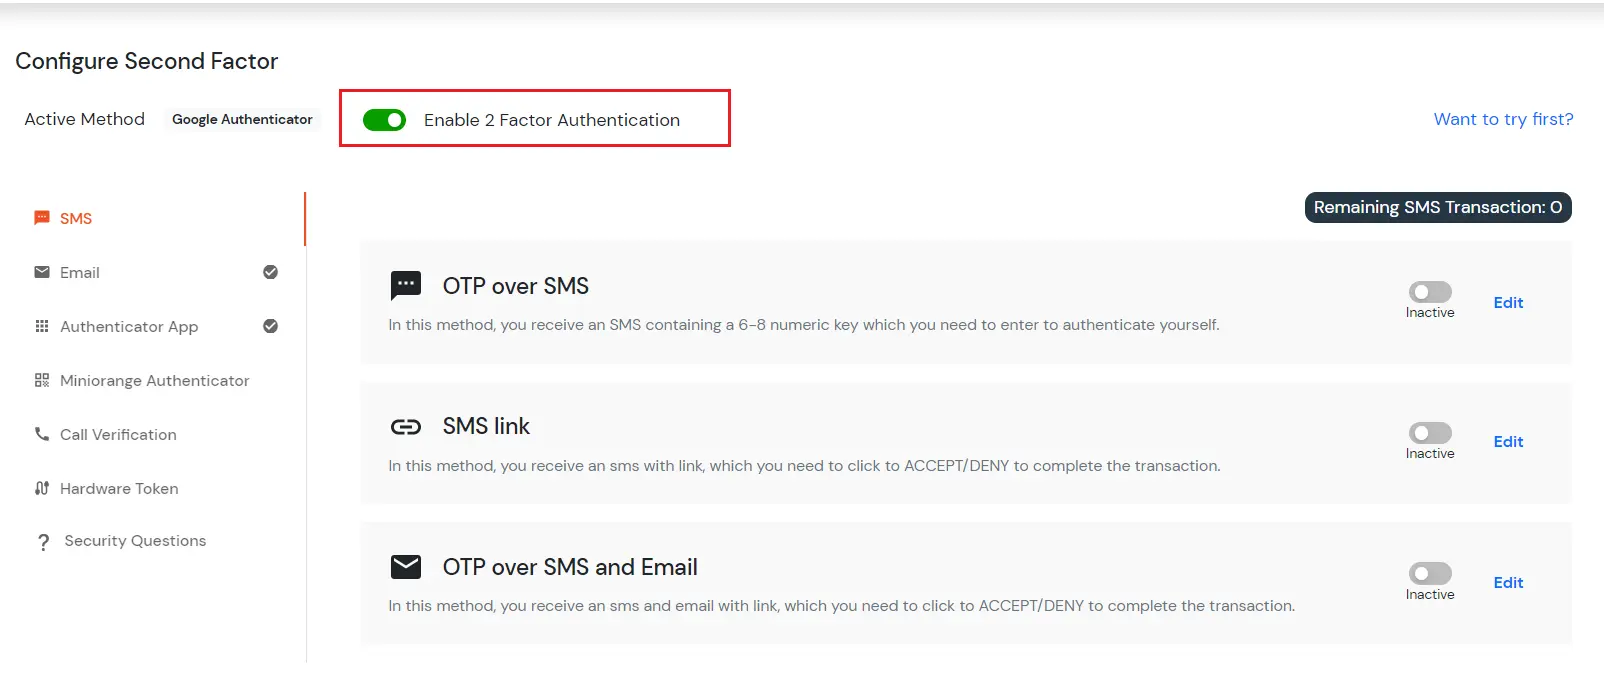
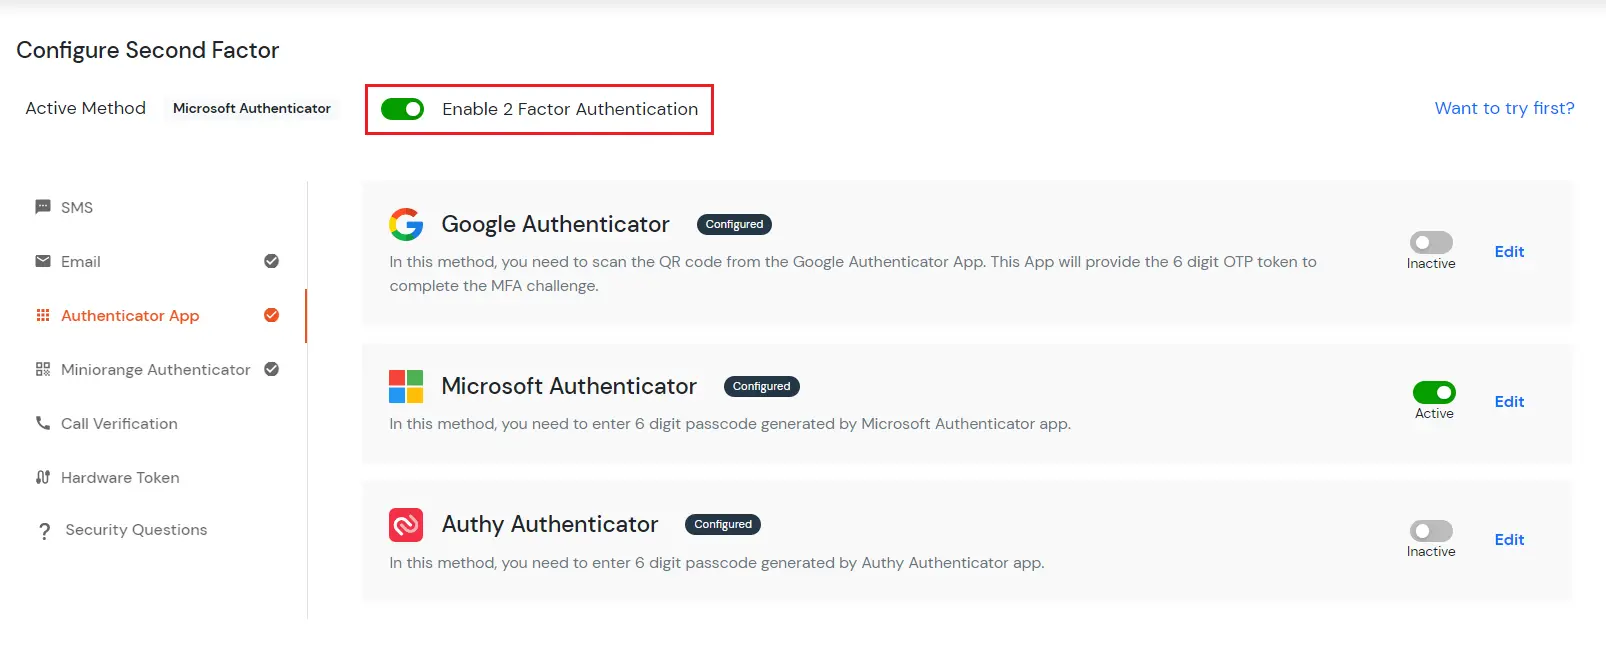
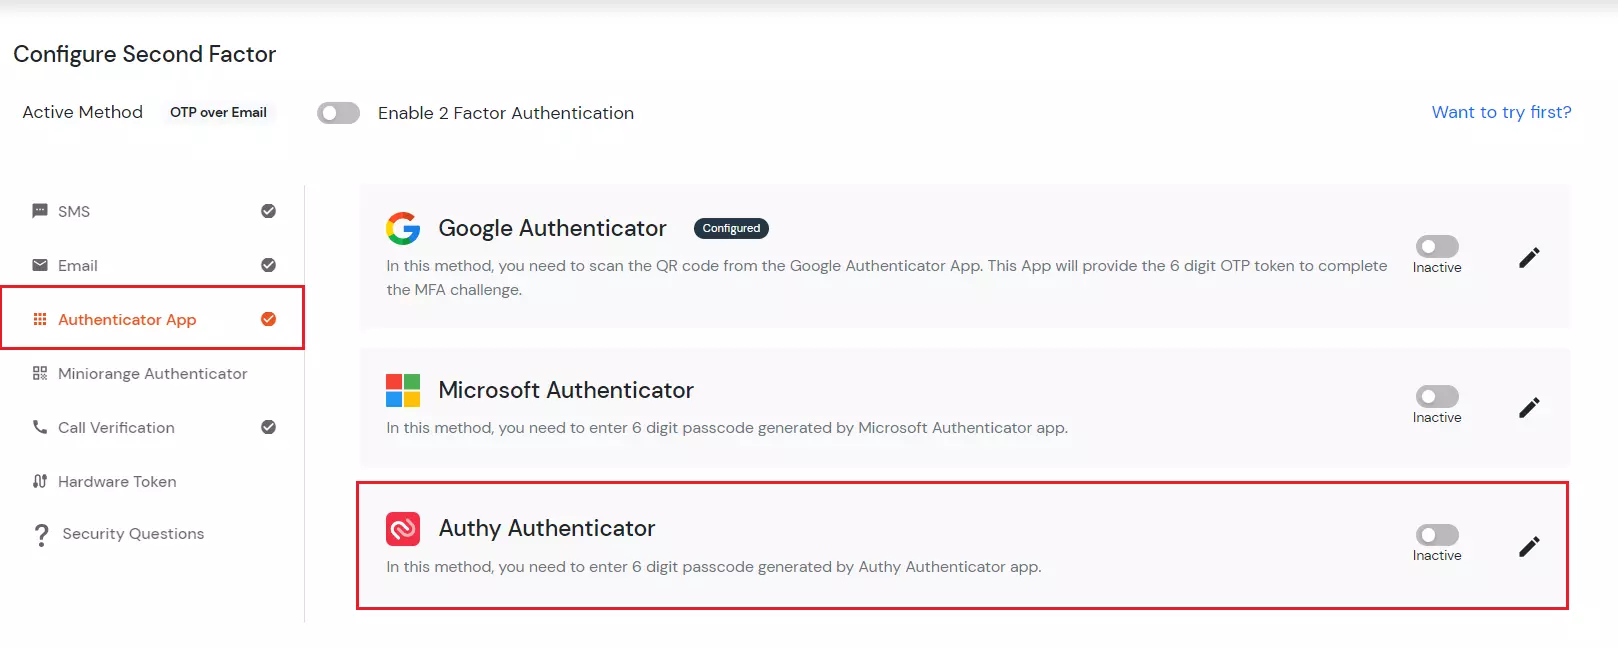
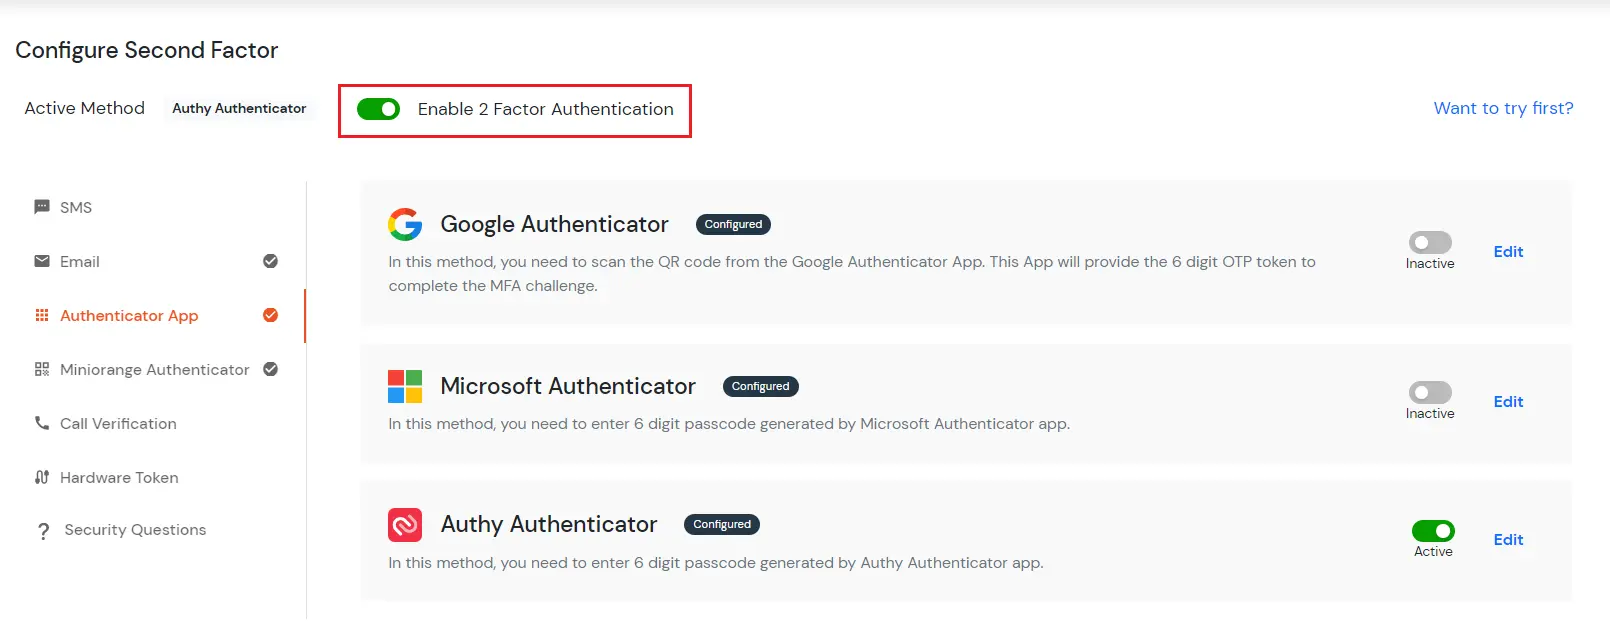
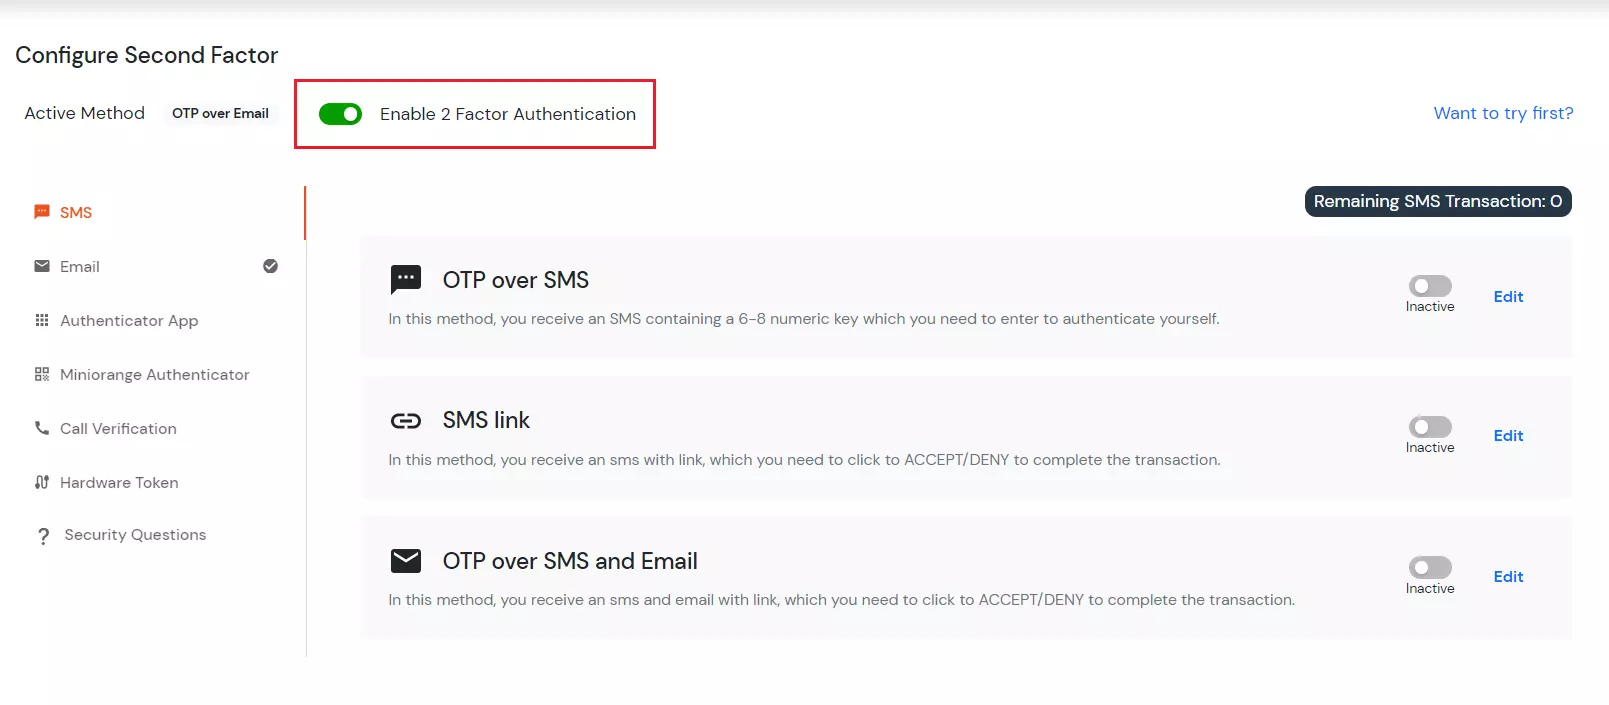
Toggle Enable 2-Factor Authentication as shown below.
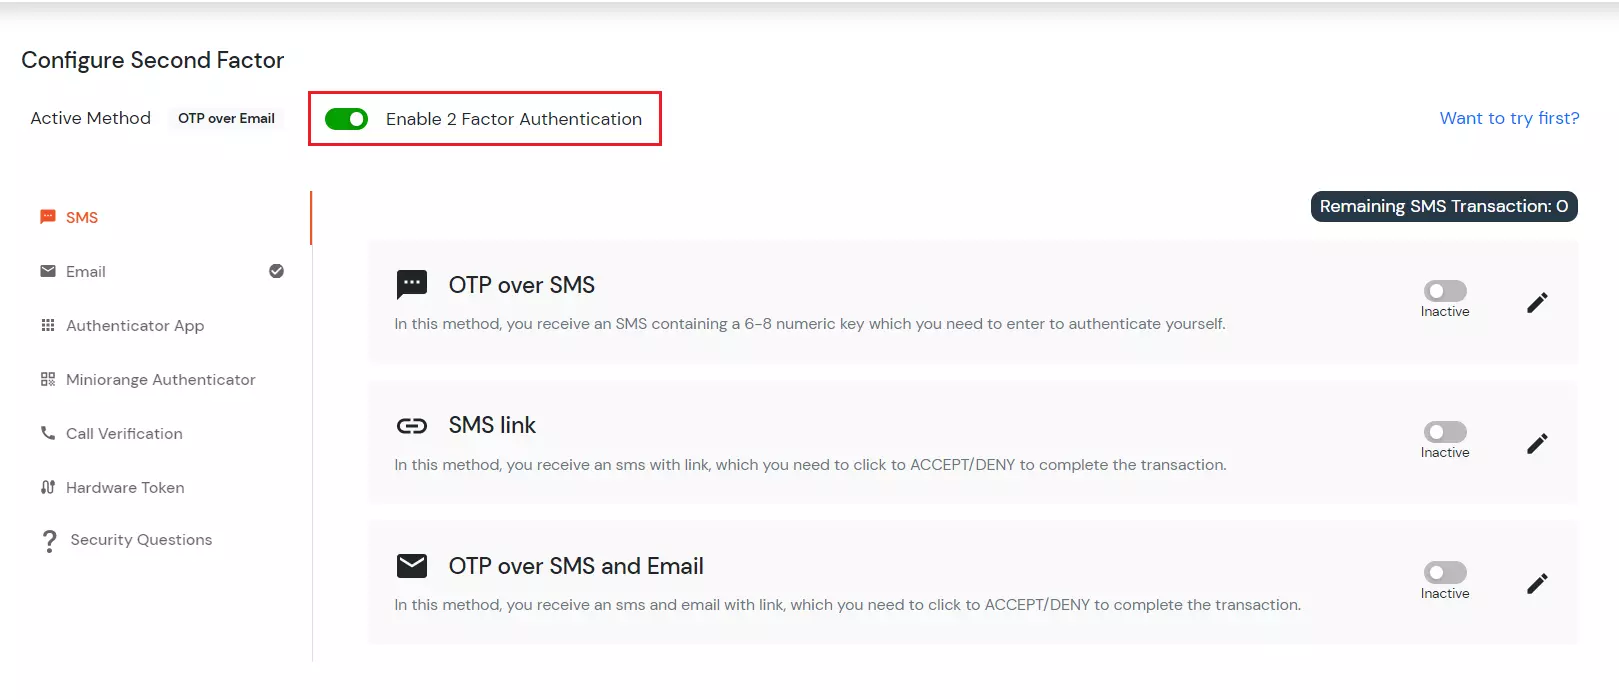
Select one method that you would like to set or change as 2FA.
As you will select the option you can customize settings according to your way.
1. SMS
In this 2FA method, the User receives an OTP over SMS containing a 6-8 numeric key. You need to follow the given steps to enable it in your admin dashboard for the end user's security.
A. OTP over SMS Method
- Click on OTP over SMS in the SMS to configure this method.

- Click on the Edit option and add your mobile number on which you want to receive the OTP.
- Then click on Save.

- Now, enable the second-factor toggle if not done before as shown below.
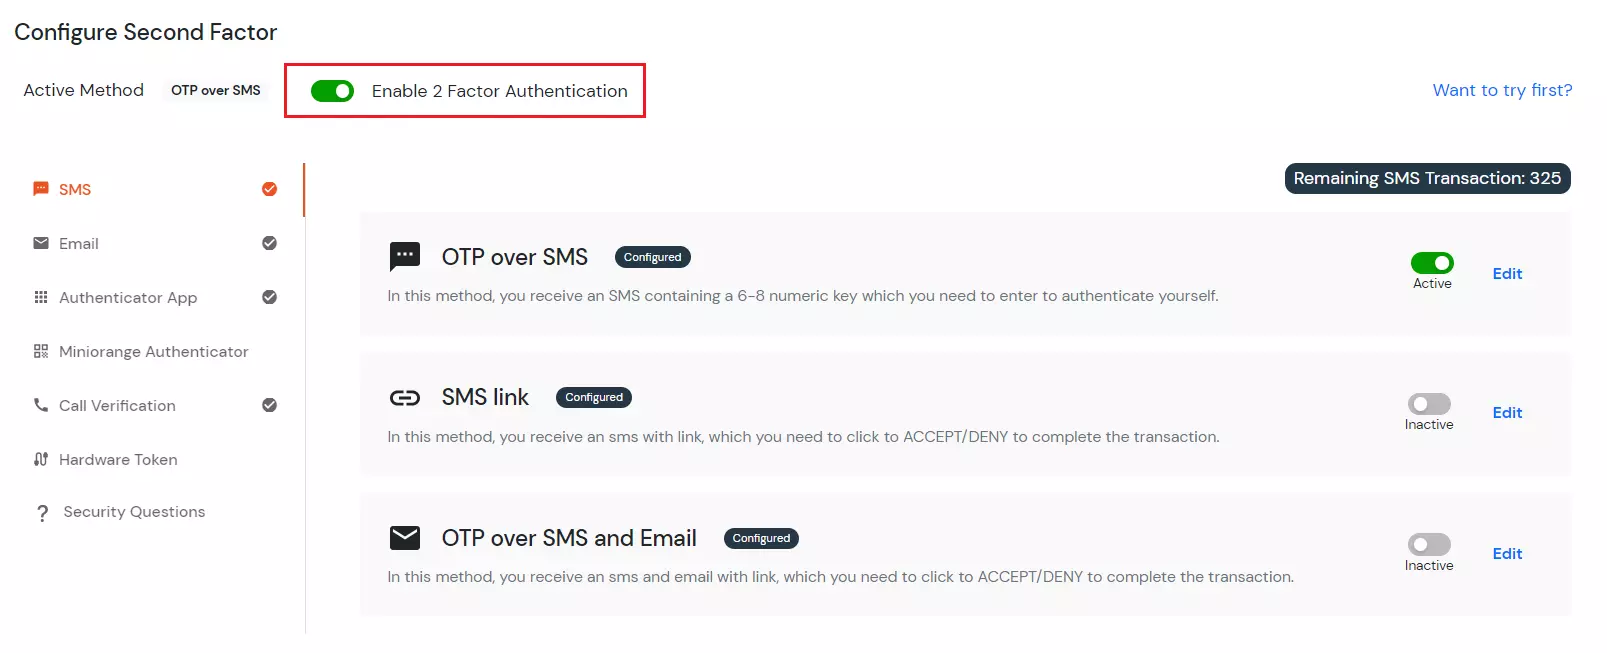
- The Active method at the top will specify "OTP over SMS".
- To verify the second factor, sign out and sign in again it will ask you username and password.
- After that, it is redirected to the below page:
- Enter the OTP received on the phone and click on verify.

- If you are redirected to your dashboard, you have successfully configured OTP over SMS as your 2FA method.
B. SMS Link
- Click on the SMS link in the SMS section tab to implement this method and click on Edit.
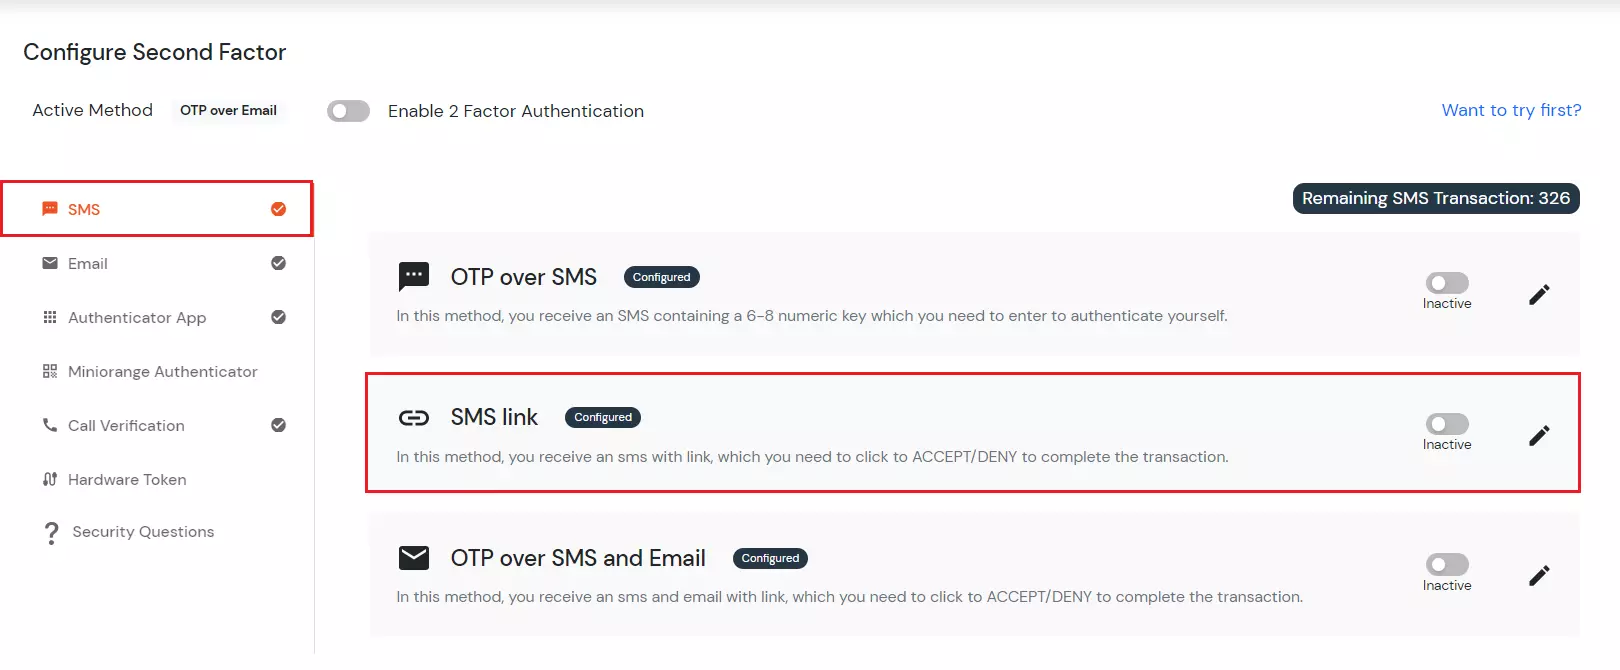
- Add the phone number in the Phone field to get an accept or deny link.
- Then click on Save.
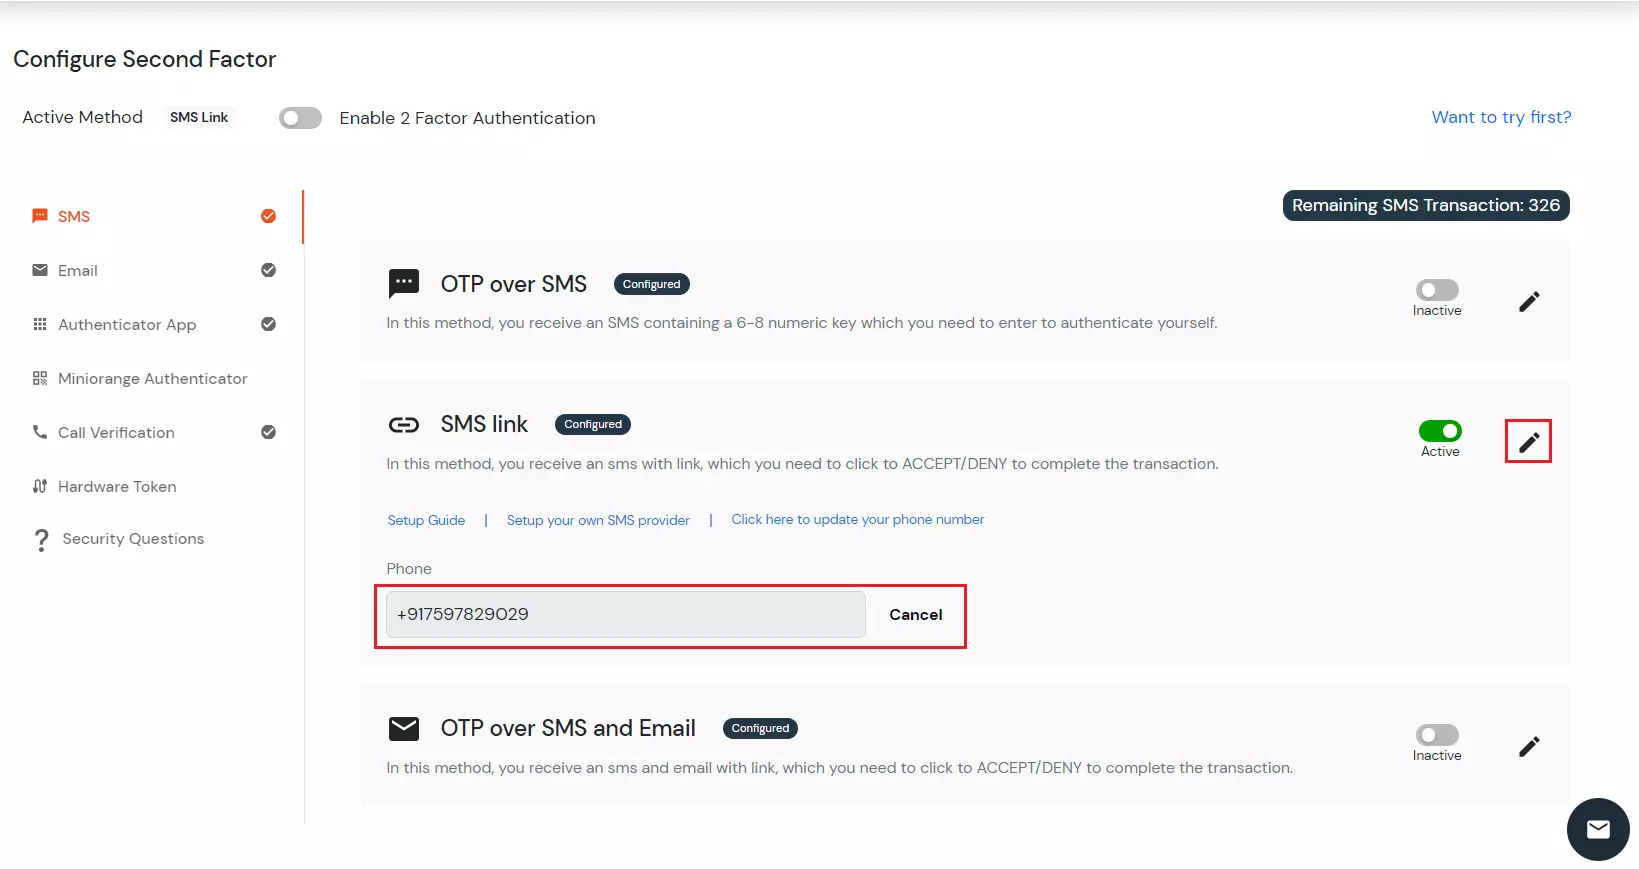
- Now Enable 2-Factor Authentication toggle if not done before as shown below.
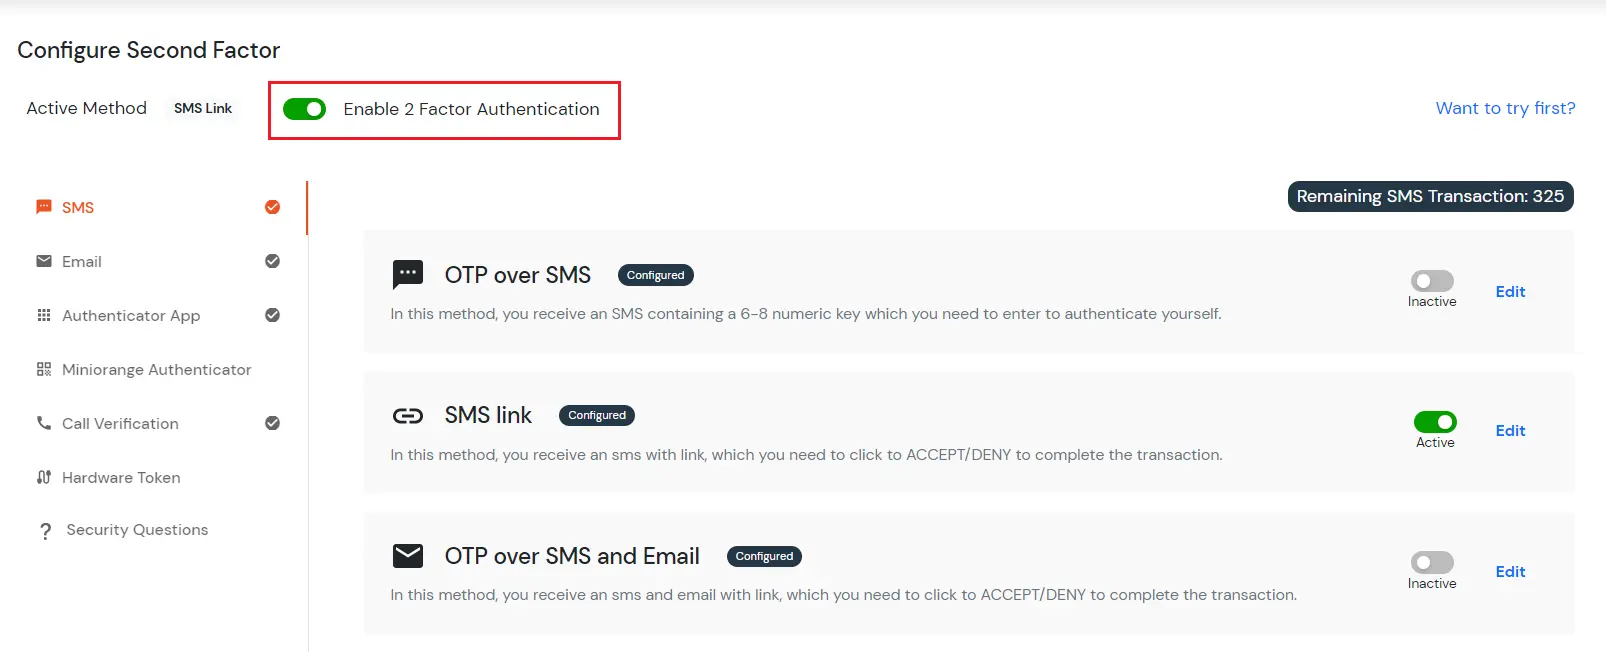
- The Active method at the top will specify SMS link.
- To verify the second factor sign out and sign in again. It will ask you Username and password. After that, it is redirected to the below page:
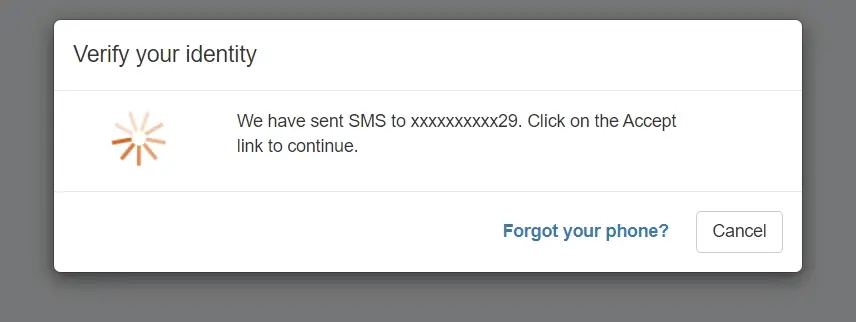
- Click on the Accept or Deny link that you have received on your phone.
- By clicking on the accept link, you will be able to see your dashboard, which means you have successfully configured the SMS Link method.
C. OTP over SMS and EMAIL
- Click on OTP over SMS and EMAIL in the Configure 2FA tab to configure this method.
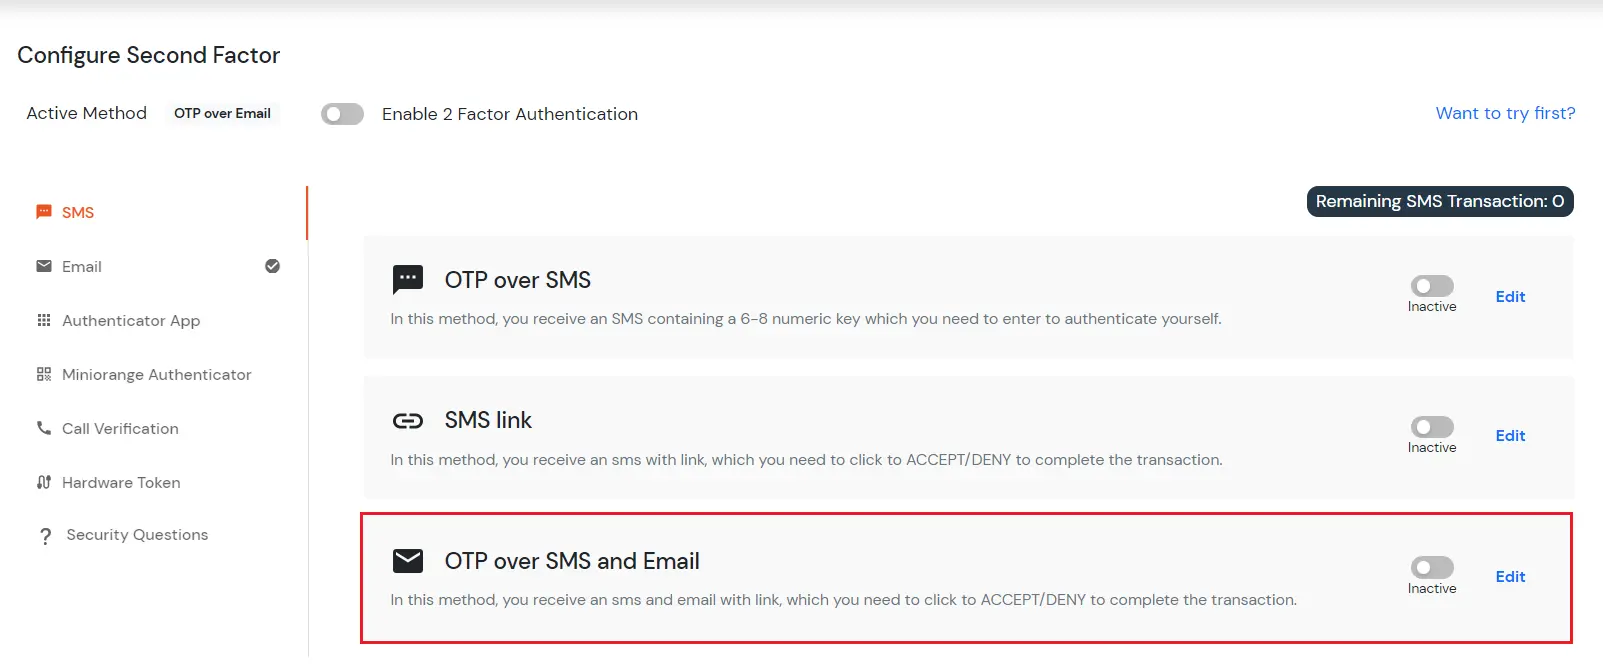
- Now add your mobile number and email on which you want to receive the OTP.
- Then click on Save.
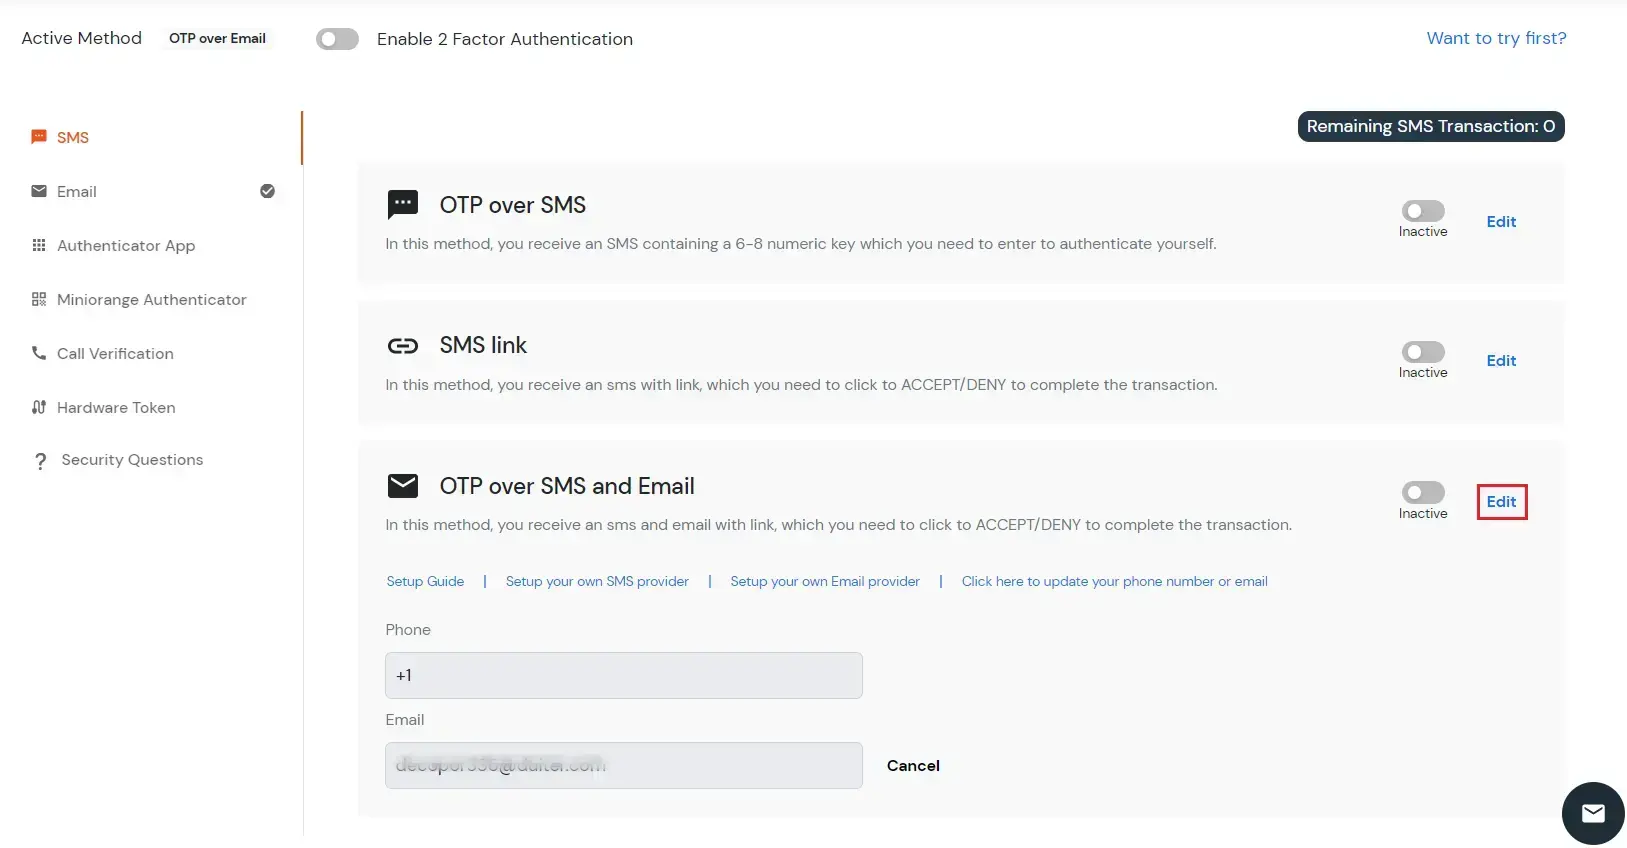
- You can see the message "Your configurations have been saved successfully" in green.
- Now Enable 2-Factor Authentication toggle if not done before and click on save.
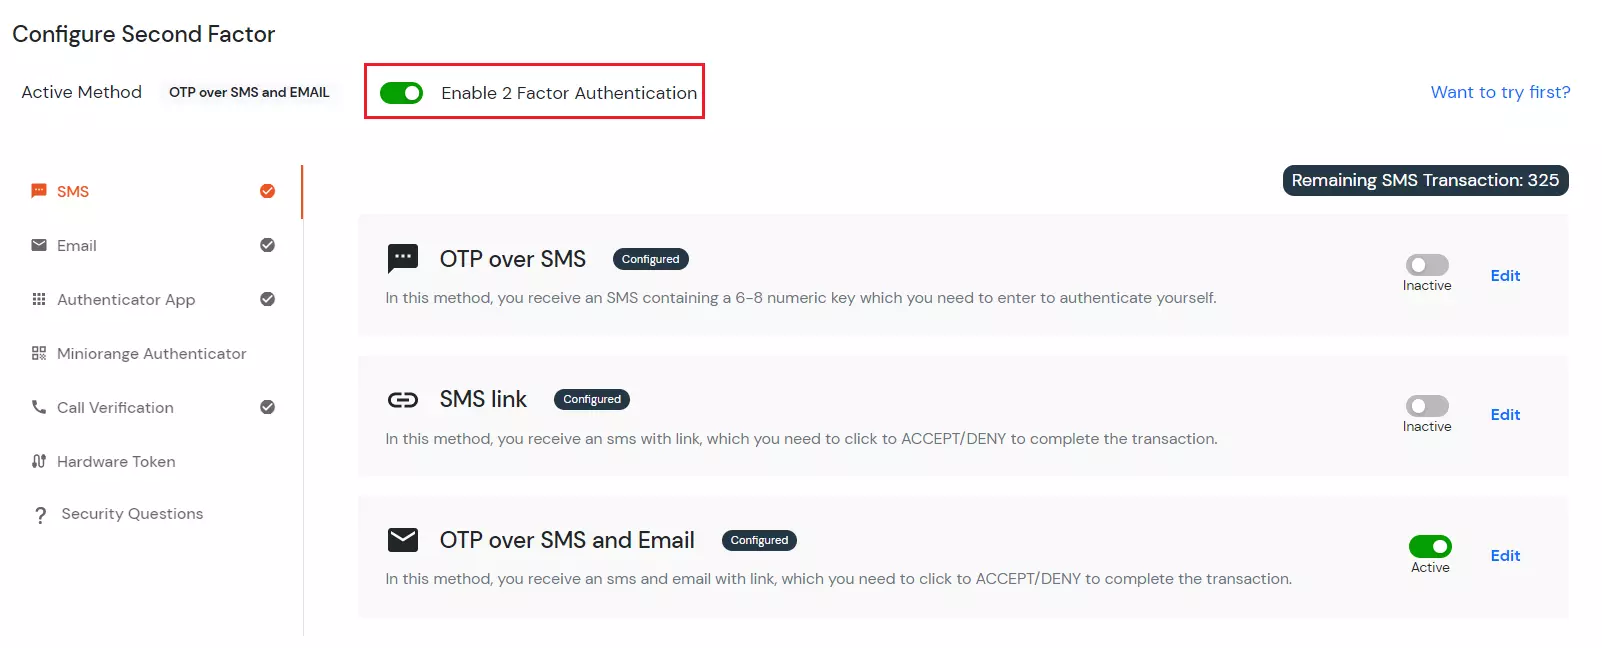
- To verify the second factor sign out and sign in again, it will ask you Username and password.
- After that, it is redirected to the 2-Factor Authentication page.
- Now you will receive an OTP via both SMS and EMAIL. Enter the OTP received and click on Verify button.
- If you are redirected to your dashboard it means you have successfully configured OTP over SMS and EMAIL 2FA method.
2. Email
A. OTP over Email
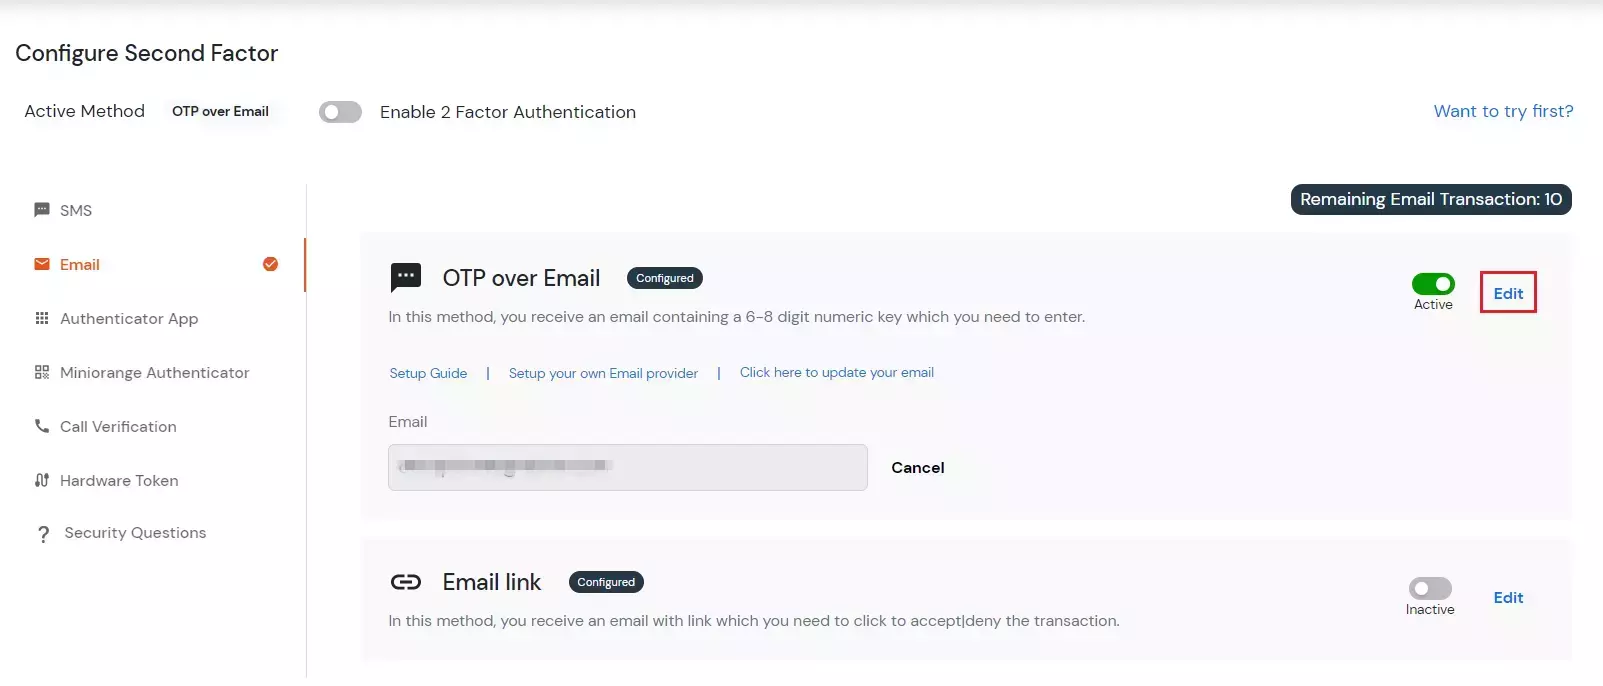
- Select OTP Over Email in the Email tab to enable this method. Click on Edit.
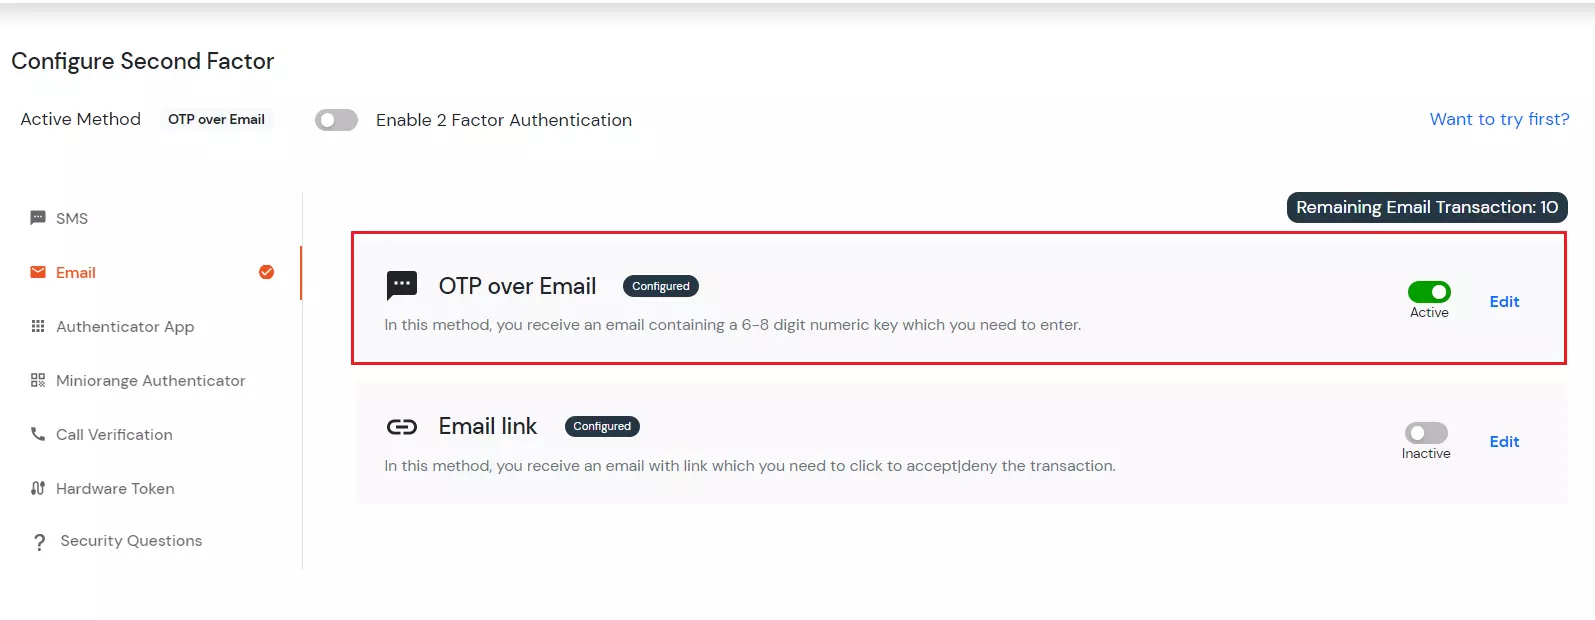
- Click on Save since the Email ID specified is the one you have registered from. Click on Save.
- Enable the second factor if you didn’t enable it before.
- To verify the second factor sign out and sign in again.
- It will ask you Username and password.
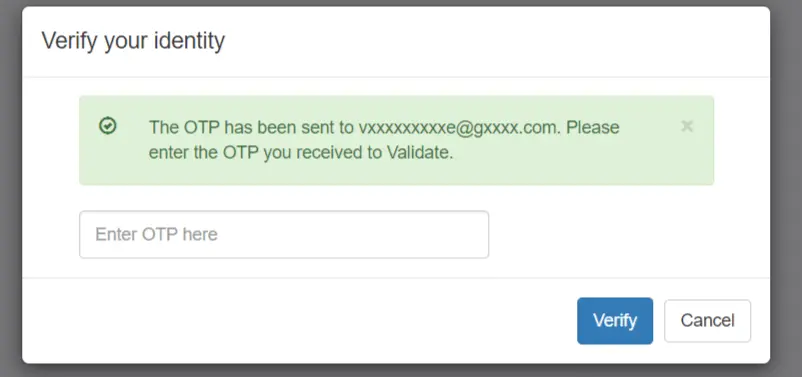
- Enter the OTP received on the email address specified and click on Verify OTP.
- When you click on verify and if redirected to your dashboard it means you have successfully configured OTP over Email method.
E. Email Link
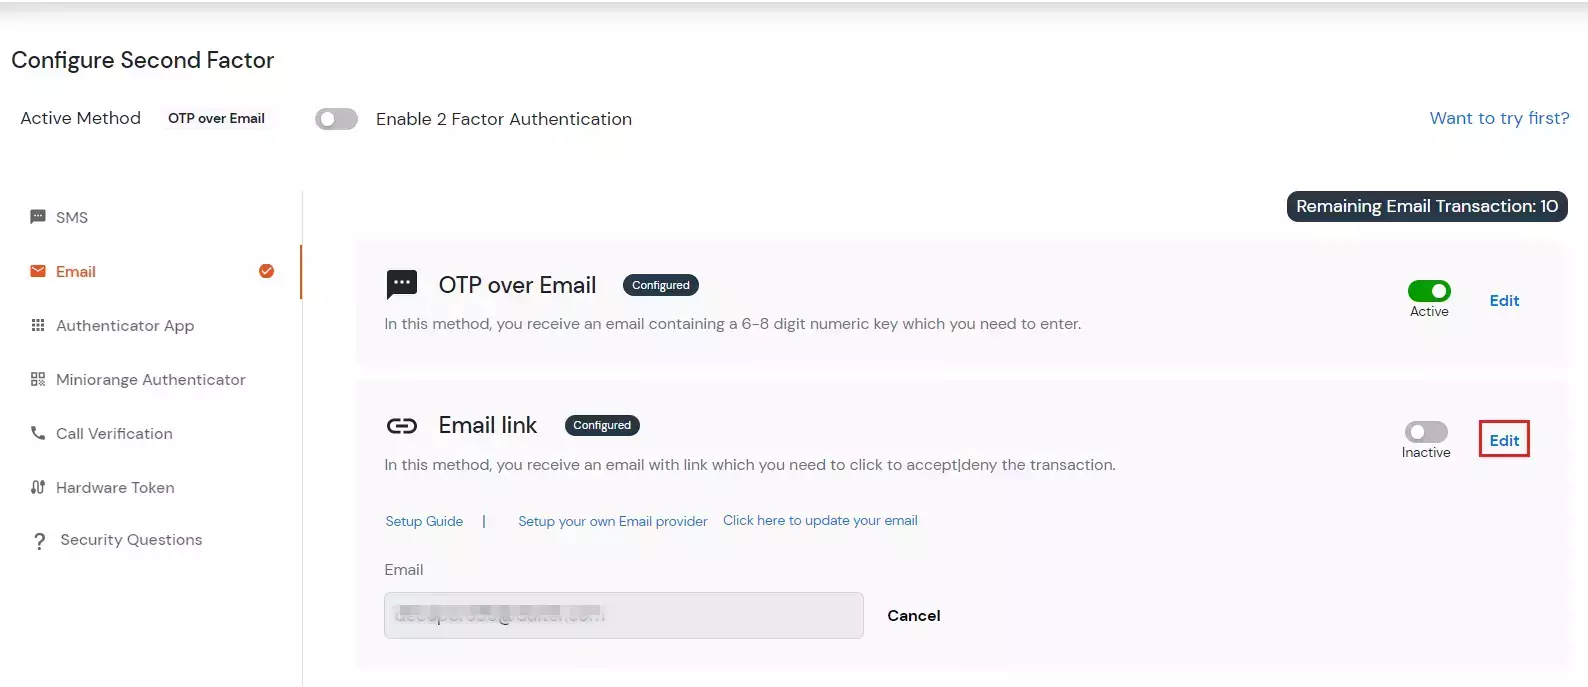
- Select Email Link in the Email tab to activate this method. Click on Edit.
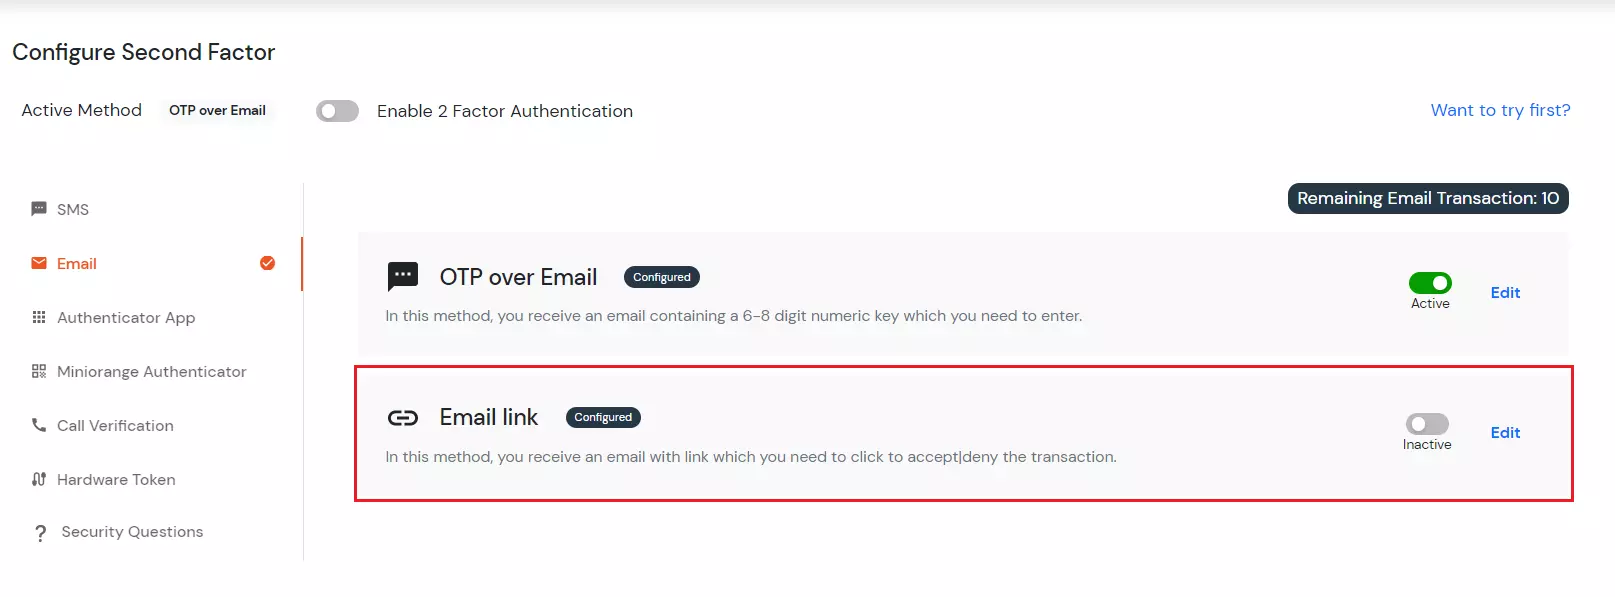
- Click on Save and enable the second factor if you haven’t done it before.
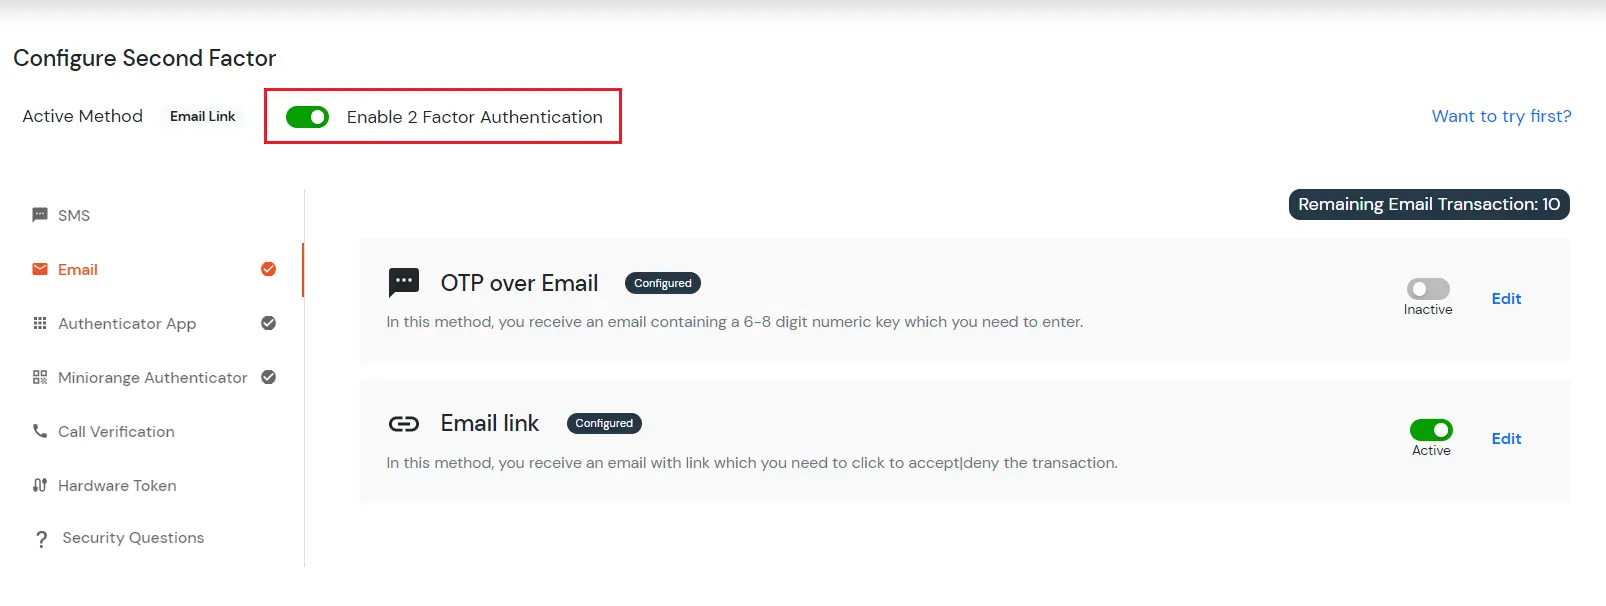
- To verify the second factor sign out and sign in again.
- It will ask you Username and password. After that, it is redirected to the below page:
- You will receive an Email on the Email specified above with Accept or Deny link.
- When you click on the accept link and it redirects to your dashboard, it means you have successfully configured the email link.
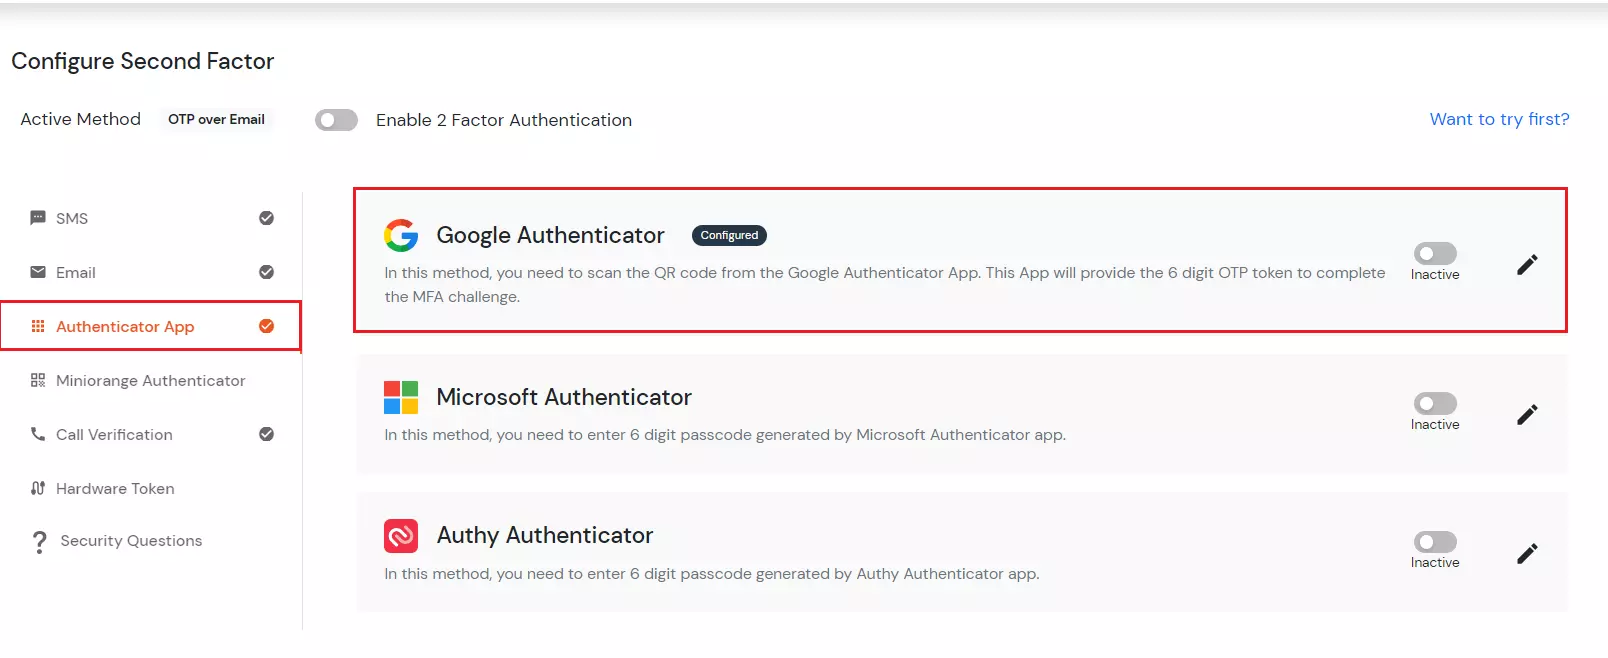
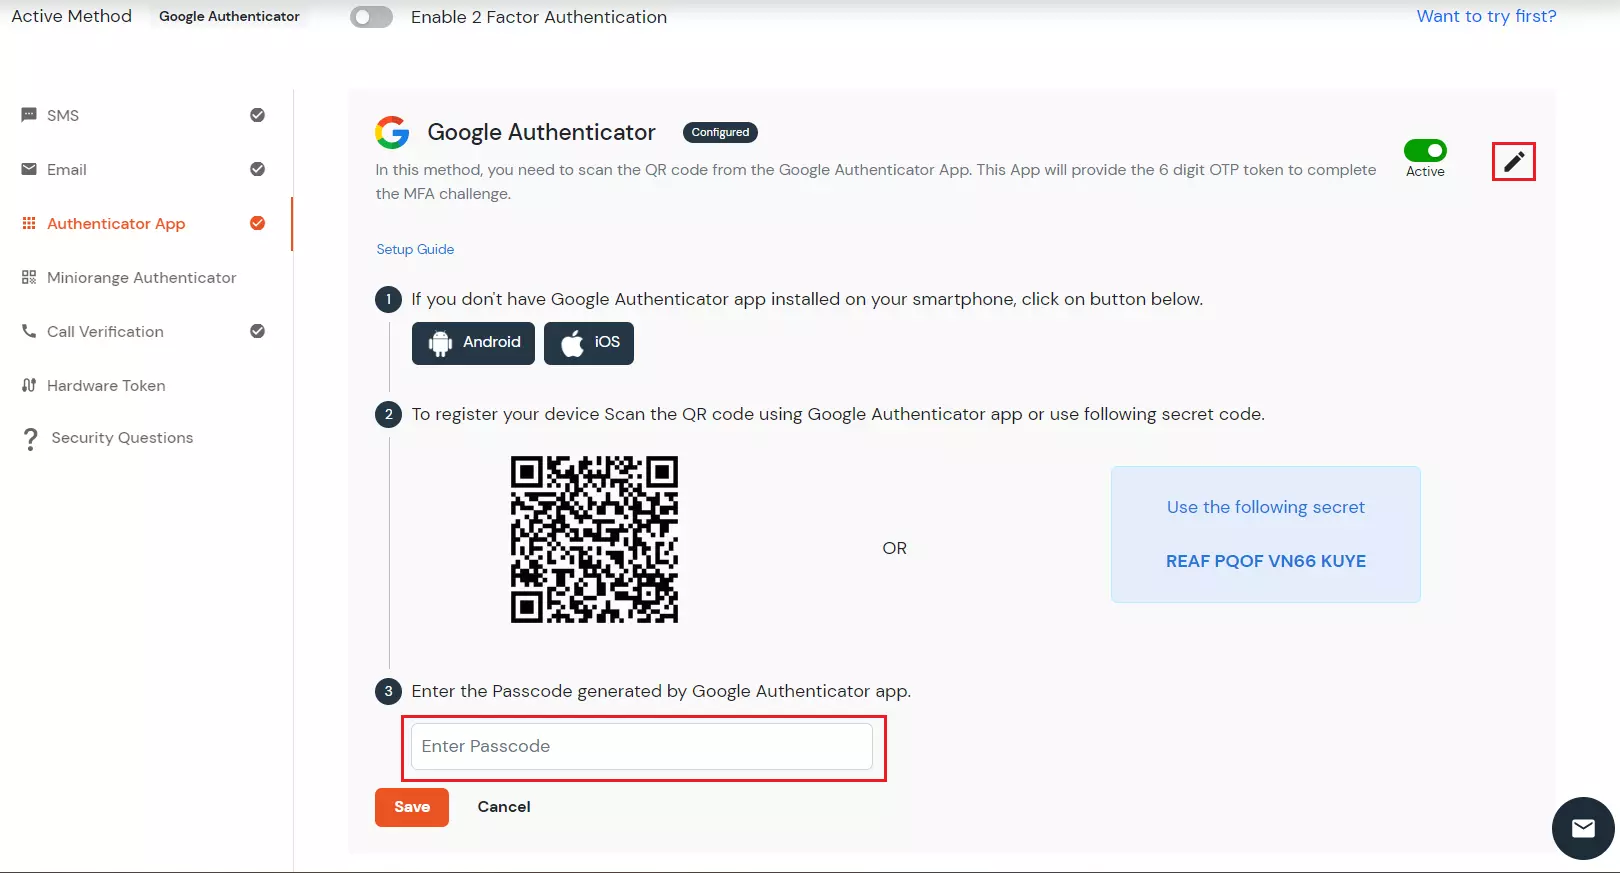
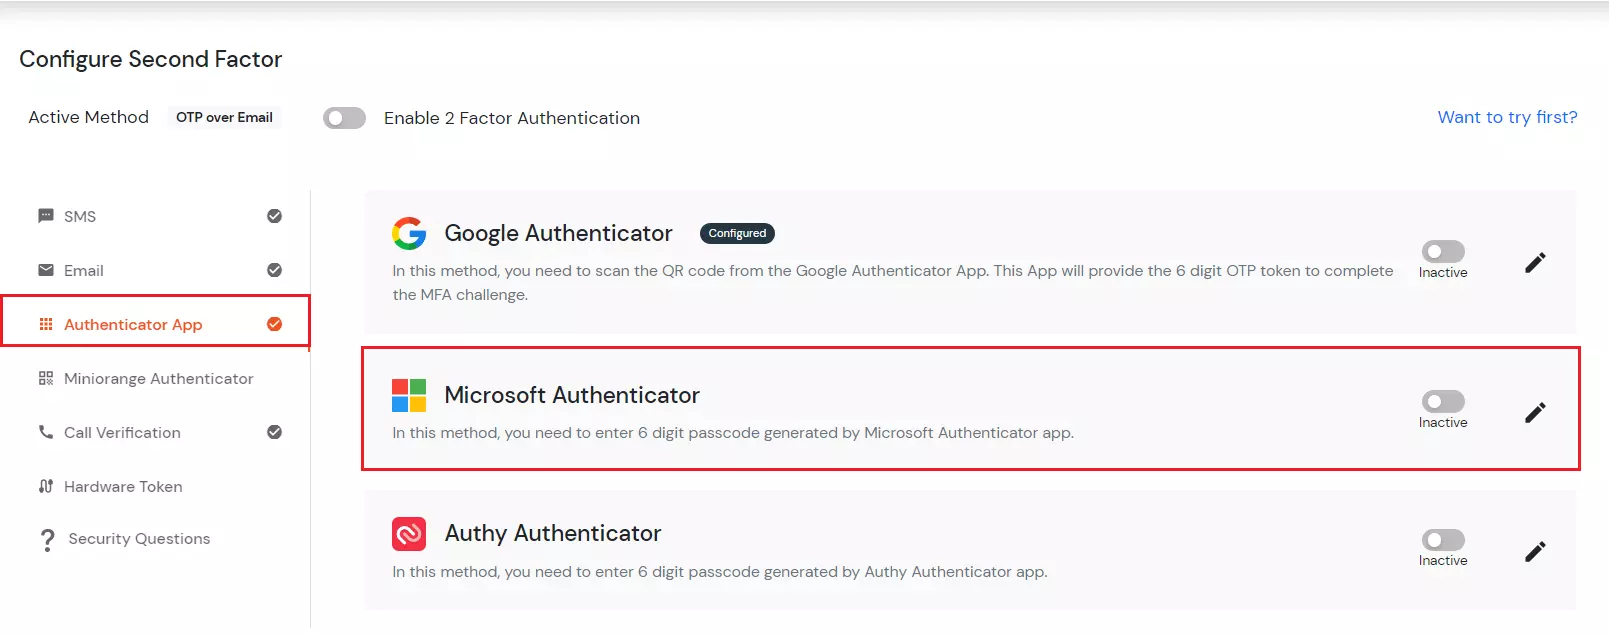
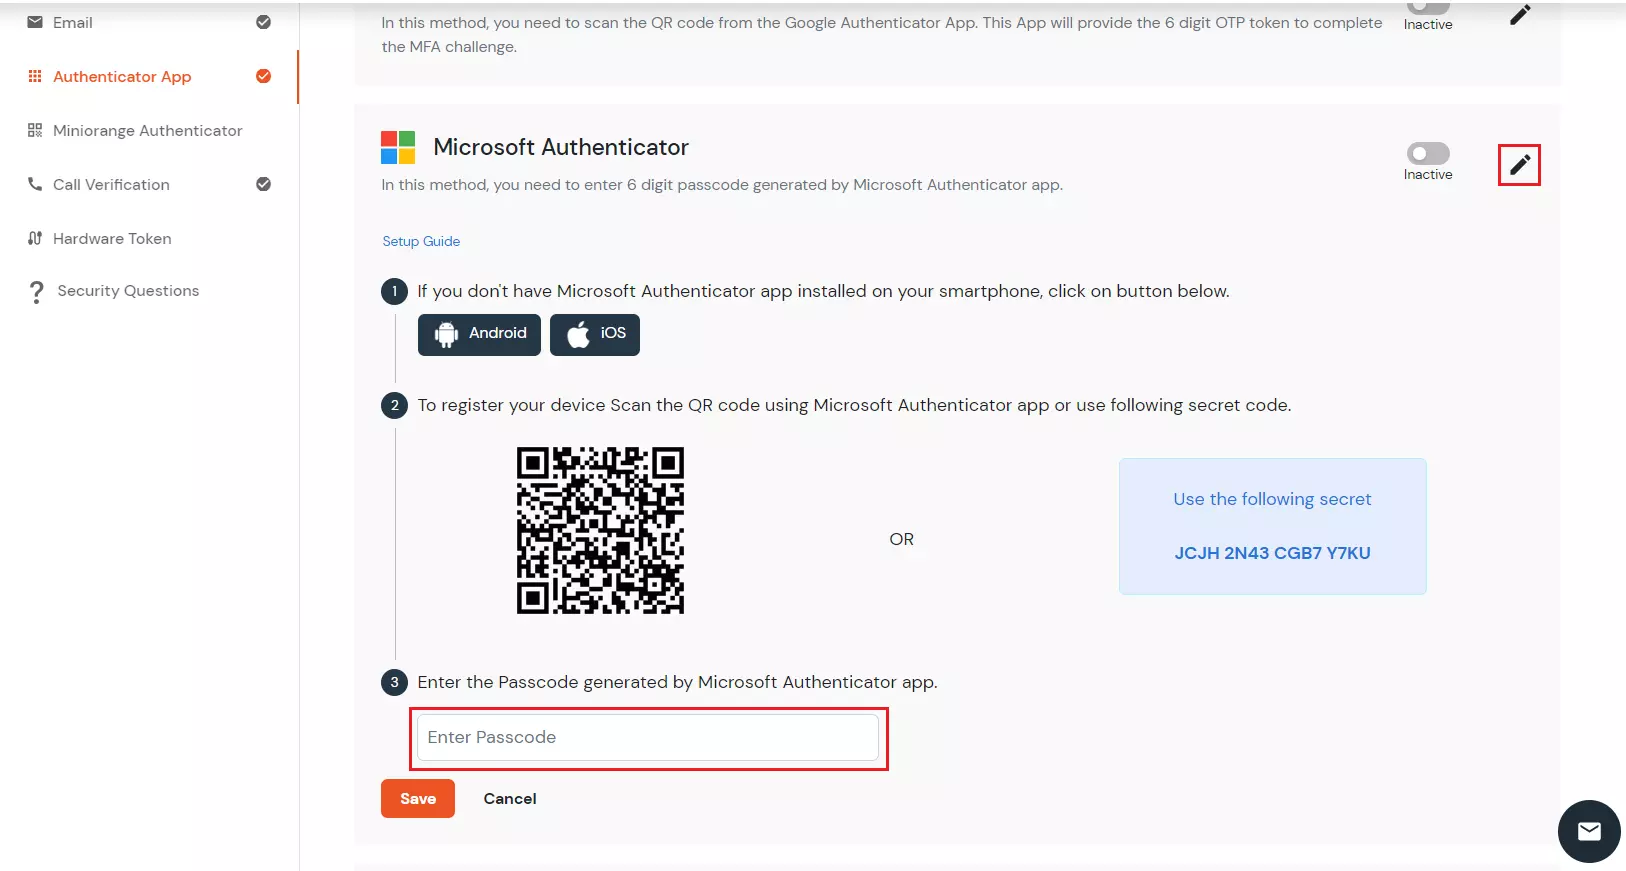
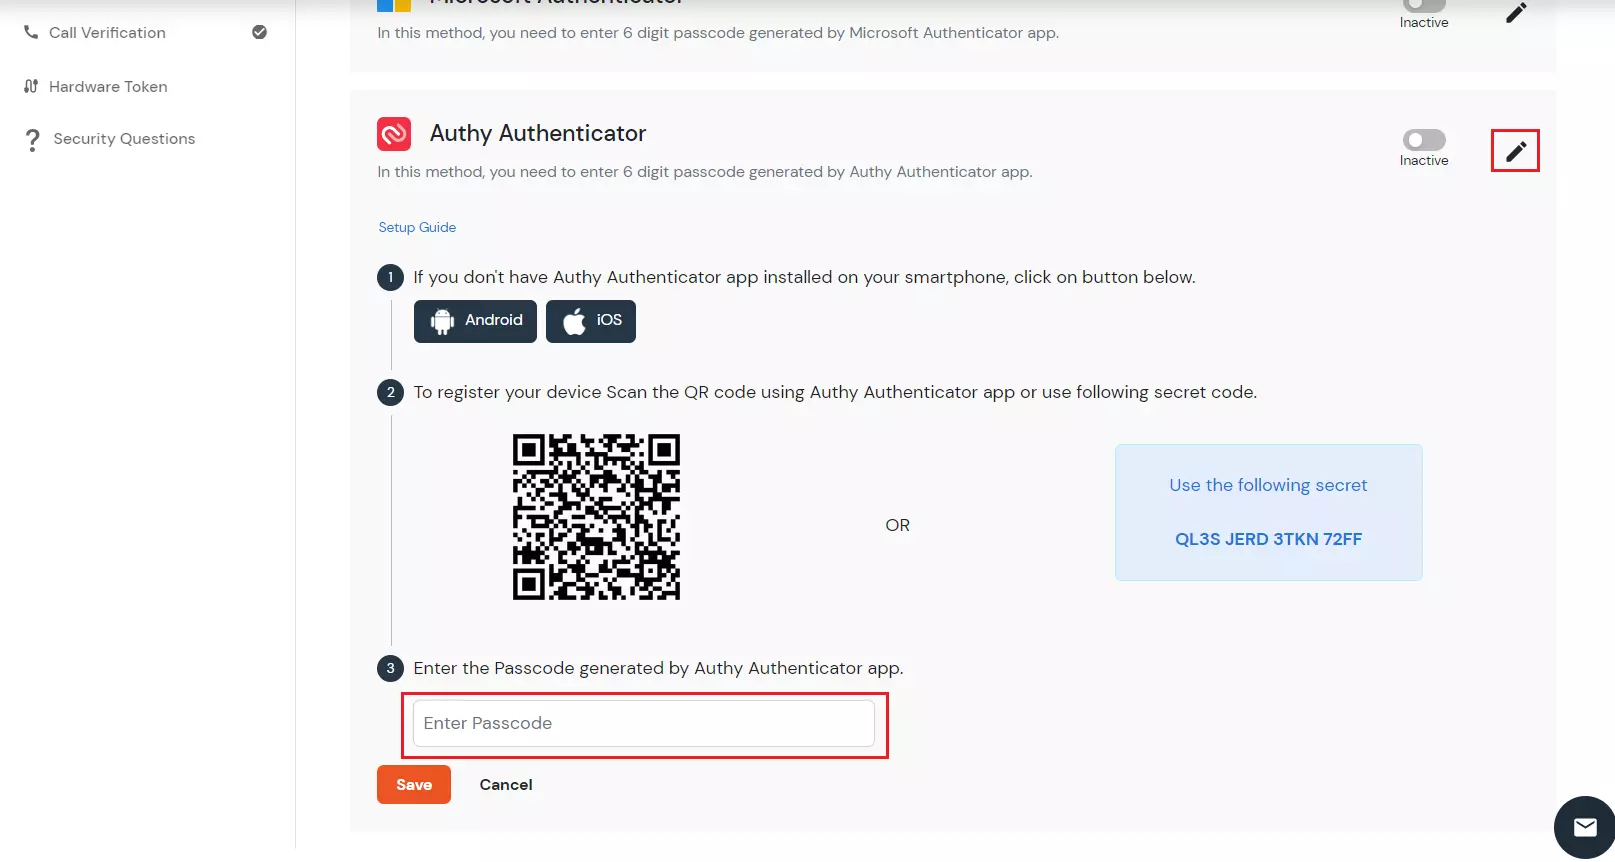
3. Authenticator App
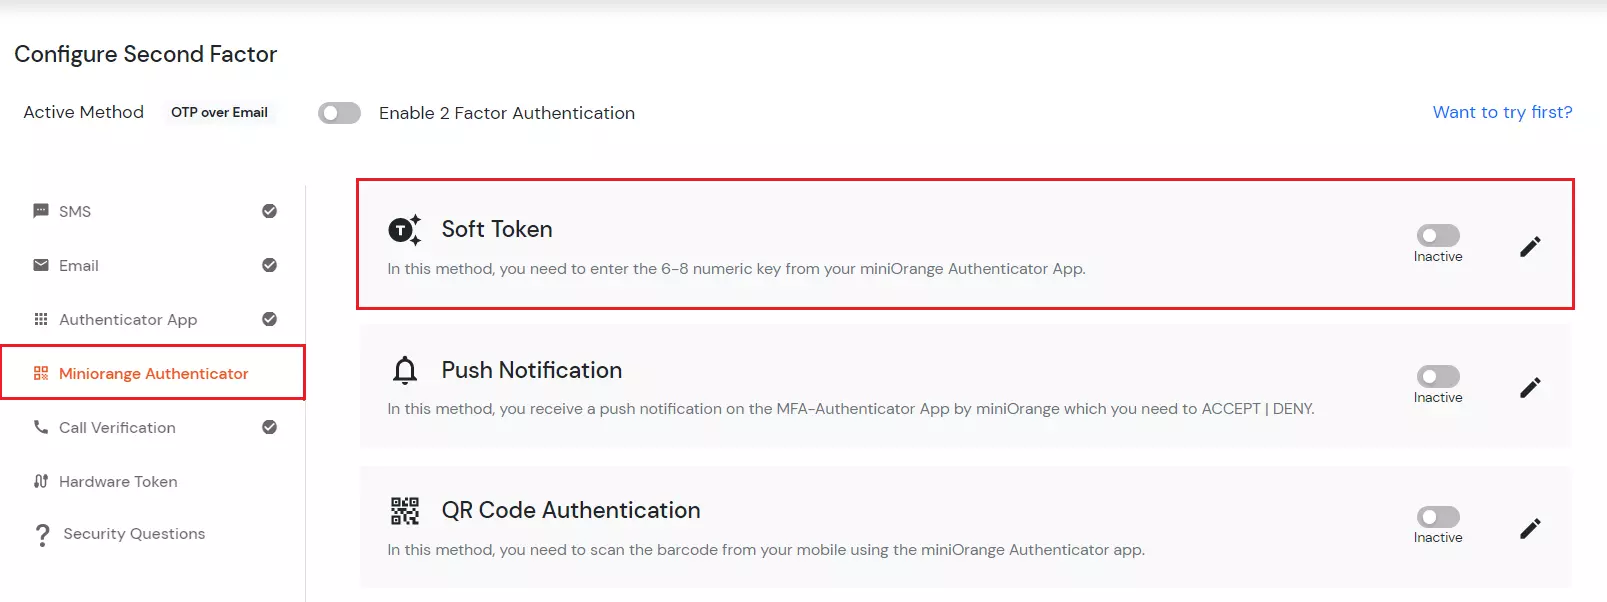
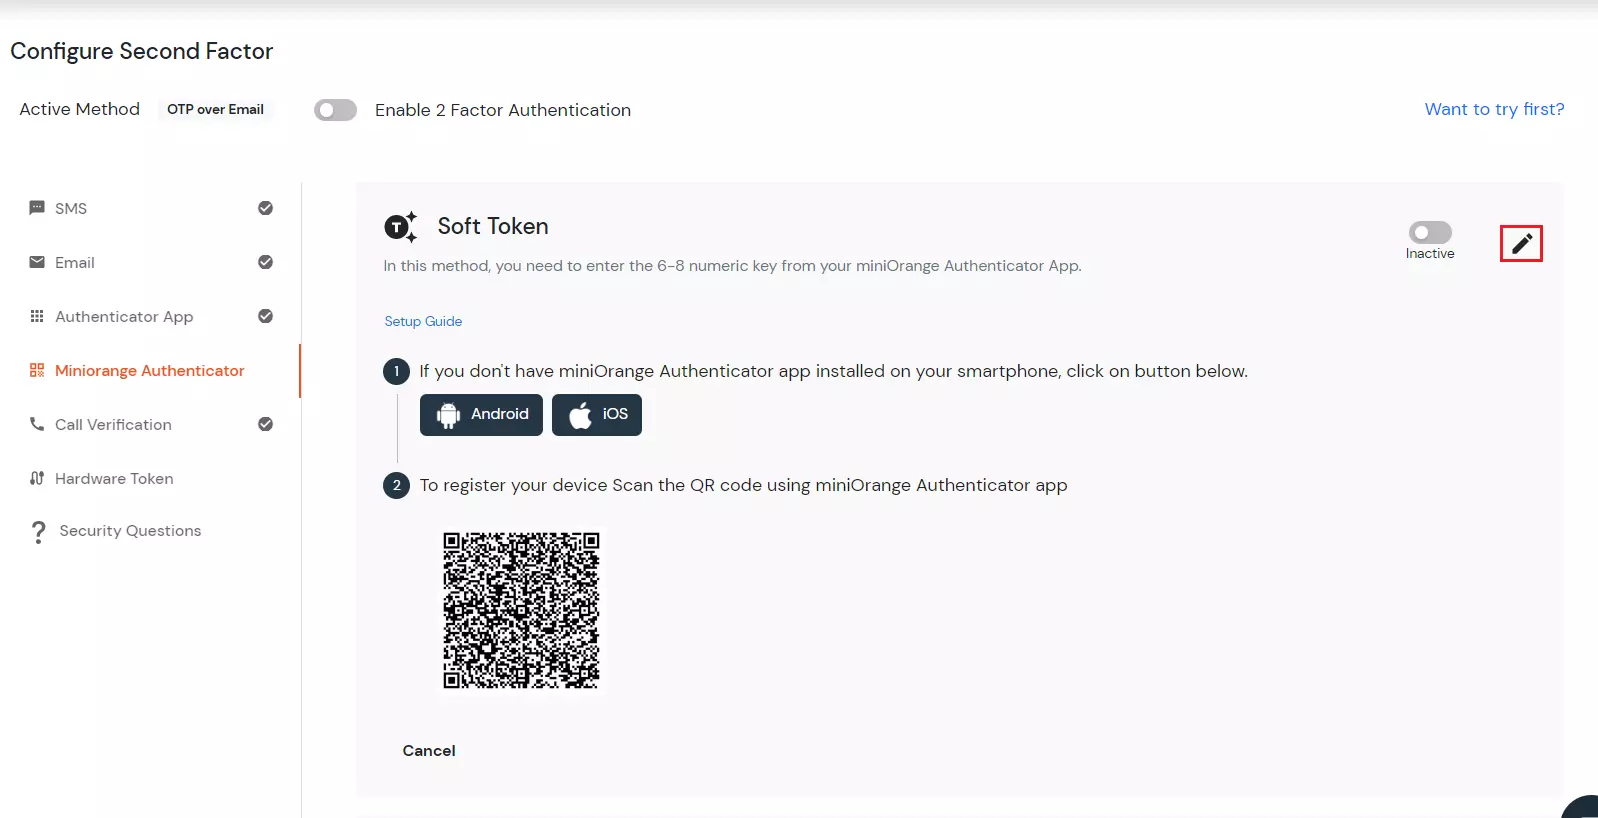
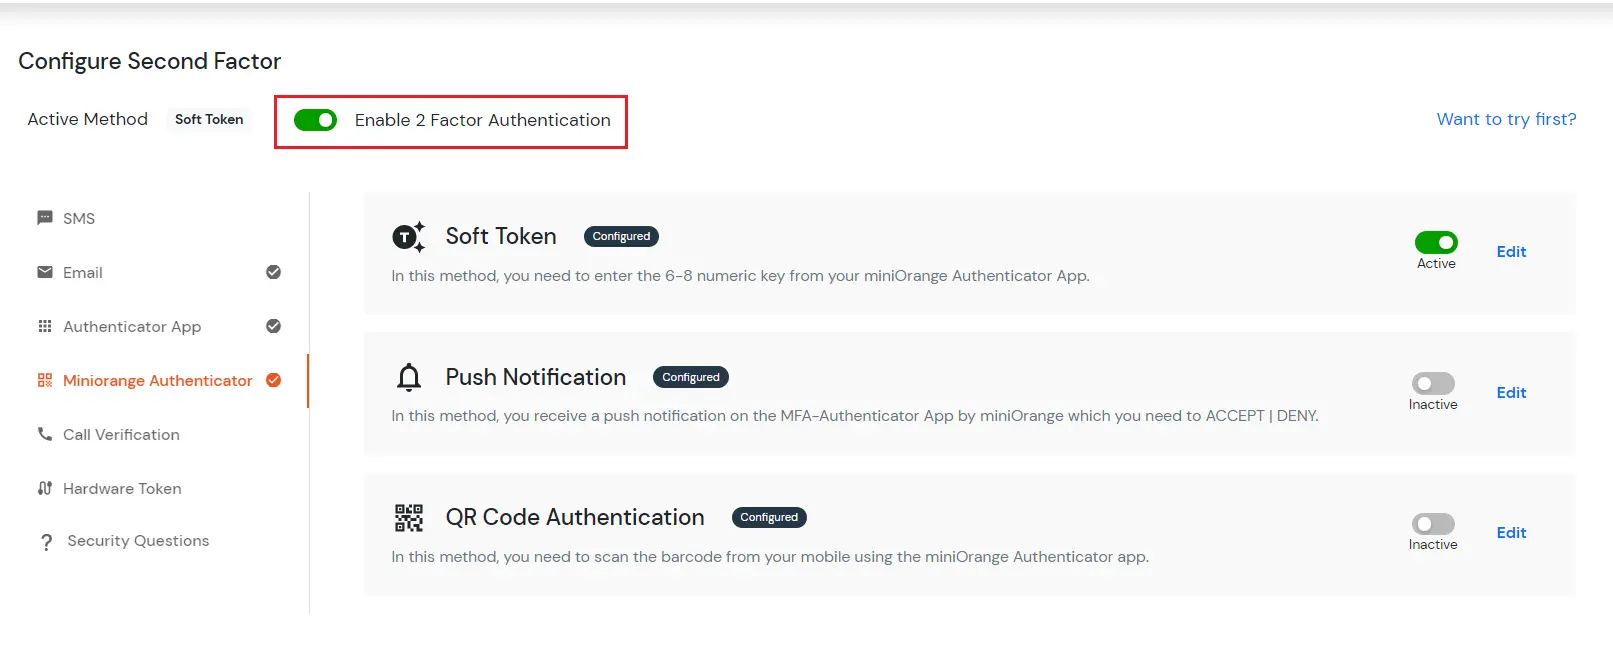
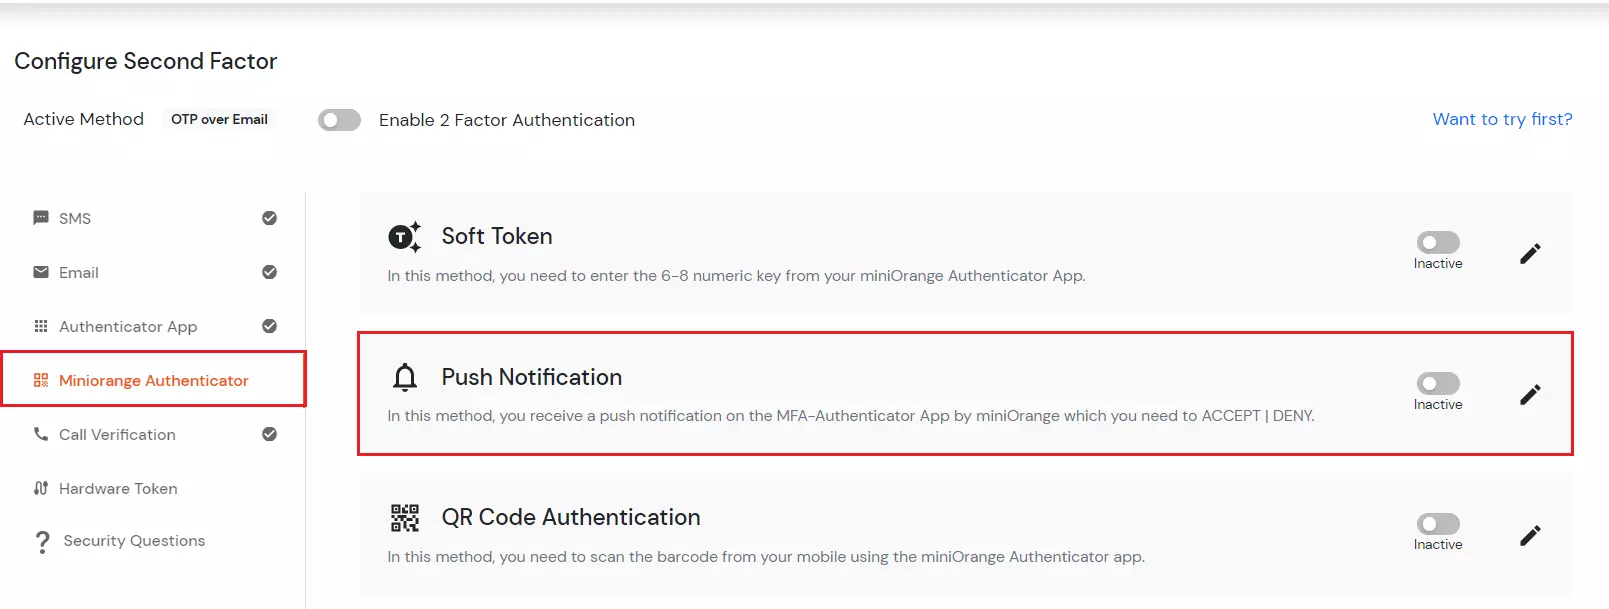
4. miniOrange Authenticator
K. Soft Token method
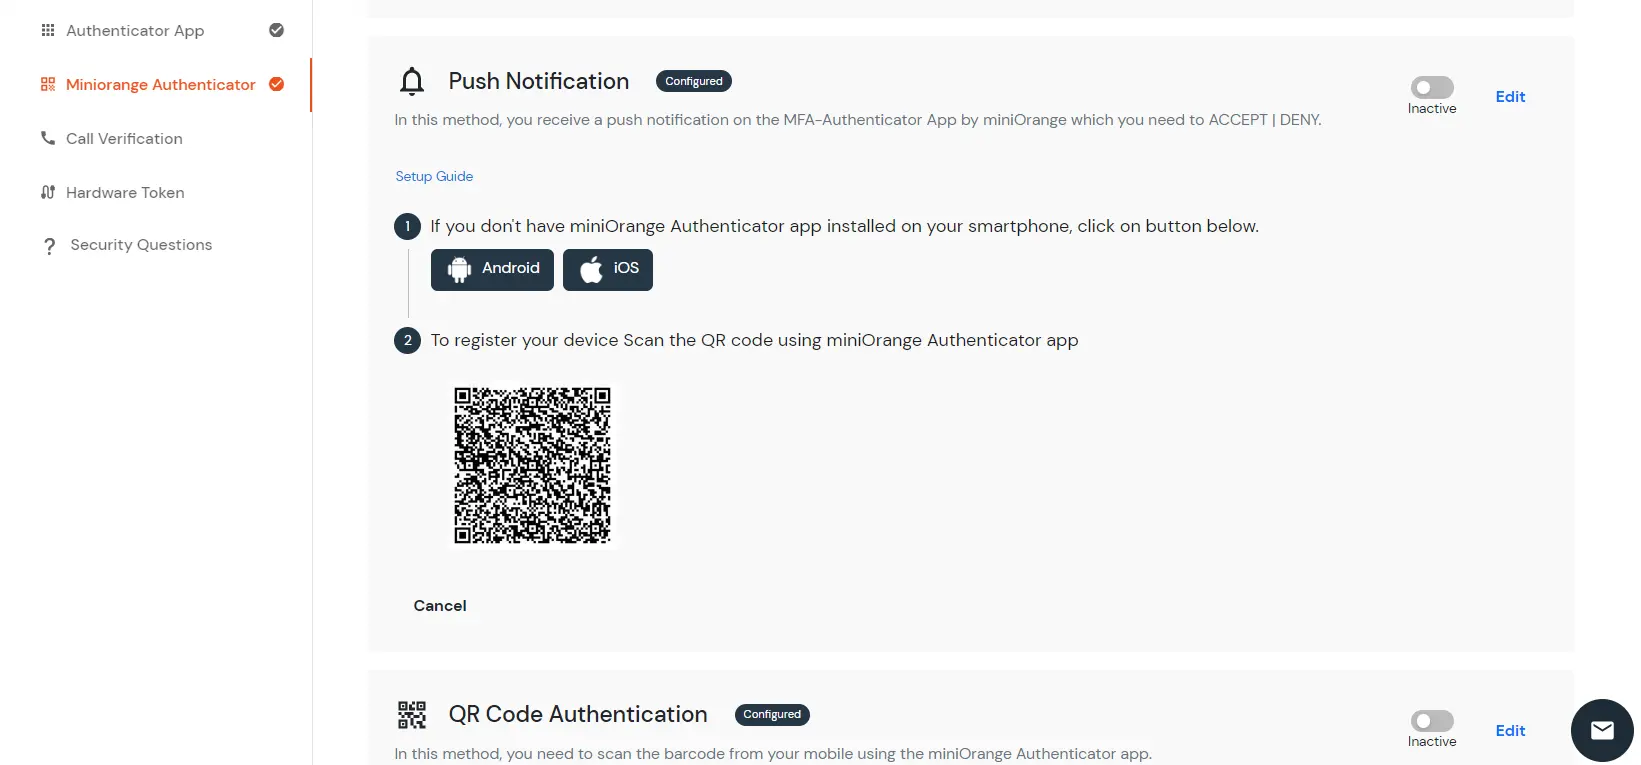
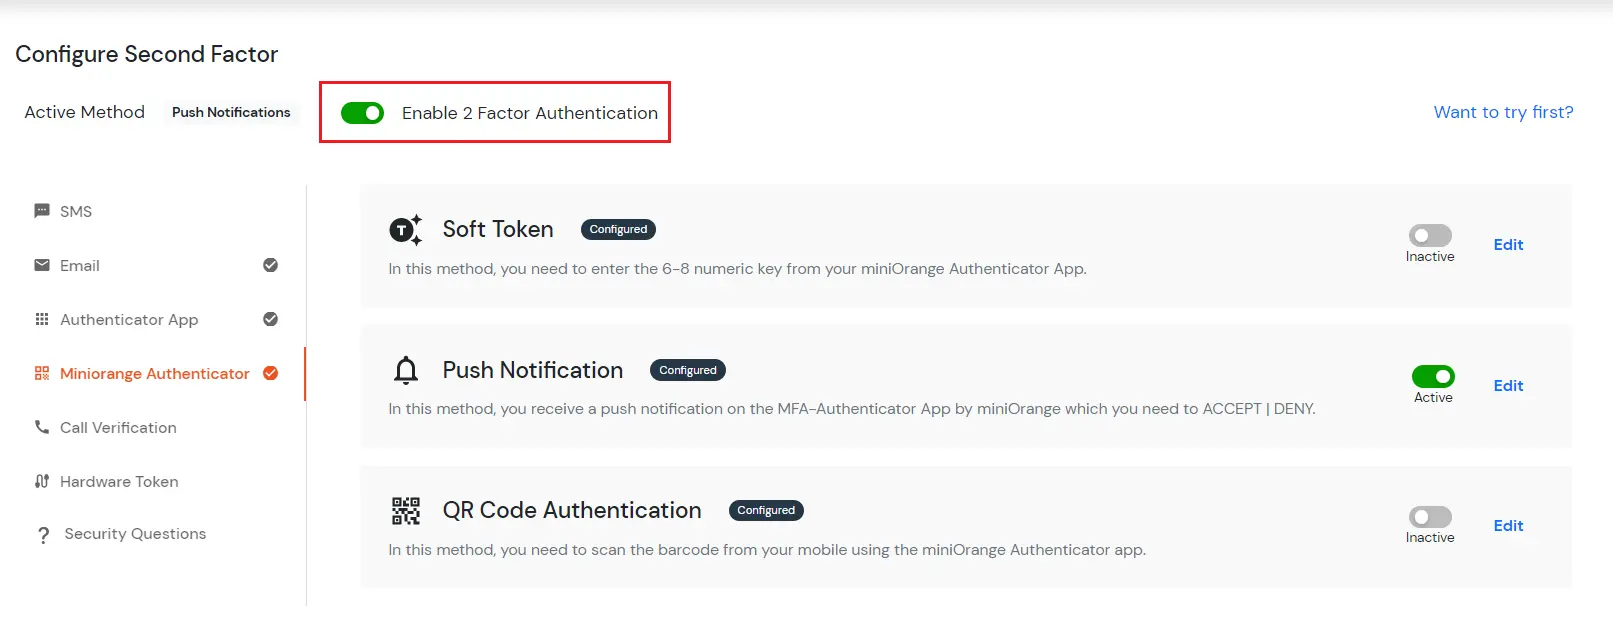
L. PUSH Notifications Method
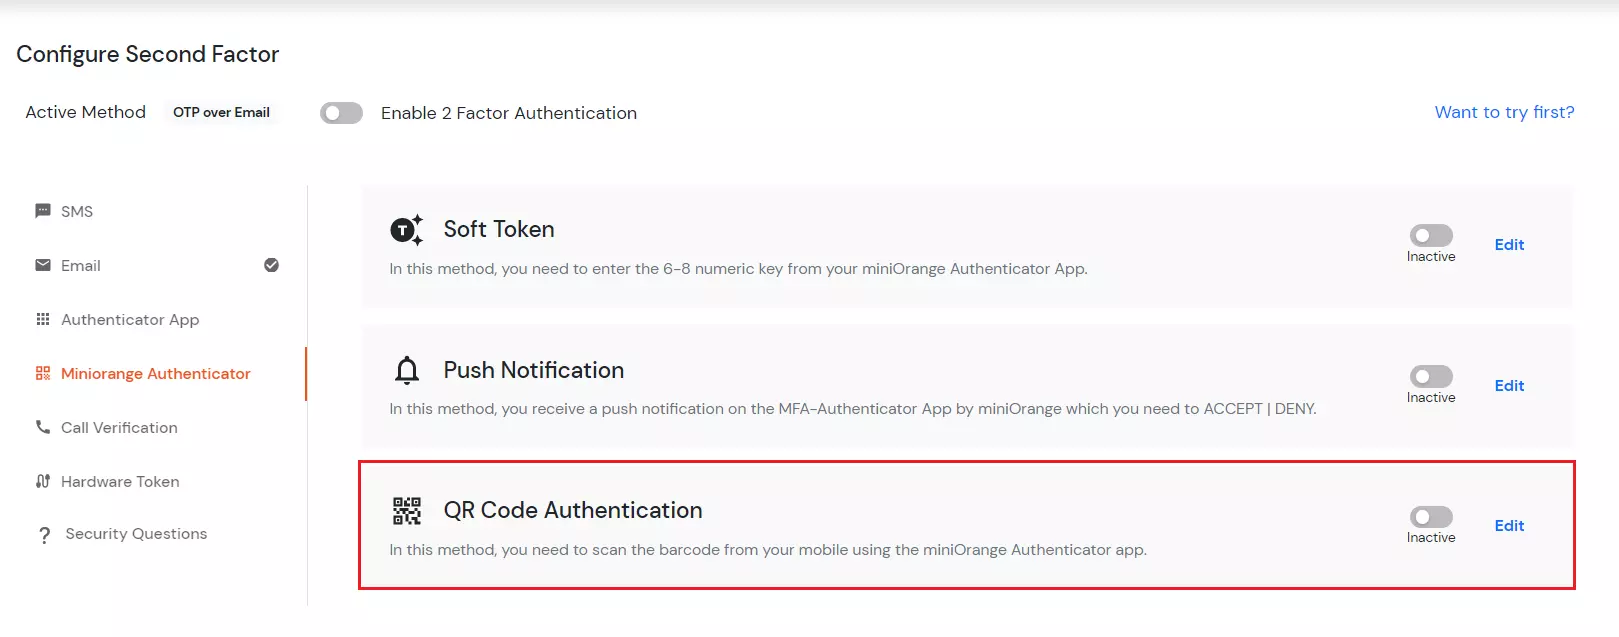
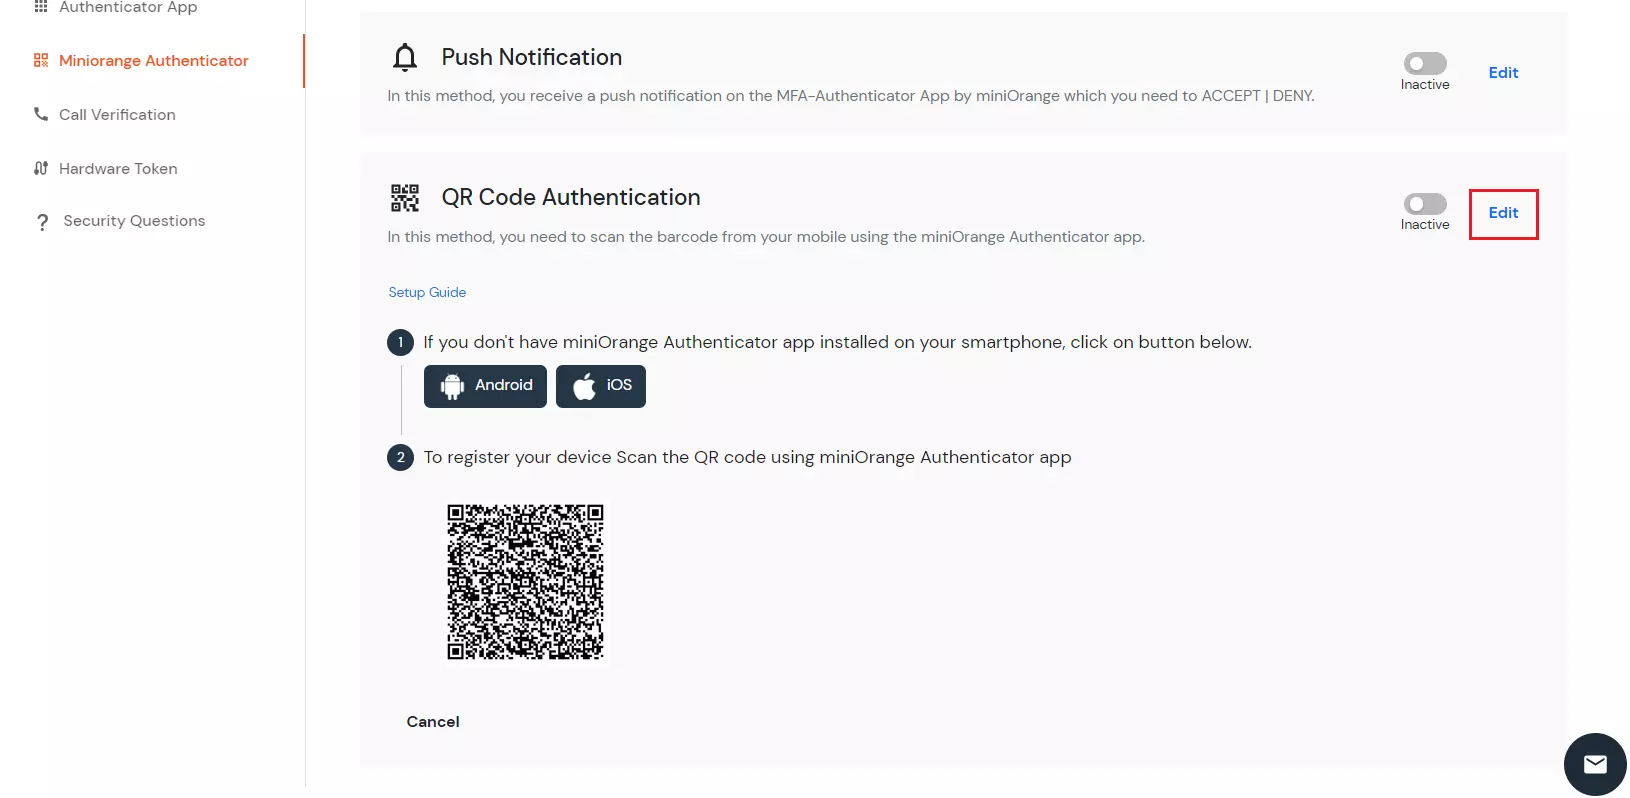
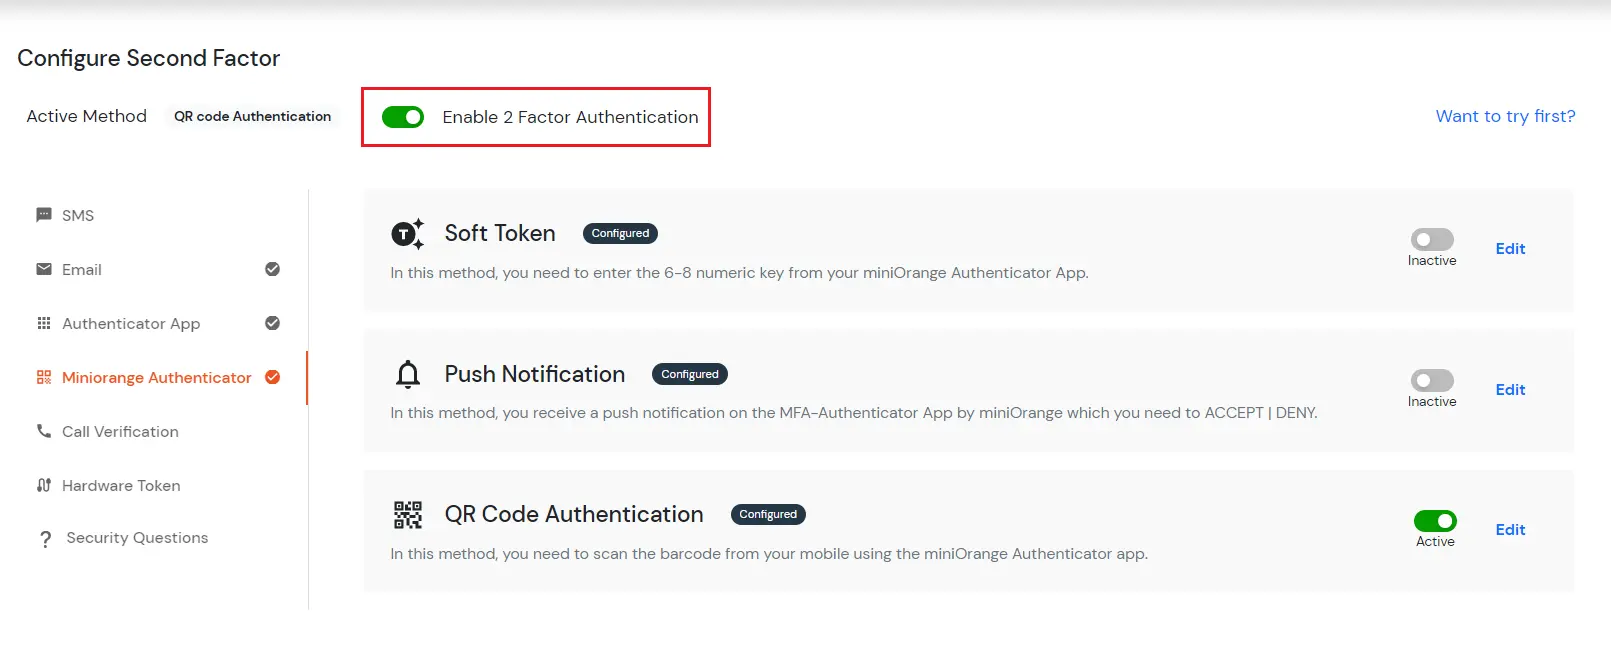
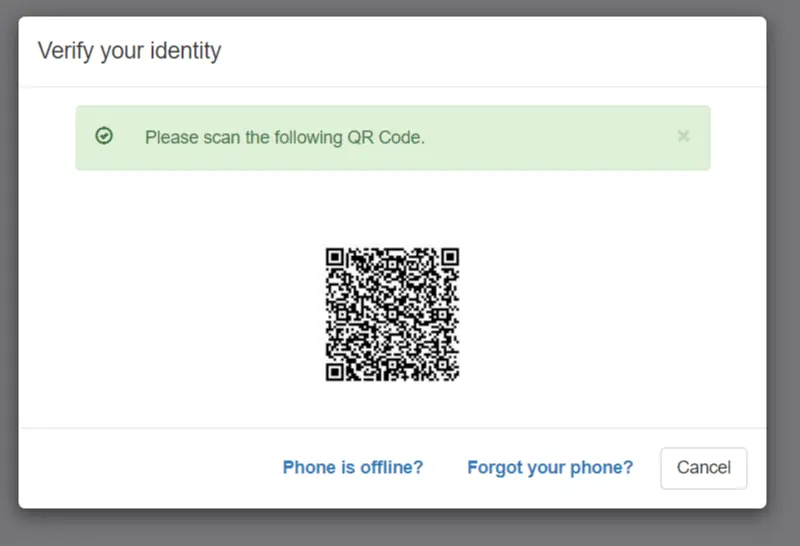
M. QR Code Authentication
5. Call Verification
J. OTP Over Phone Call
- In the call verification section, click on the OTP over phone call and then click edit.
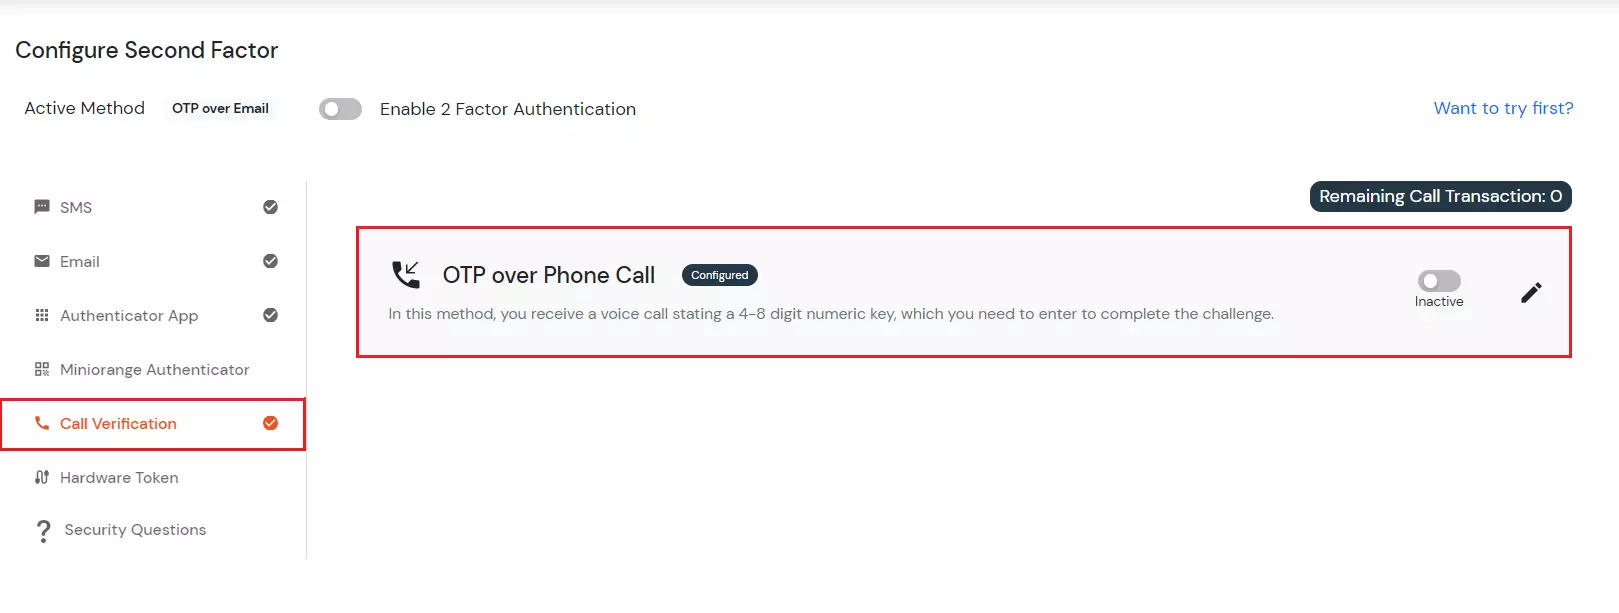
- Add the phone number on which you want to get the OTP and click the save button.
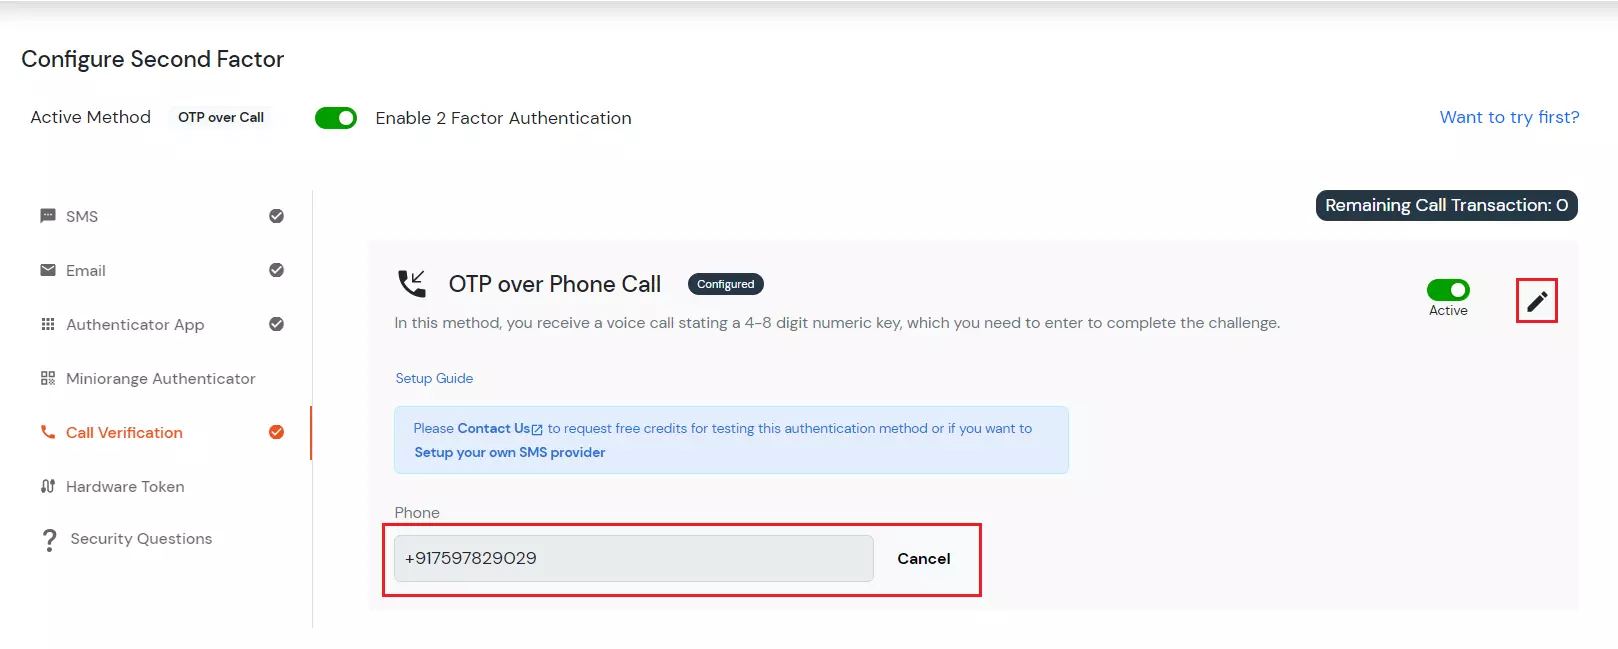
- You can then see the message "Your configurations have been saved successfully" in green.
- The Active method at the top will specify OTP over a phone call.
- Now Enable second factor toggle if not done before as shown below.
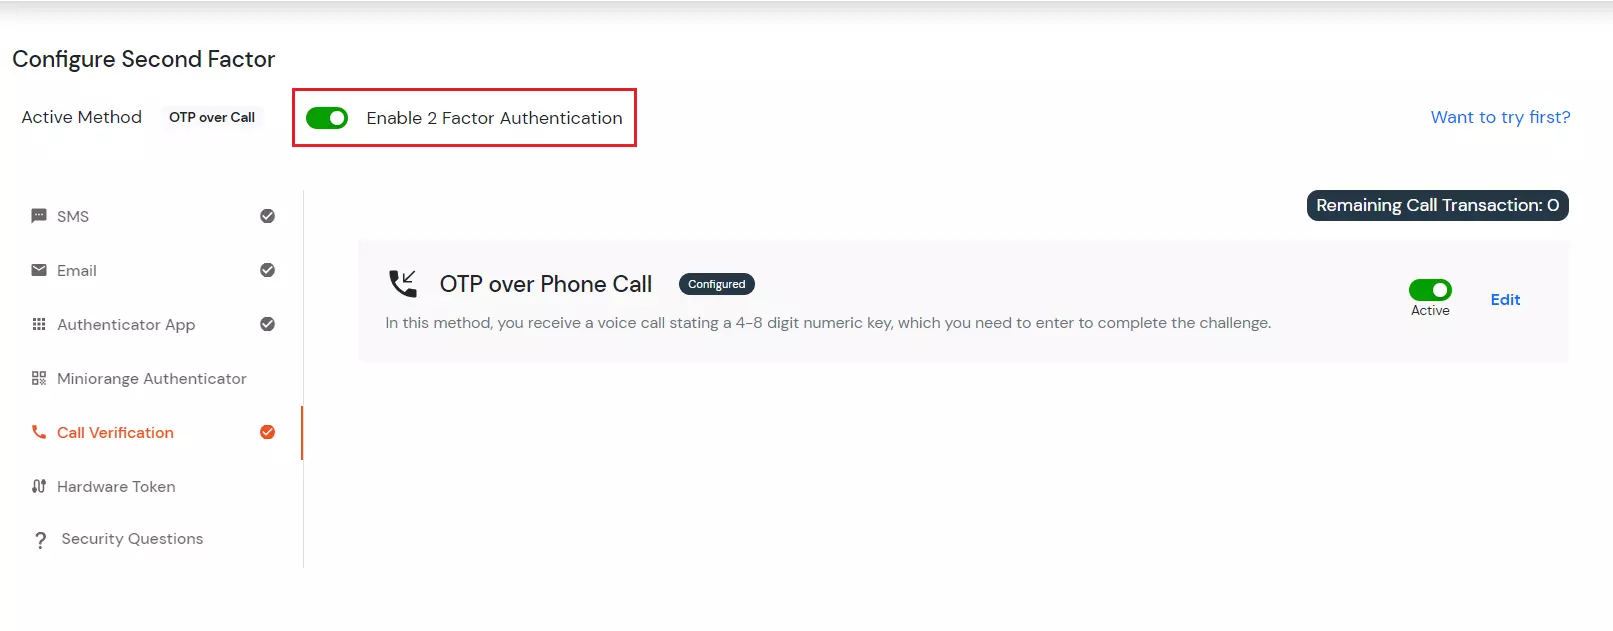
- To verify the second factor sign out and sign in again. It will ask you Username and password. After that, it is redirected to 2-Factor Authentication Page. Now you will receive OTP via Phone call. Enter the OTP and click on the Verify button.
- If you are redirected to your dashboard it means you have successfully configured Phone Verification 2FA method.
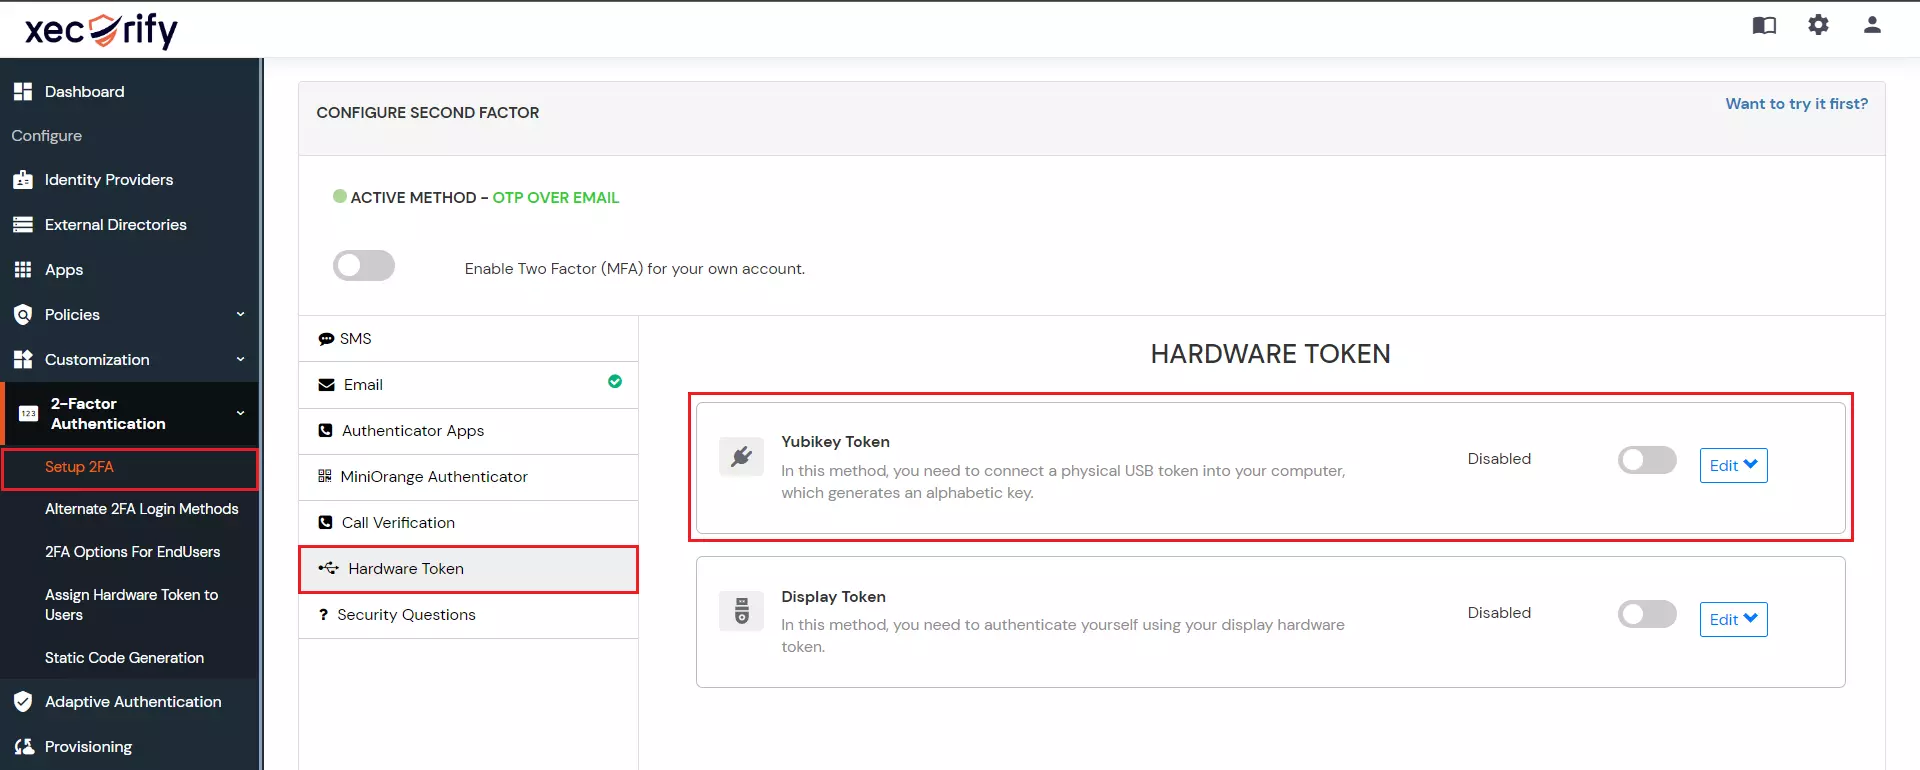
6. Hardware Token
N. YubiKey hardware Token
- Select YubiKey Token in the Hardware Token tab to enable this method. Click on Edit.
- Firstly, you need to connect the YubiKey hardware through the USB port.
- Click on the Enter OTP tab.
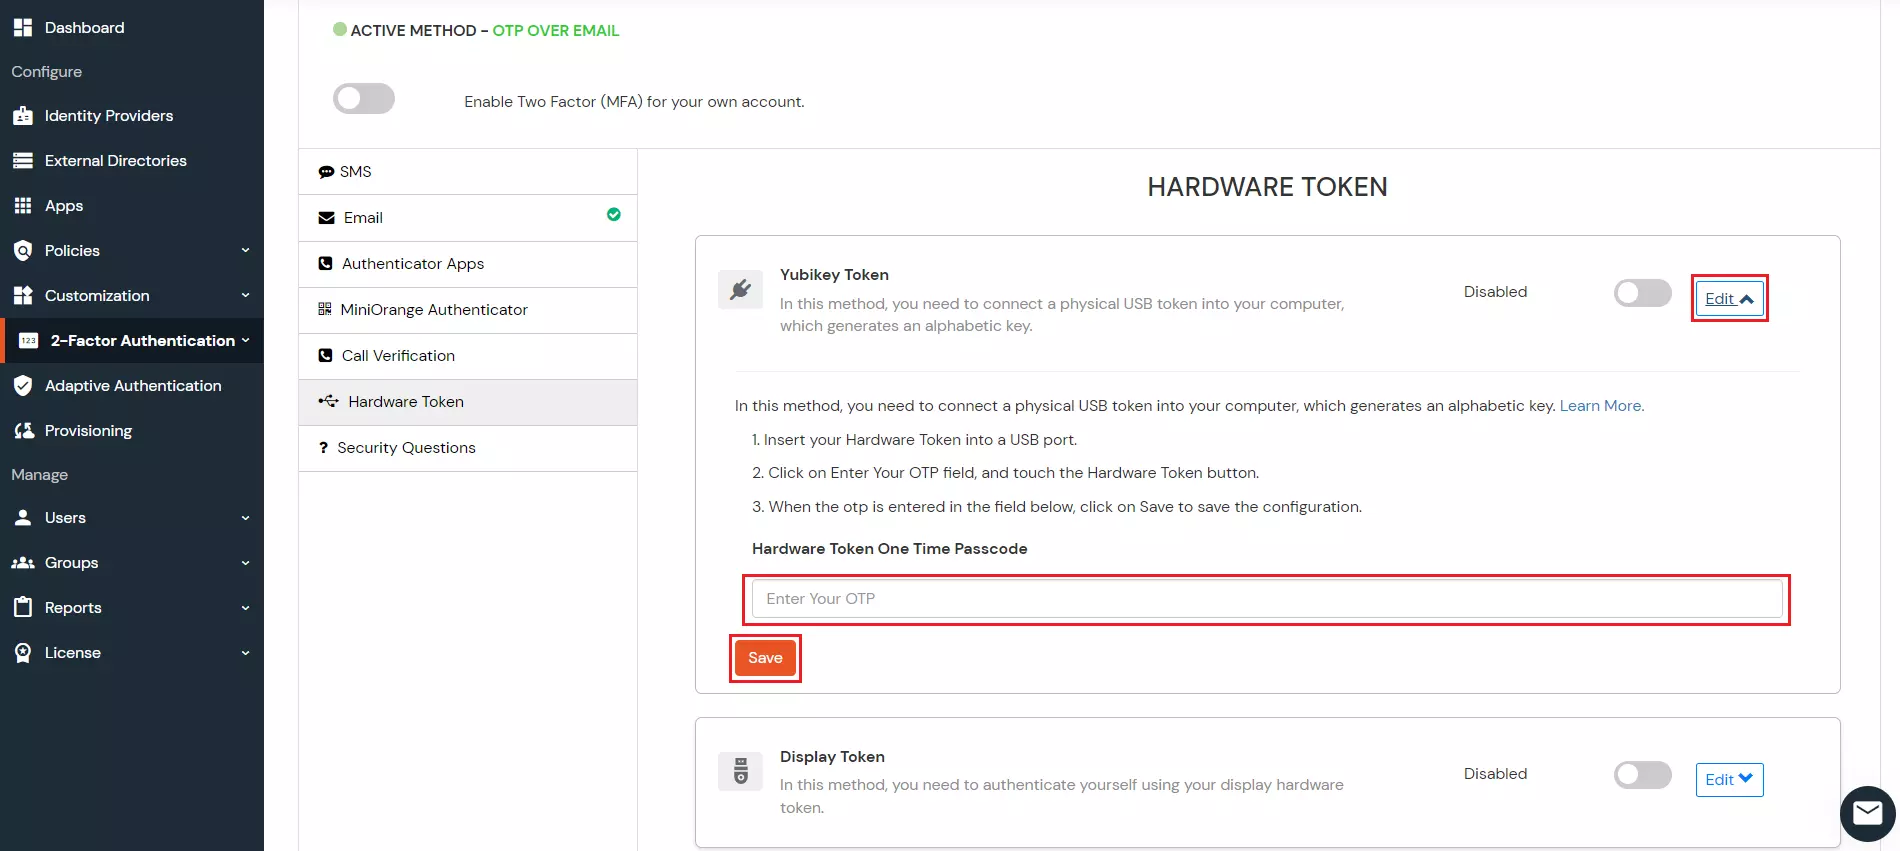
- Now hold the hardware, OTP will be automatically added in this field and you will be redirected to the configure 2FA field.
- The next step is to Enable second factor if not done before.
- To verify the second factor sign out and sign in again. It will ask you Username and password. After that, it is redirected to below page:
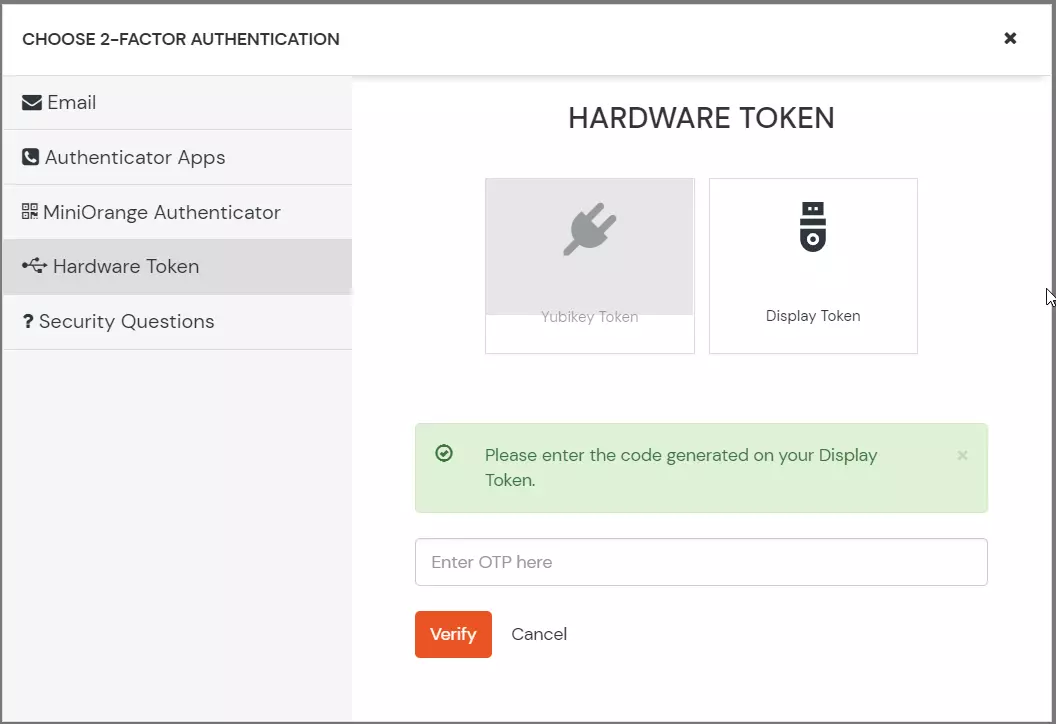
- Here you need to select the Enter OTP field.
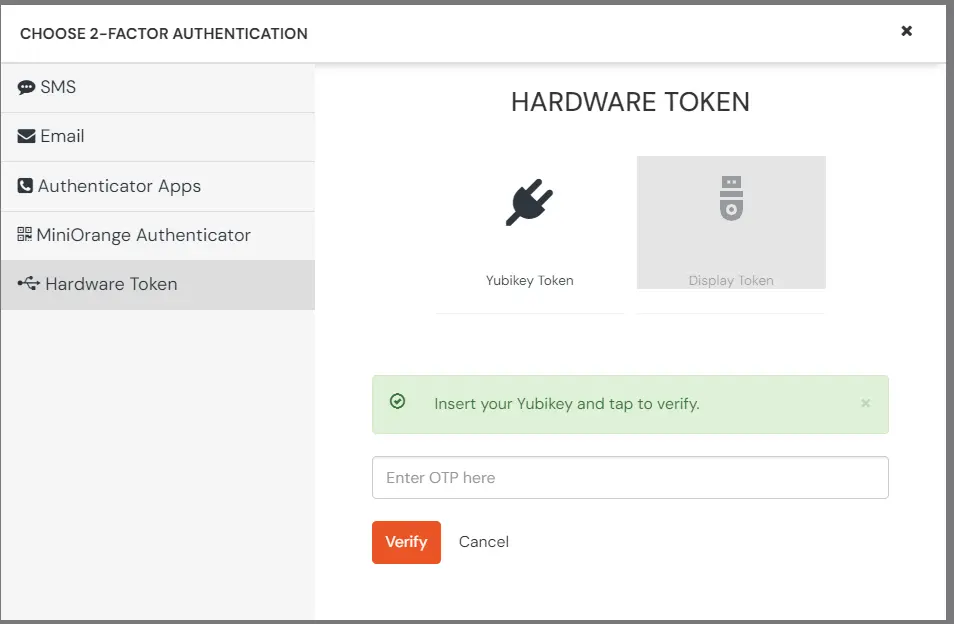
- Press the Hardware token to get the key automatically.
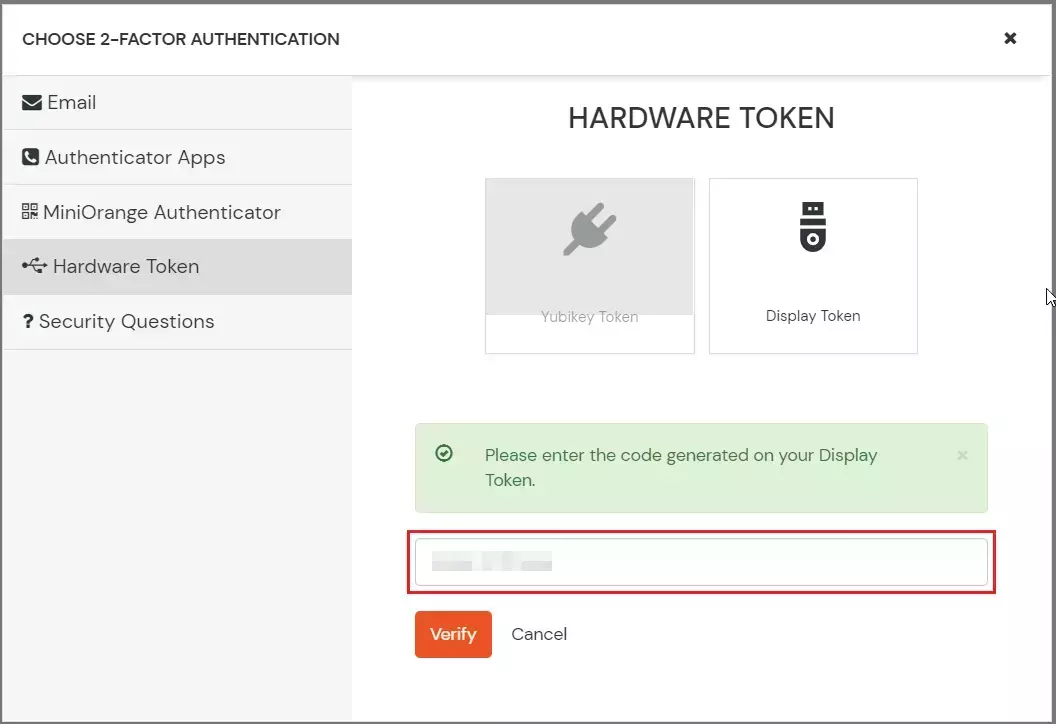
- If redirected to your dashboard it means you have successfully configured the YubiKey Hardware Token 2FA method.
7. Security Questions
- Select the Security Questions section, and click on Edit.
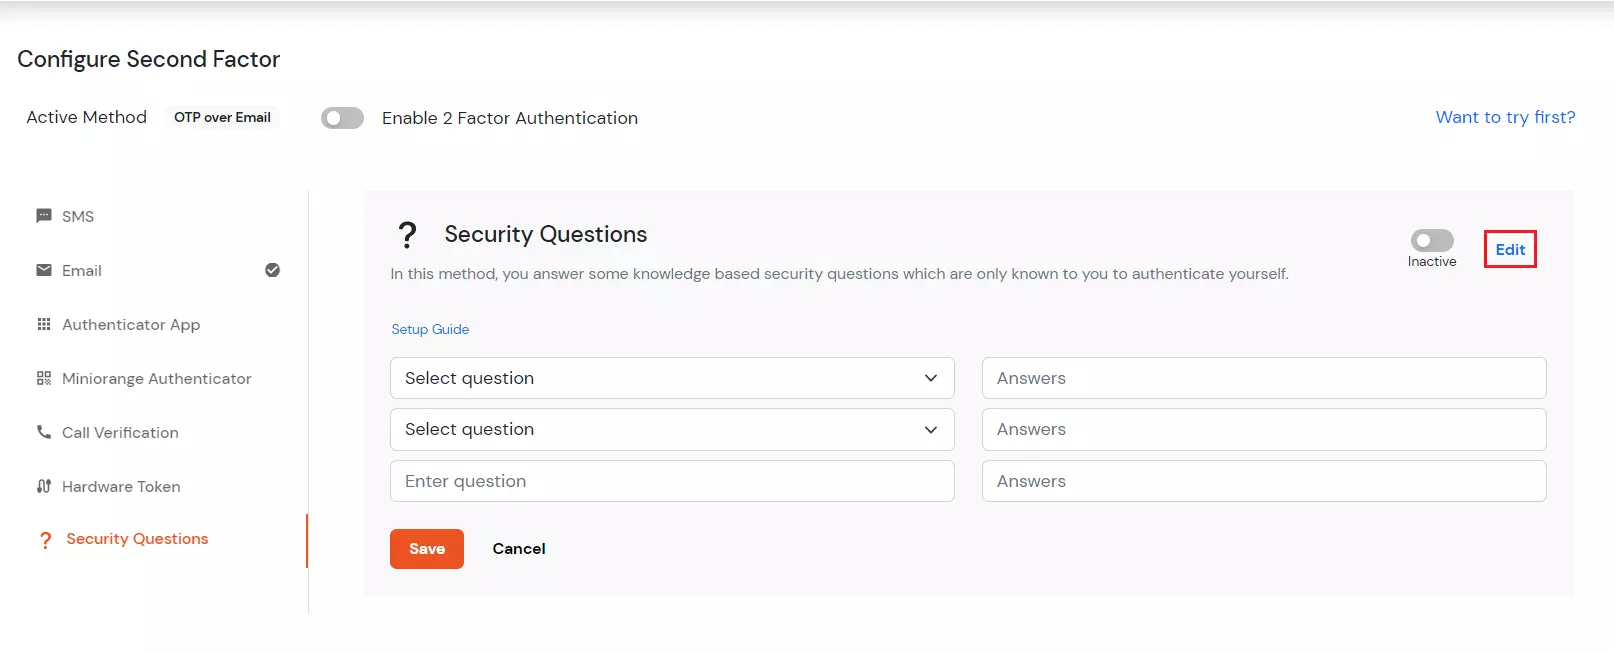
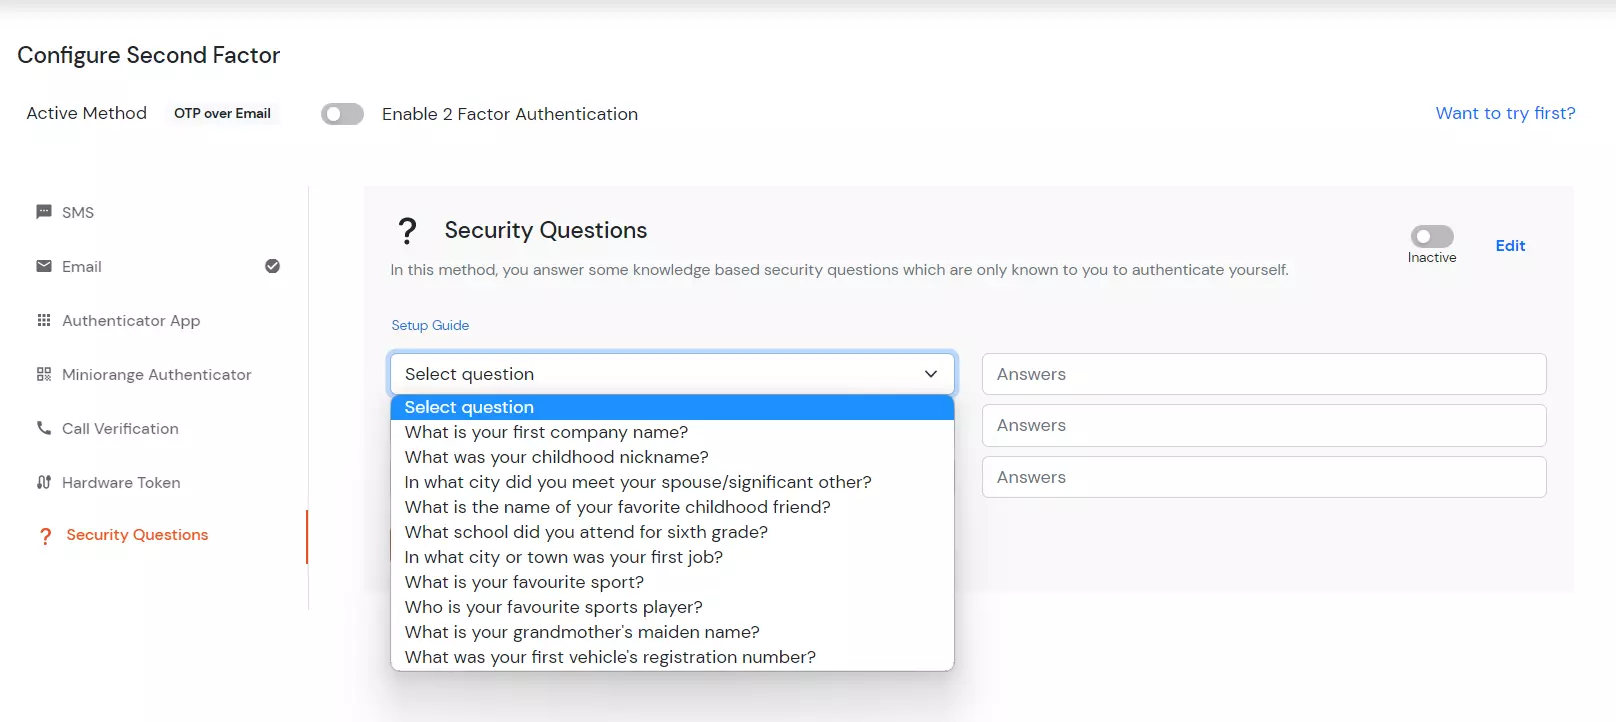
- Here you need to select 2 questions and answer them. Write the customized question and answer it.
- Click on Save and enable the 2-Factor Authentication toggle, if not enabled already as shown below.
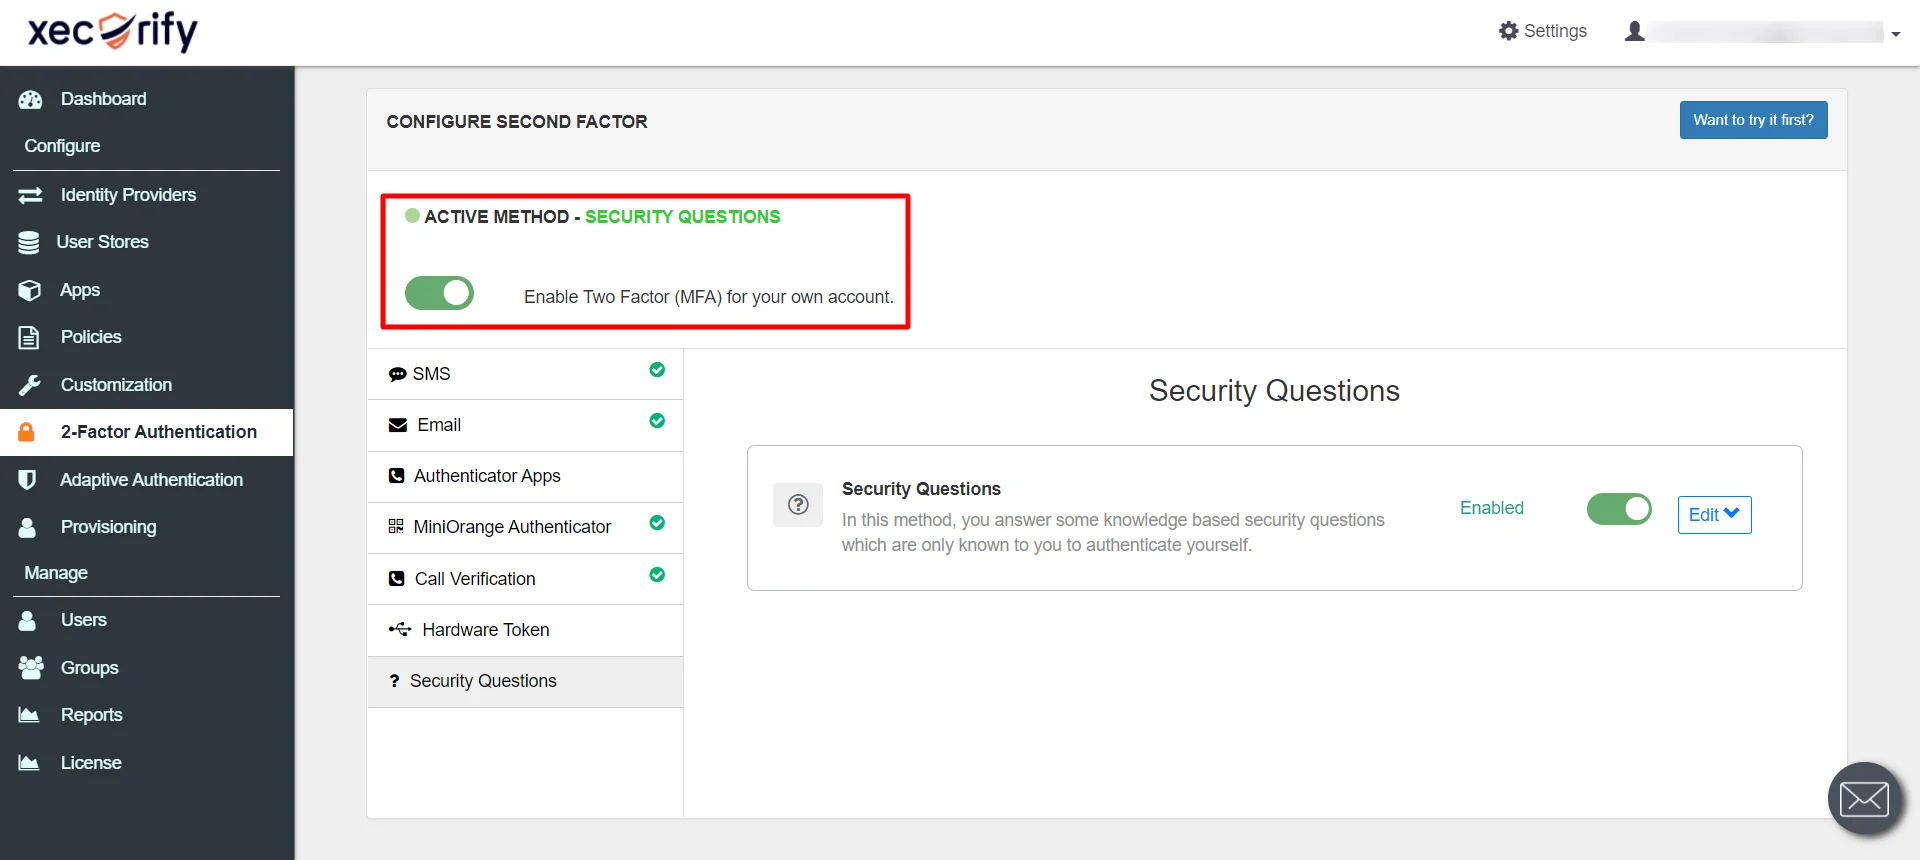
- To confirm whether the 2FA is been activated, sign out and sign in again. After entering your username and password you will be redirected to the below page:
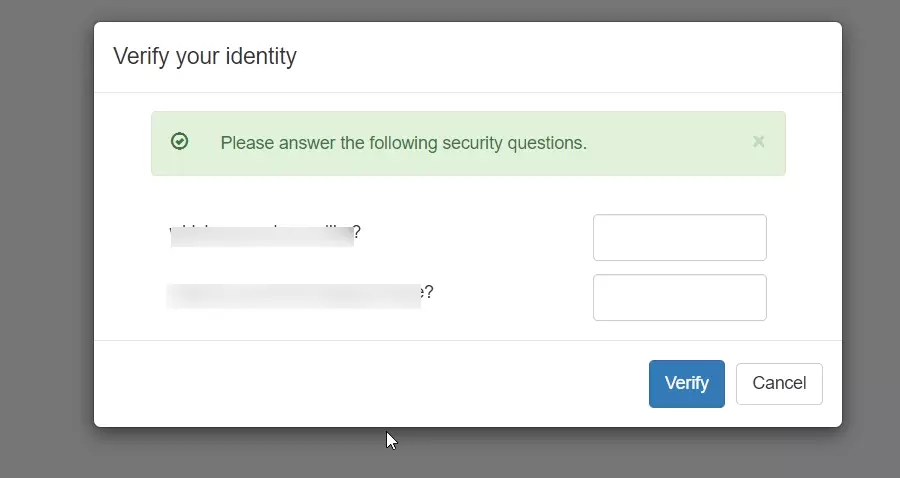
- Answer your KBA question and click on Verify.
- You will see the admin(your) dashboard.
- You have successfully configured KBA as your 2FA method.
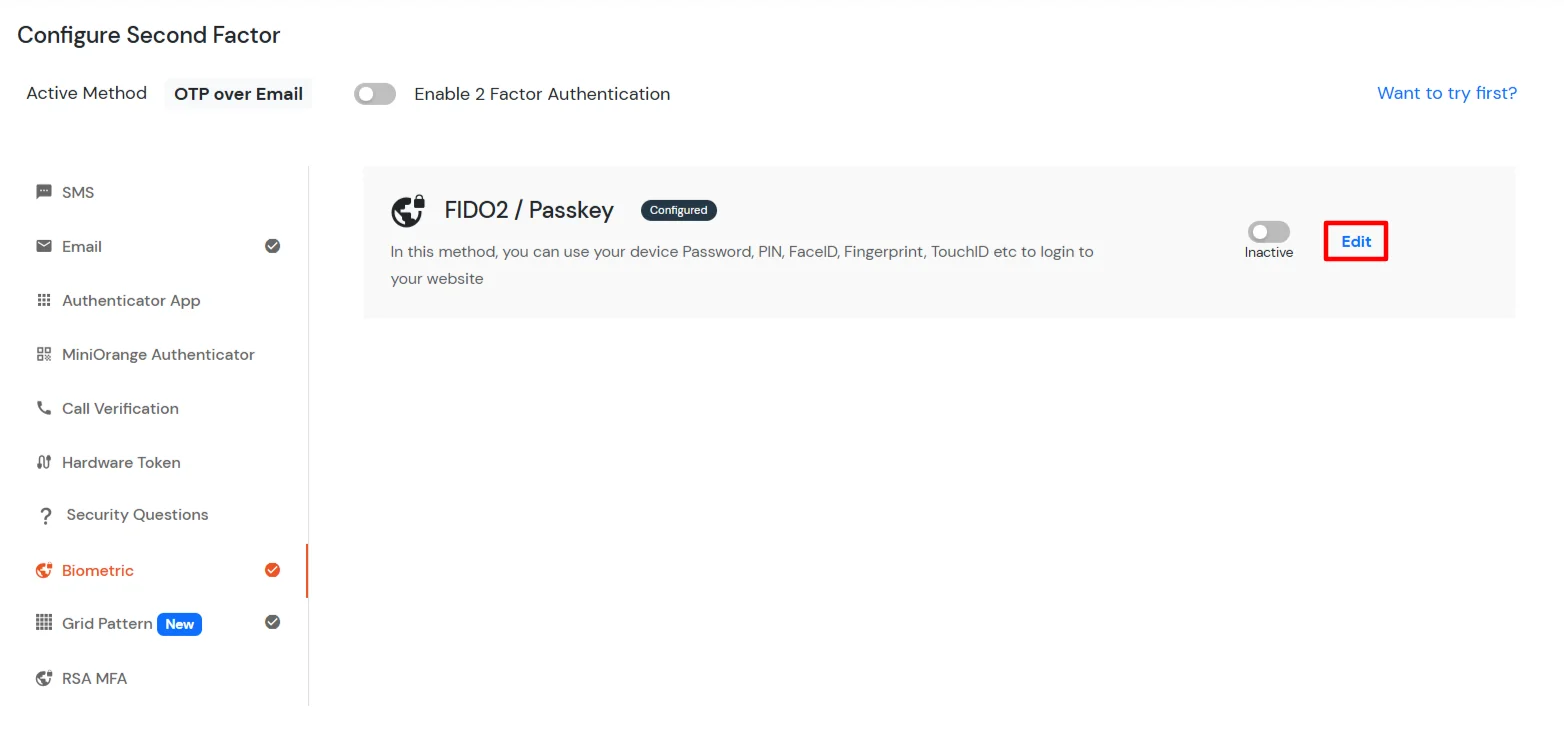
8. Biometric (FIDO2/Passkey)
In this method, the users need to use built-in authentication methods (Windows Hello, inbuilt fingerprint, Biometrics (Face ID or fingerprint)), and Hardware security Tokens (eg. Yubikey FIDO2 Token) for 2FA verification.
Note [Only for on-premise]: You will have to set up SSL for your IDP deployment before using this MFA method.]
- Go to Biometric section, and click on Edit beside the FIDO2/Passkey method.
- The Biometric method supports two types of authenticators:
- Platform Authenticators: Built-in authenticators available on a phone, laptop, or tablet that create and use Passkeys locally, such as Fingerprint Recognition, Face Recognition, and Device PIN.
- Cross-Platform Authenticators: External authenticators such as USB, NFC, or Bluetooth FIDO2 security keys that store Passkeys on the hardware itself.
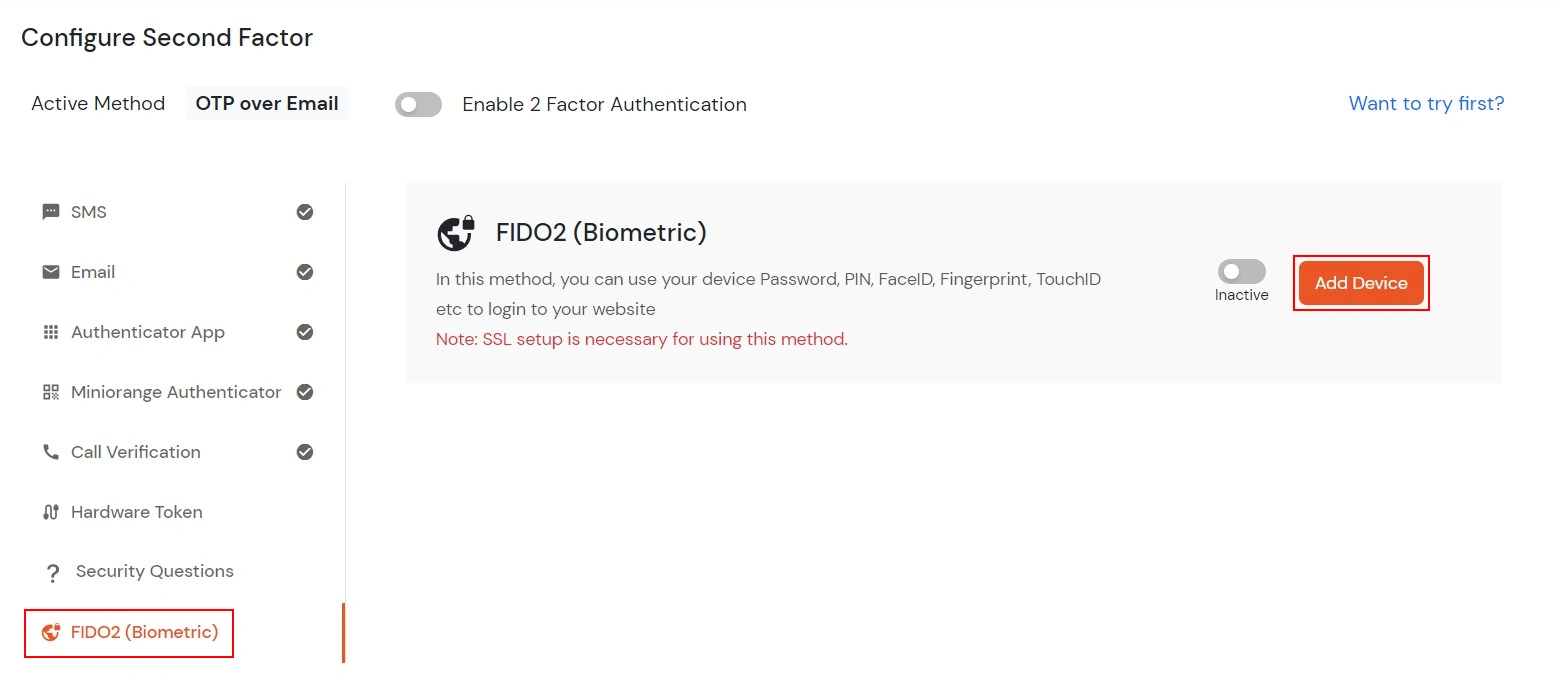
- Click on the Add Device button to register a new biometric or FIDO2 device.
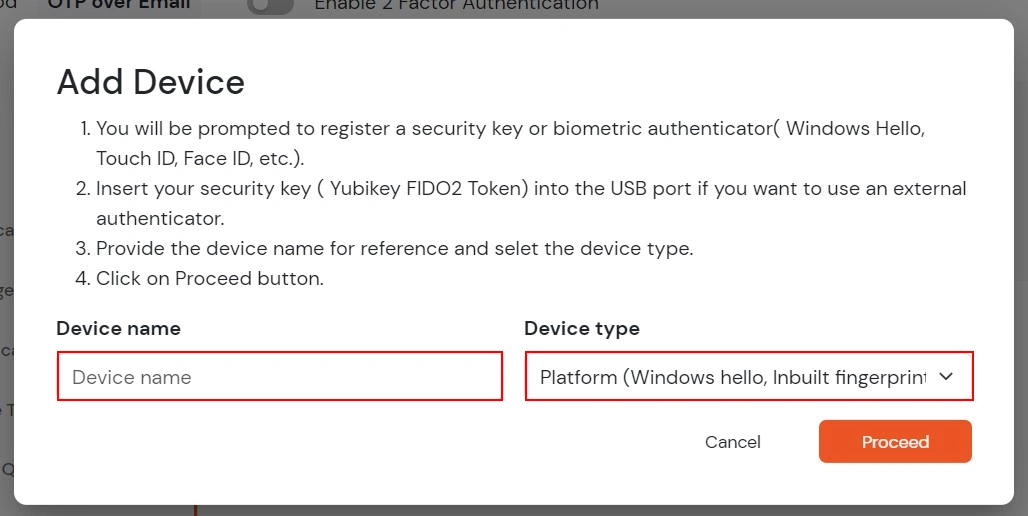
- In the Add Device window, enter a Device Name for easy identification.
- Select the required Device Type from the dropdown:
- Platform Authenticators: Built-in authenticators available on a phone, laptop, or tablet that create and use Passkeys locally, such as Fingerprint Recognition, Face Recognition, and Device PIN.
- Cross-Platform Authenticators: External authenticators such as USB, NFC, or Bluetooth FIDO2 security keys that store Passkeys on the hardware itself.
- Platform authenticators can be used for biometric Passkey login using built-in device verification, while roaming/cross-platform authenticators can be used through external FIDO2 hardware tokens.
- Click on Proceed to complete the device registration process.
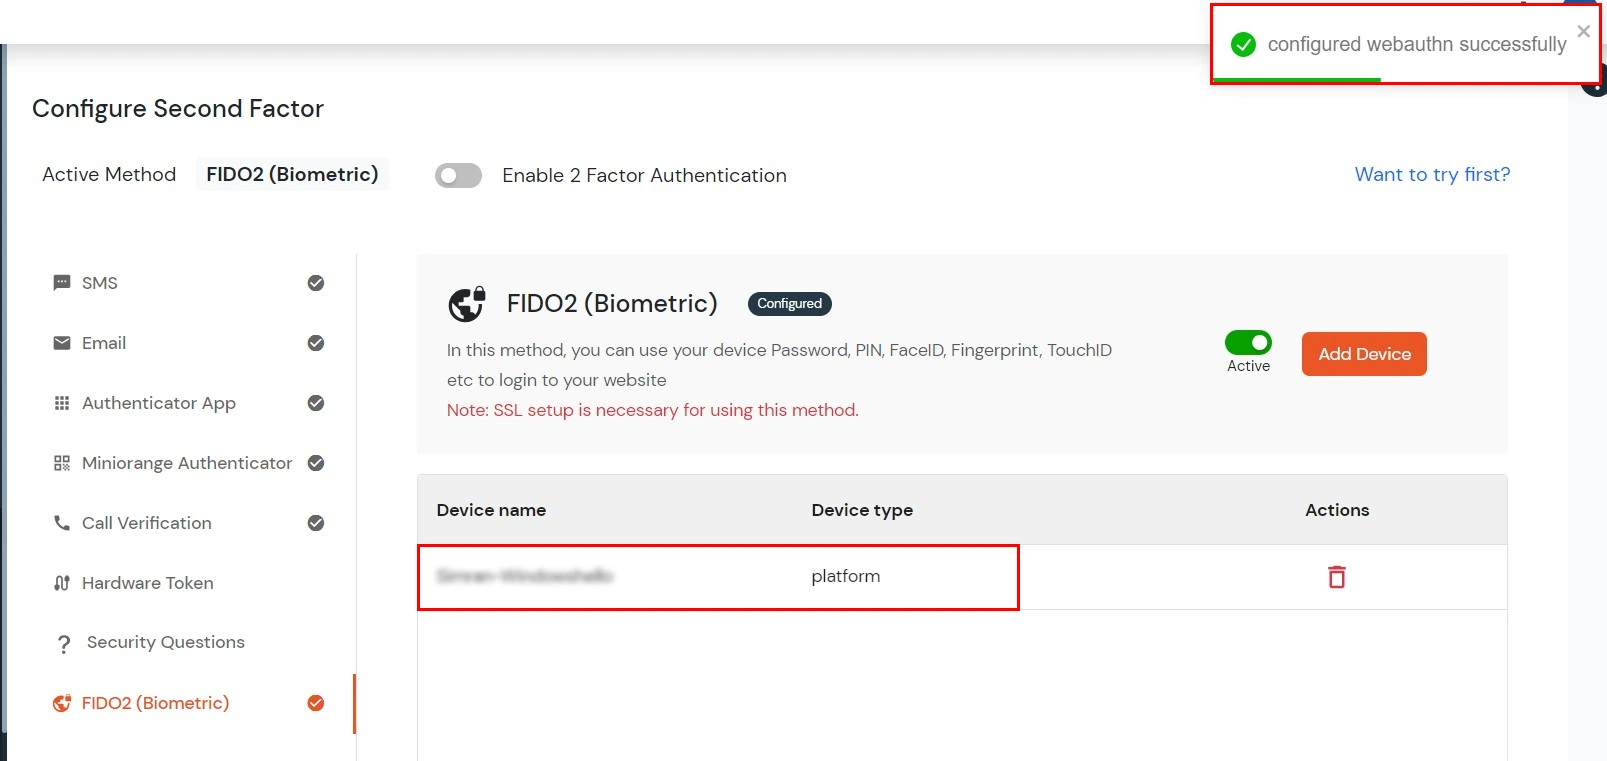
- Once the device is successfully added, it will appear in the registered devices table below with the configured device name and device type.
- Admins can delete any registered biometric device at any time using the delete icon available under the Actions column.
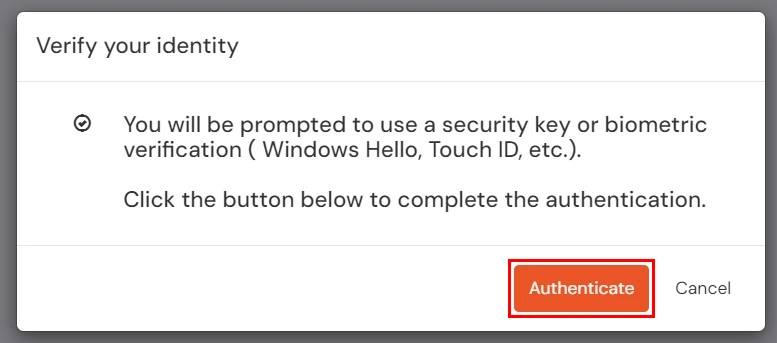
- To verify the second factor, sign out and sign in again.
- Complete verification using the available passkeys or devices.
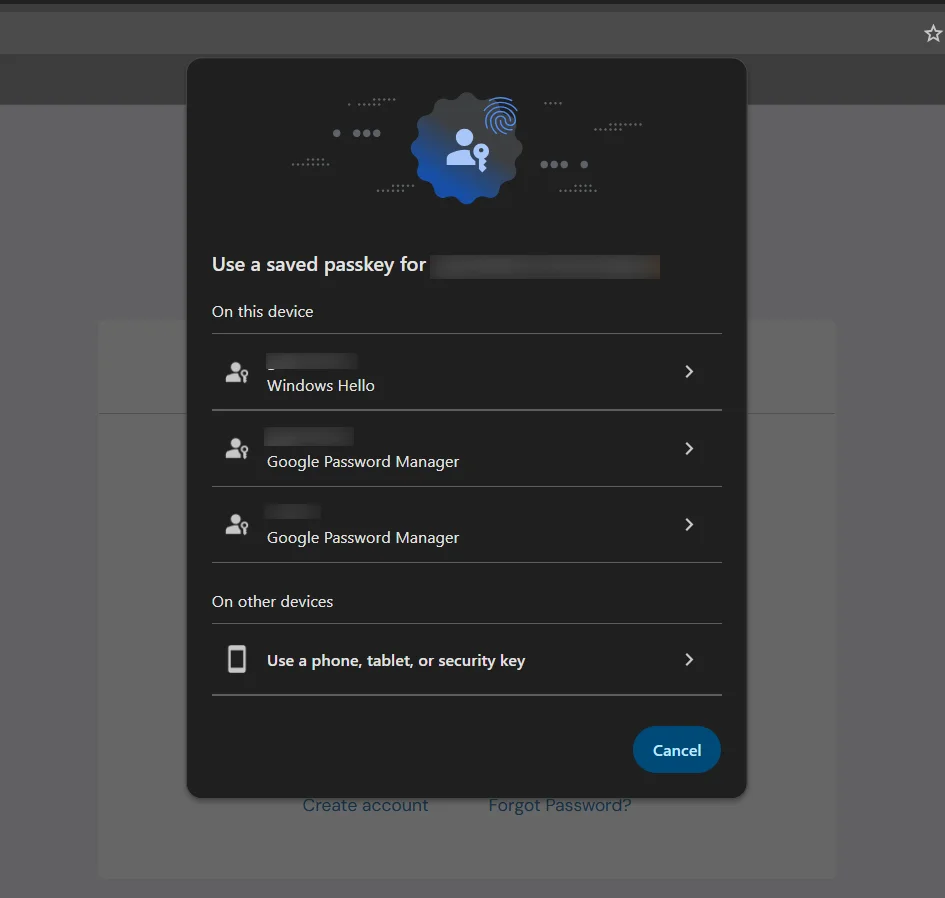
- After successful verification, the user is securely logged in to the account.
- Enable 2-factor Authentication if not done before.
- To verify the second factor, sign out and sign in again. It will ask you for the Username and password.
- After that, you will be prompted to verify the second factor using your registered device.
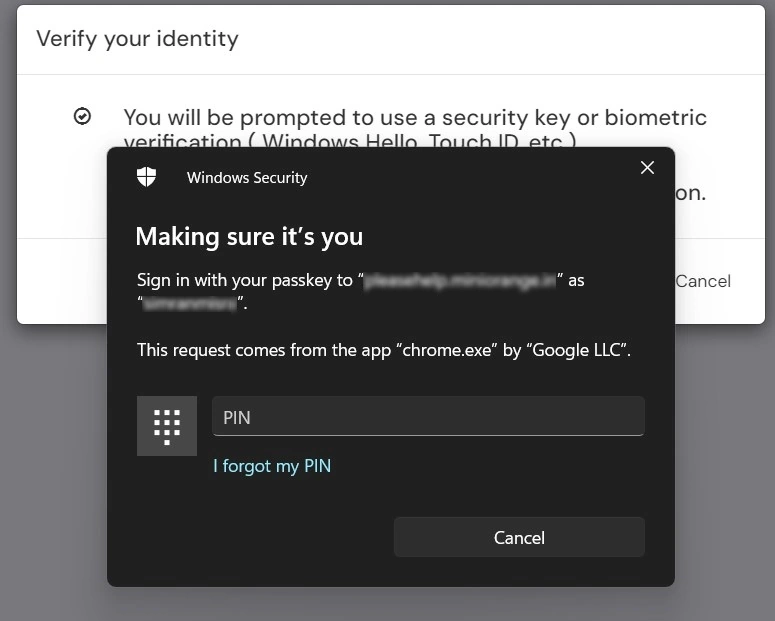
- If you don’t receive any prompt or close the prompt by mistake, you can click on Authenticate to open the prompt again.
- Enter your PIN/Touch ID/Password/Face ID for the registered device.
- If you are redirected to your dashboard, it means you have successfully configured the Biometric (FIDO2/Passkey) method.
9. Grid Pattern Authentication
Grid Pattern Authentication is a method of verifying a user’s identity by having them select a specific sequence of tiles from a grid. The grid typically consists of numbered boxes arranged in rows and columns. During setup, the user clicks a series of tiles in a chosen order to create a unique pattern. This pattern acts as a second factor of authentication and must be repeated exactly during each login.
- Begin by logging into the miniOrange Admin dashboard using your username and password. Navigate to the security settings or 2-Factor Authentication (2FA) section.
- From the available authentication methods, select Grid Pattern Authentication. Click the enable or activate button to begin setup.
- A numbered grid will appear. You’ll be prompted to click 6 tiles in a specific order to create your pattern. The order of selection is important and will be used for future logins.
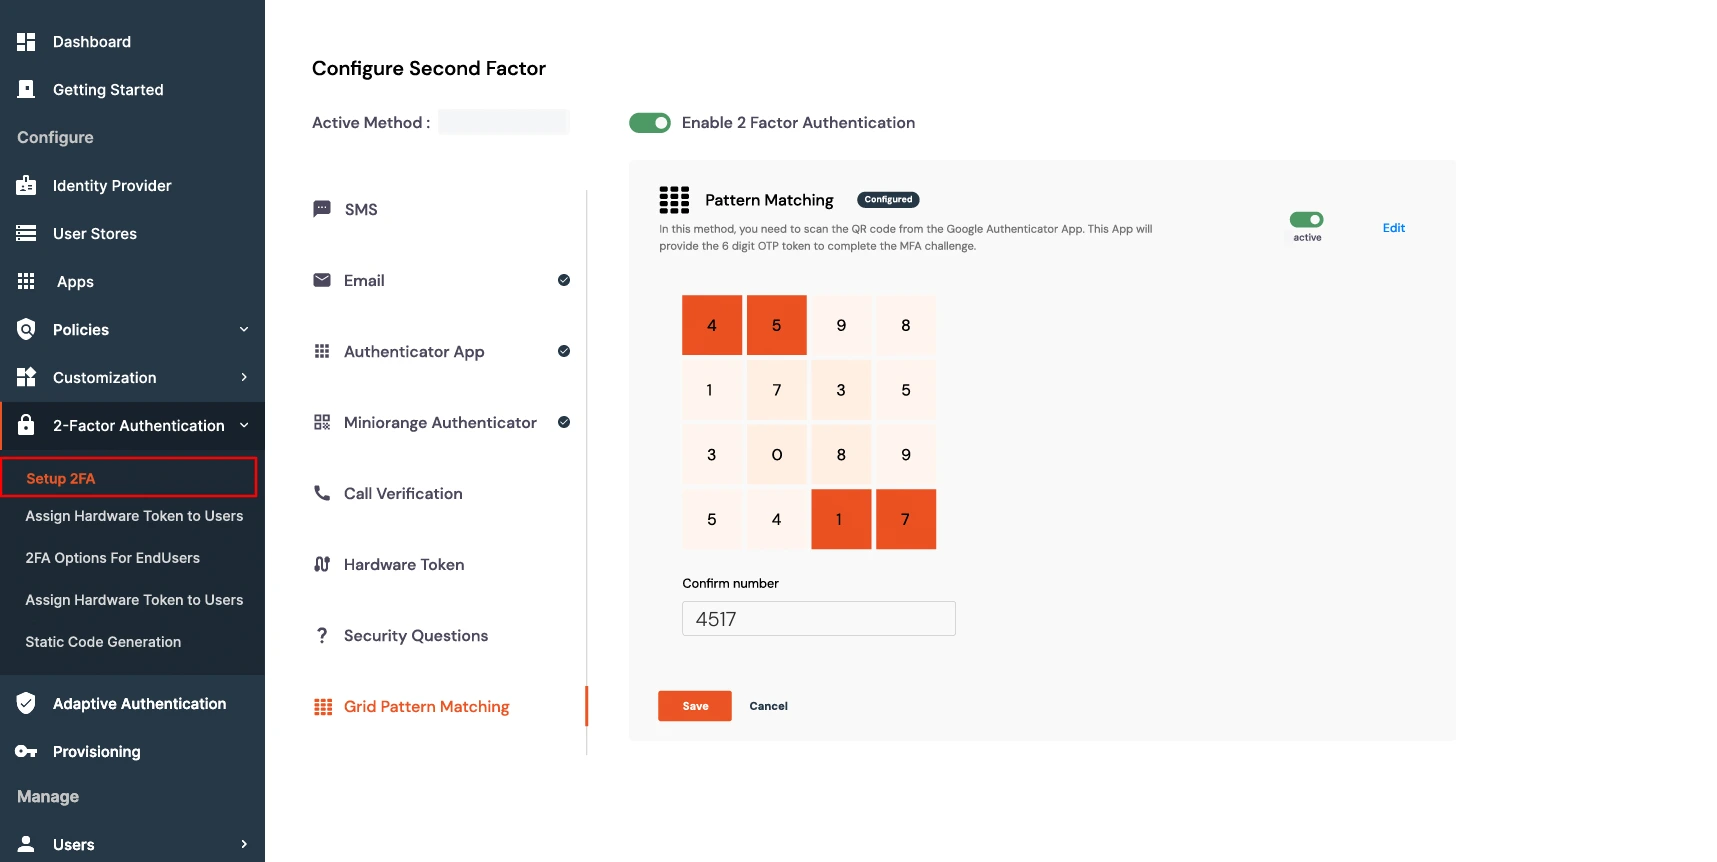
- After selecting your tiles, re-enter the same sequence to confirm. Once confirmed, your pattern is saved and linked to your account.
For example: If you select tiles in the order (4,5) (1,7), you must repeat this exact sequence and not the numbers on the tiles during login to authenticate successfully.
How to Authenticate on Your Device
- Go to the login page and enter your username and password.
- Once the grid appears, click the same tiles in the same order as your saved pattern. As per the above setup, your pattern will be the tiles (1,2), (3,4) respectively.
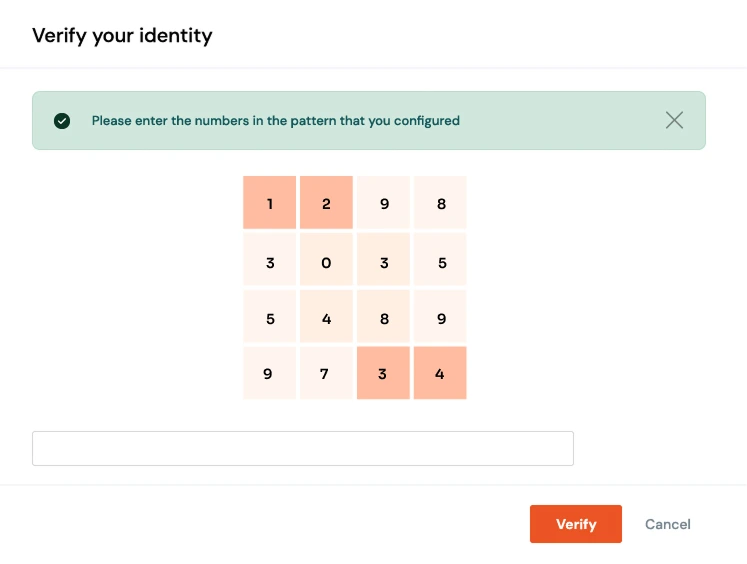
- If the sequence matches, access will be granted. If the order is incorrect, authentication will fail.
- Please follow this guide to know more and configure grid pattern matching.
10. RSA Authenticator (SecurID)
The RSA SecurID MFA integration allows users to utilize RSA authentication methods for secure access within the miniOrange platform. This documentation provides an overview of the configuration process and the necessary parameters required for a successful setup.
To configure RSA Authentication (SecurID) in miniOrange, follow the steps below:
- Navigate to the 2-Factor Authentication > Setup 2FA for Admin section in your admin dashboard.
- Choose RSA Authenticator (SecurID) and click on Edit and then select Configure Second Factor.
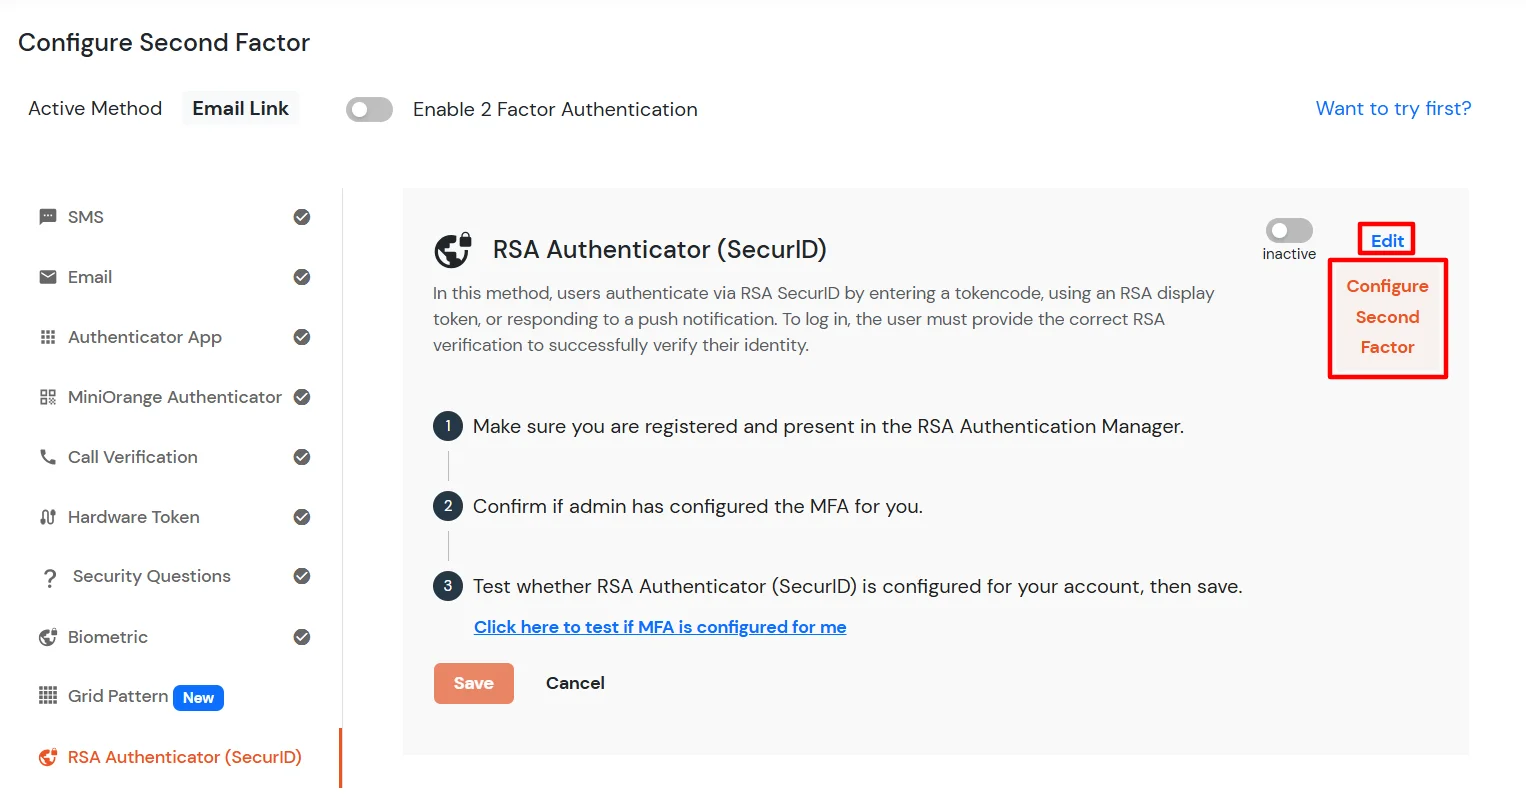
- Provide the configuration parameters as detailed in the section below.
End-User Setup
- Set RSA SecurID as the default MFA method for end-users.
- Enable MFA from the policy settings.
- All methods configured on RSA and enabled on miniOrange configurations will be displayed to the end user.
Note:
For further assistance or inquiries regarding the configuration, please contact miniOrange support.
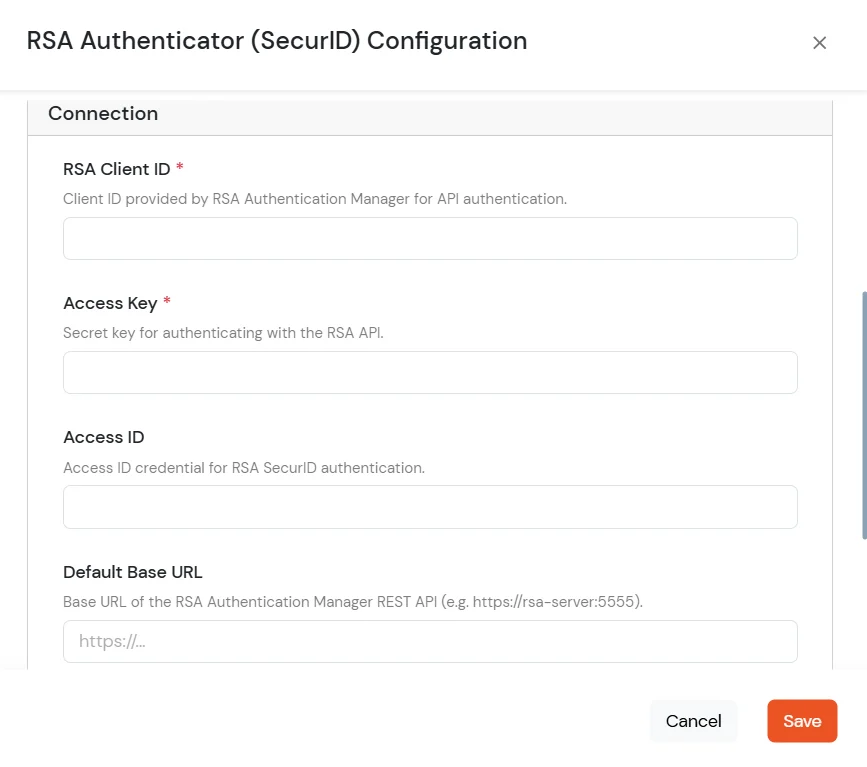
RSA Configuration Parameters:
Enter the values below in the RSA configuration screen. Required and optional fields are listed in the Status column.
| Parameter |
Description |
Status |
| default_policy_condition |
The default condition under which a policy is applied. |
Required |
| rsa_client_id |
The unique identifier for the RSA client application. |
Required |
| rsa_context_message_id |
Identifier for the context message used in RSA transactions. |
Required |
| assurance_level |
Required level of assurance for the authentication process. |
Required |
| rsa_api_version |
The version of the RSA API being used. |
Required |
| success_status |
The status code/message indicating a successful operation. |
Required |
| default_interface_path |
The default path for the RSA interface or endpoint. |
Required |
| access_id |
The ID used to access the RSA service. |
Required |
| access_key |
The secret key corresponding to the access ID for secure communication. |
Required |
| read_timeout |
INTEGER (Default: 3000) - Timeout in milliseconds for reading data from the RSA service. |
Required |
| default_root_cert_filename |
Filename of the default root certificate for secure connections. |
Required |
| default_client_id |
A default client identifier, possibly a fallback or non-RSA specific ID. |
Required |
| system_uuid |
Unique identifier for the system instance. |
Required |
| platform |
The platform or operating system environment. |
Required |
| attempt_timeout |
INTEGER (Default: 5000) - Timeout in milliseconds for the overall authentication attempt. |
Required |
| keep_attempt |
Specifies whether the authentication attempt should be kept open after initial failure. |
Required |
| default_policy_id |
The ID of the default authentication policy to apply. |
Required |
| sid_passcode_method |
Method used for SecurID (SID) passcode generation/validation. |
Optional |
| debug_client |
Flag to enable or disable client-side debugging. |
Required (Default: 'FALSE') |
| default_language |
The default language for messages and prompts. |
Required (Default: 'en_US') |
| method_id |
Identifier for the specific authentication method being used (e.g., Push, Passcode). |
Required |
| auth_method_version_id |
Version identifier for the authentication method. |
Required |
| ia_resource_prompt_token |
Resource token for the identity assurance prompt. |
Optional |
| default_base_url |
The base URL or endpoint of the RSA server. |
Required |
| rsa_version |
The overall version of the RSA integration or software. |
Required |
| end_user_attribute |
The user attribute (e.g., username, email) used to identify the end-user to RSA. |
Required |
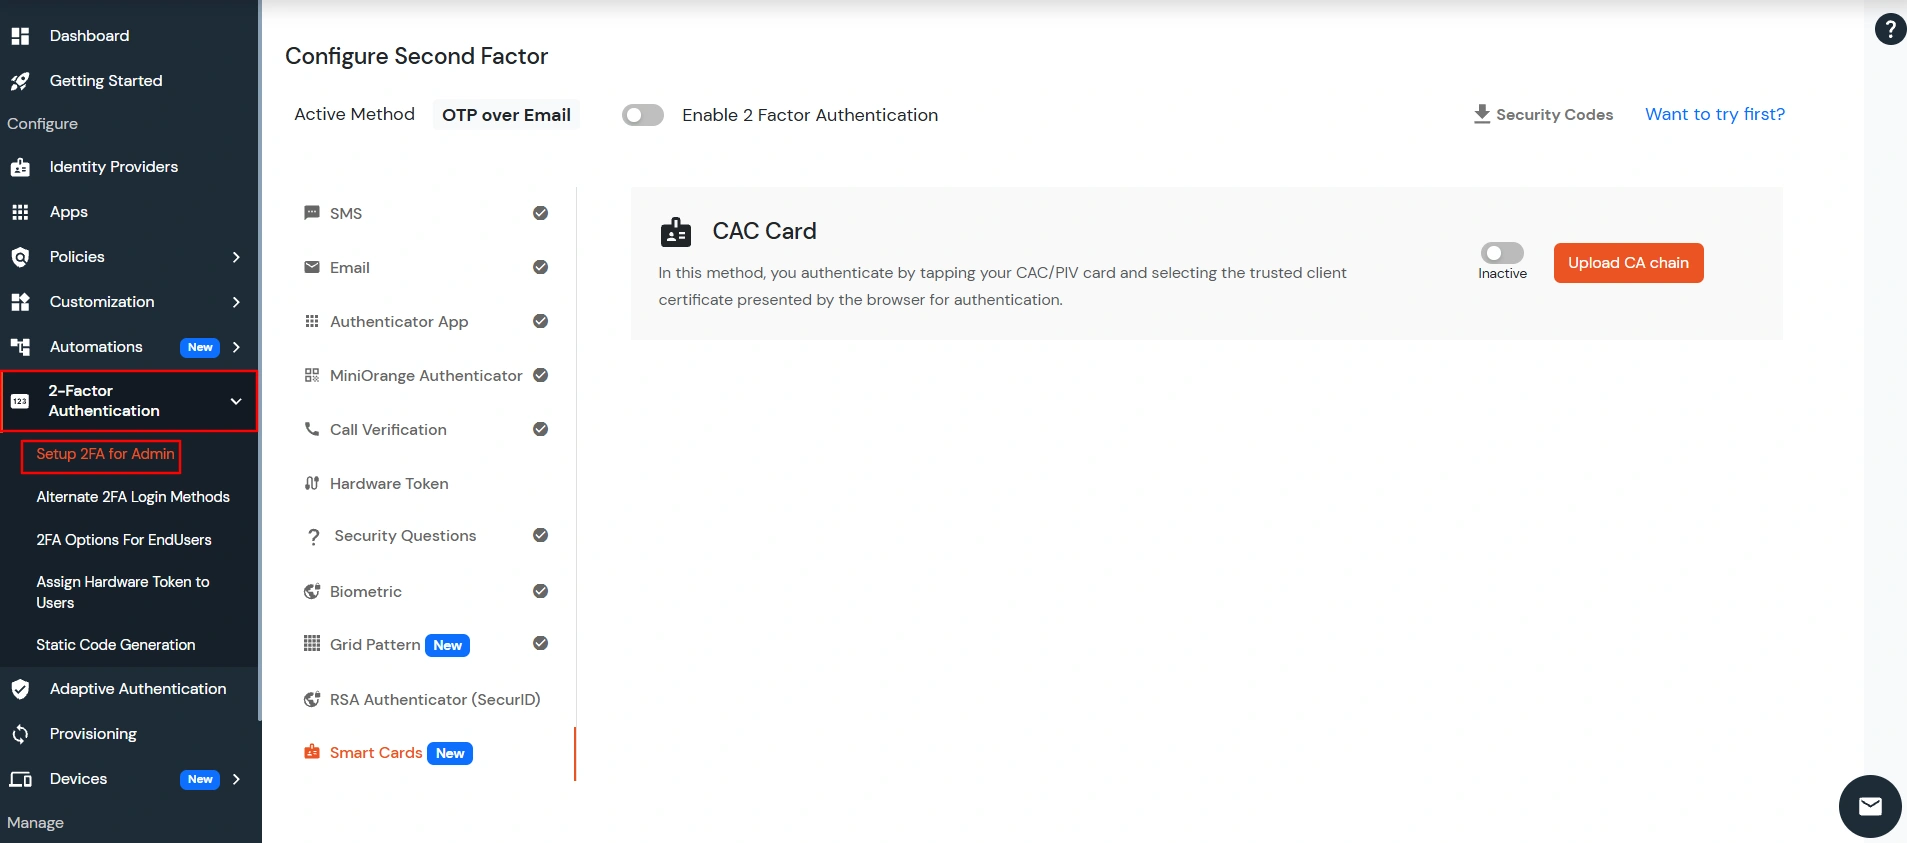
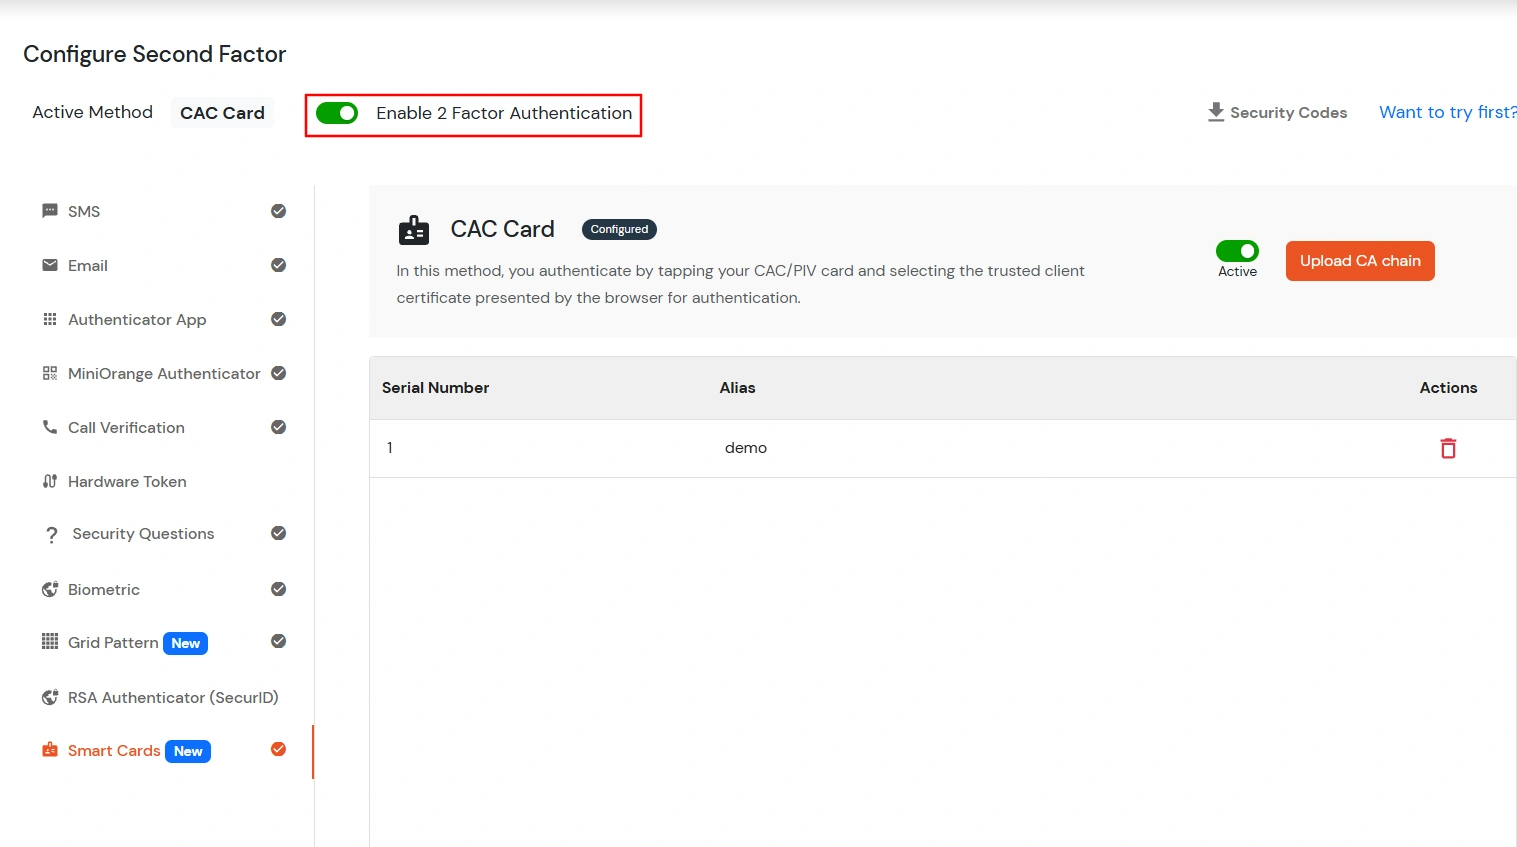
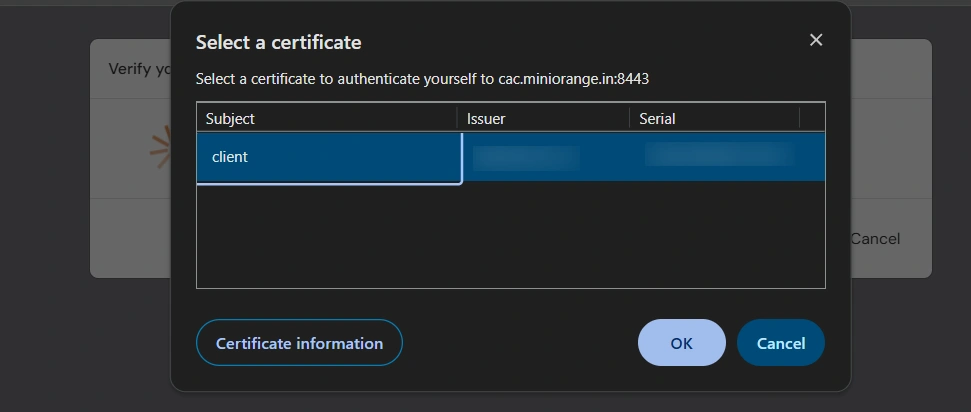
11. CAC Smart Card Authentication [This will be released soon]
CAC Smart Card Authentication allows users to authenticate using PKI-based smart cards and client certificates issued by a trusted Certificate Authority (CA). In this method, the user inserts the CAC/PIV smart card into the card reader and verifies authentication using the certificate stored on the card.
Note:
Before configuring this method, ensure that:
- A valid CAC/PIV smart card reader is connected to the system.
- The browser supports client certificate authentication.
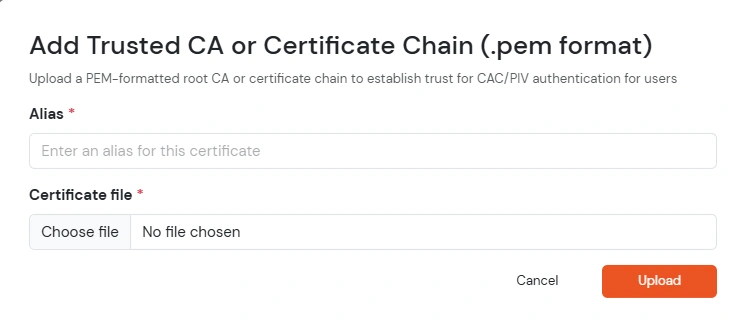
- The root/intermediate CA certificates used to sign the smart card certificates are available.
- A user with a username/email matching the SAN present in the CAC/PIV smart card certificate exists in miniOrange.
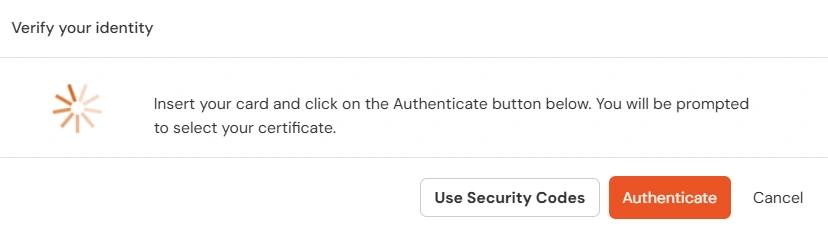
How to Verify the Second Factor