AWS SCIM Automatic Provisioning and Deprovisioning
AWS SCIM Automatic Provisioning allows to create account in a simplified and automated way to link AWS user's account to their existing or new third party apps. AWS SCIM Provisioning automates user provisioning with their identities across the applications where users need access to. Enable automatic provisioning in Amazon Web Services (AWS) Identity center for users using Active Directory credentials.
Automated User Provisioning saves time when setting up new users and teams, and also manages access privileges through user lifecycle managemnet. miniOrange can create, read, and update user accounts for new or existing users, remove accounts for deactivated users, and synchronize attributes across multiple user stores.
AWS SCIM User provisioning and deprovisioning actions are bi-directional, so you can create accounts inside an external application and import them into miniOrange, or alternatively create the accounts in miniOrange and then push them out to any linked external applications.
AWS SCIM automatic Deprovisioning means deleting a user and removing their access from multiple applications and network systems at once. Deprovisioning action is triggered when an employee leaves a company or changes roles within the organization. The deprovisioning features increase your organization's security profile by removing access to sensitive applications and content from people who leave your organization.
Automatic Provisioning & Deprovisioning Scenarios for Amazon Web Services (AWS) Identity center
miniOrange provides Provisioning solutions for all scenarios of user management (provisioning), which includes AD Integration, LDAP Integration and automated provisioning for all External Applications such as AWS SCIM, Google Workspace, Workday, Salesforce, Microsoft apps, etc.
Follow the step-by-step guide given below to setup Automated AWS SCIM Provisioning
1. Setup Provisioning for AWS SCIM
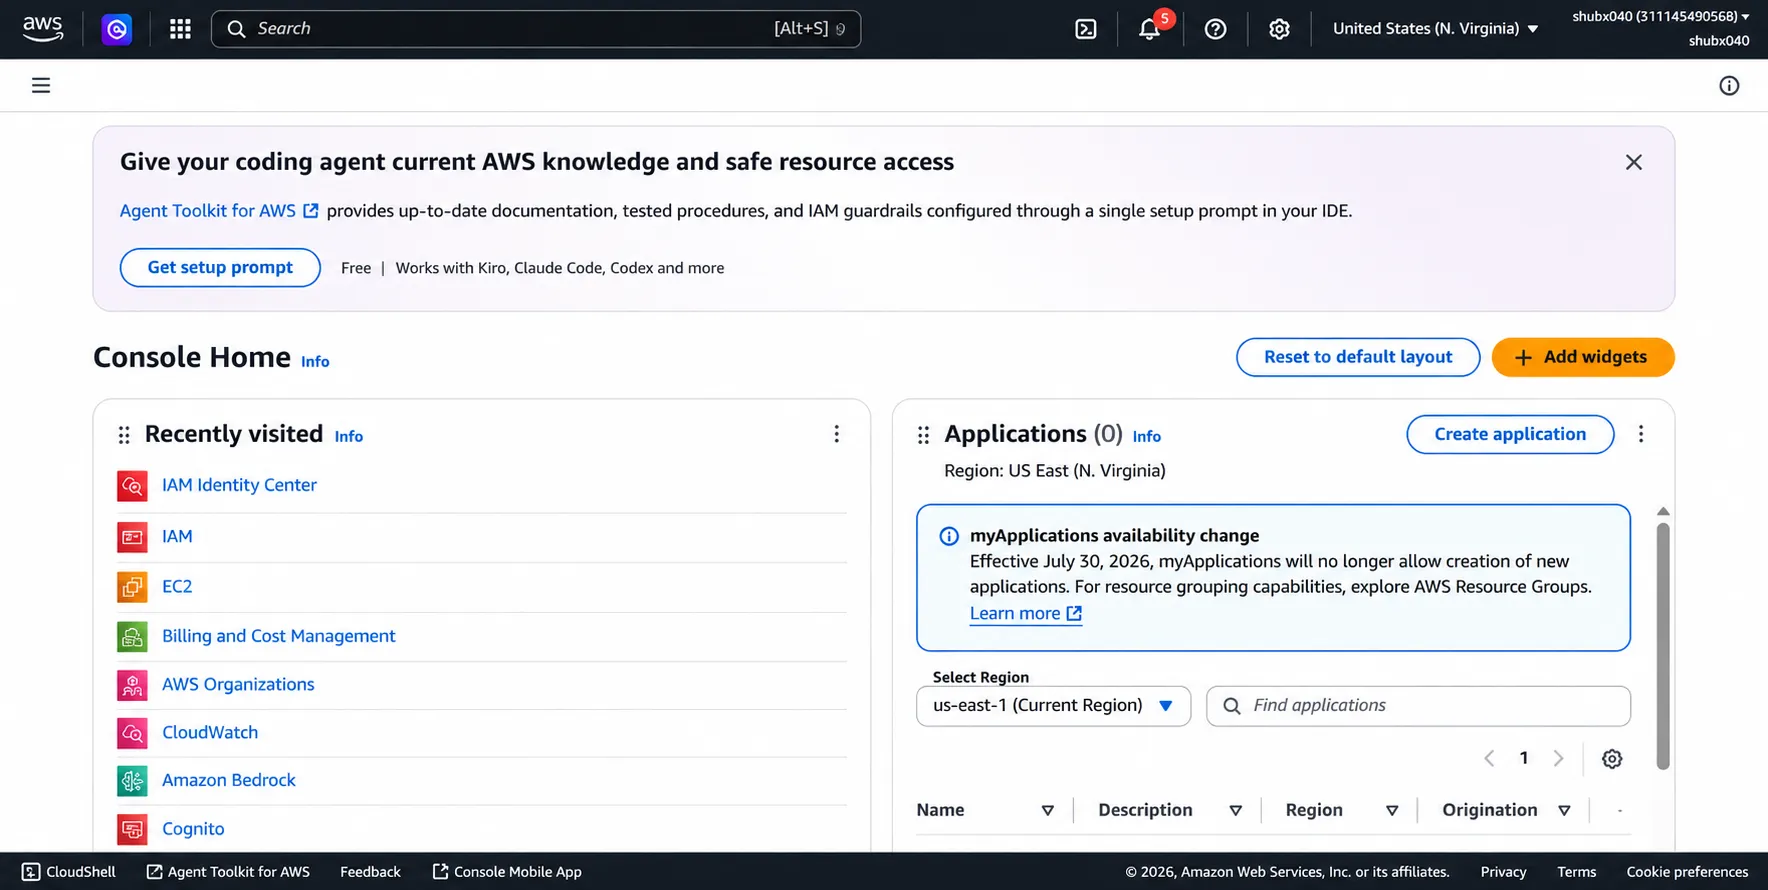
- Log in to the AWS Management Console.
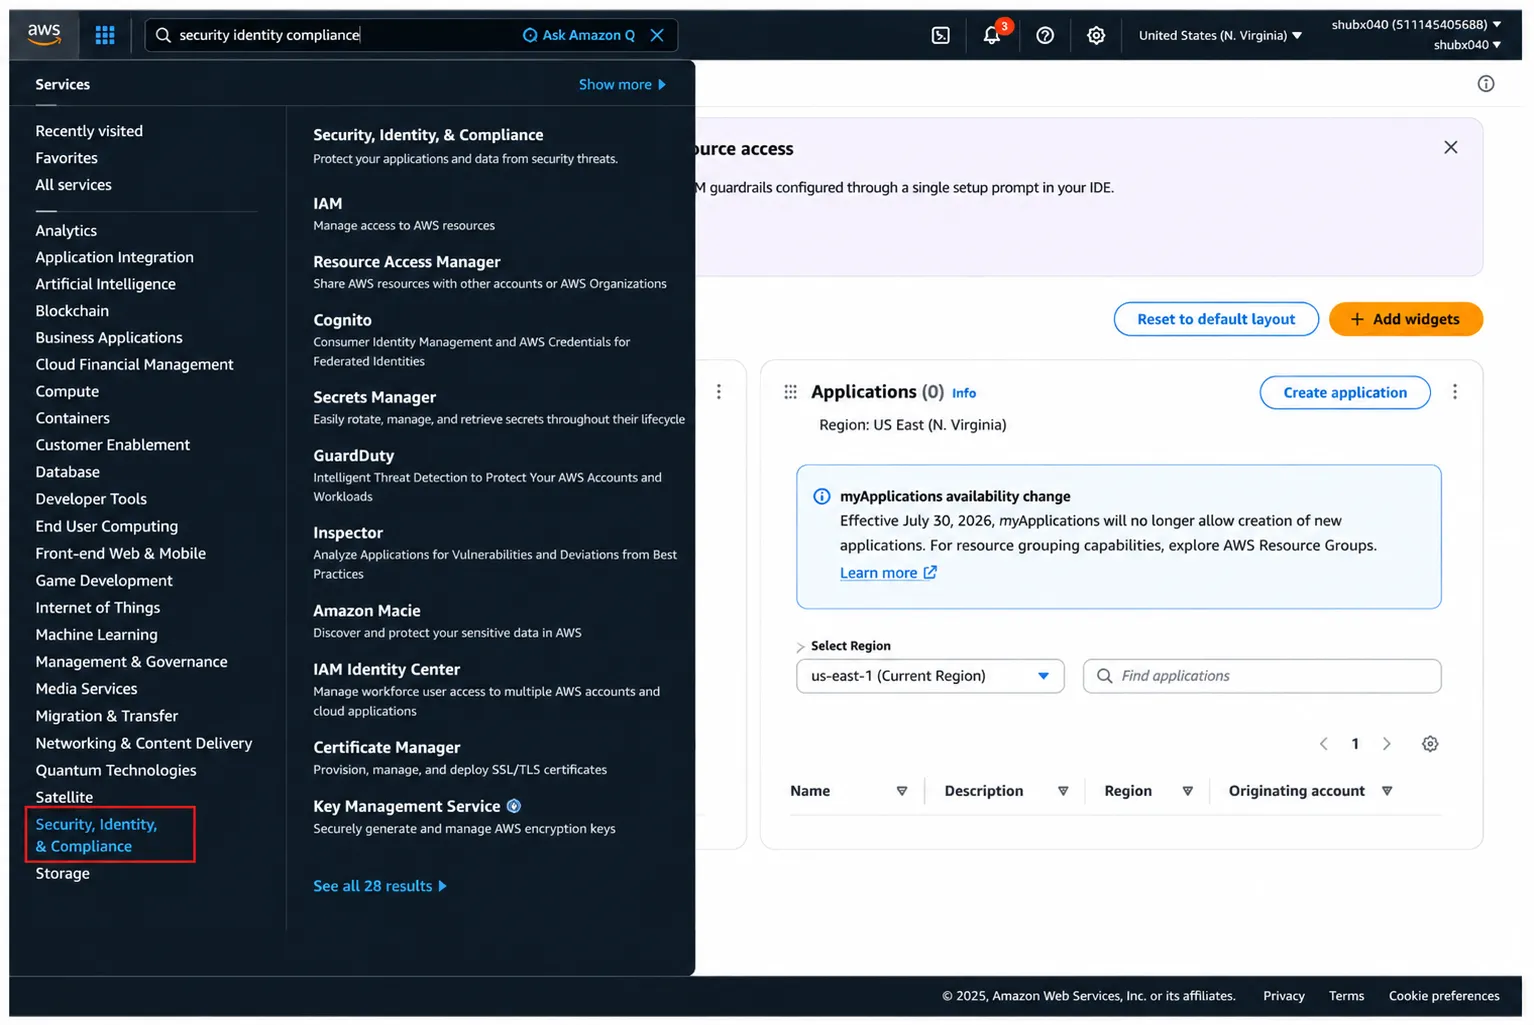
- Navigate to Security, Identity, & Compliance.
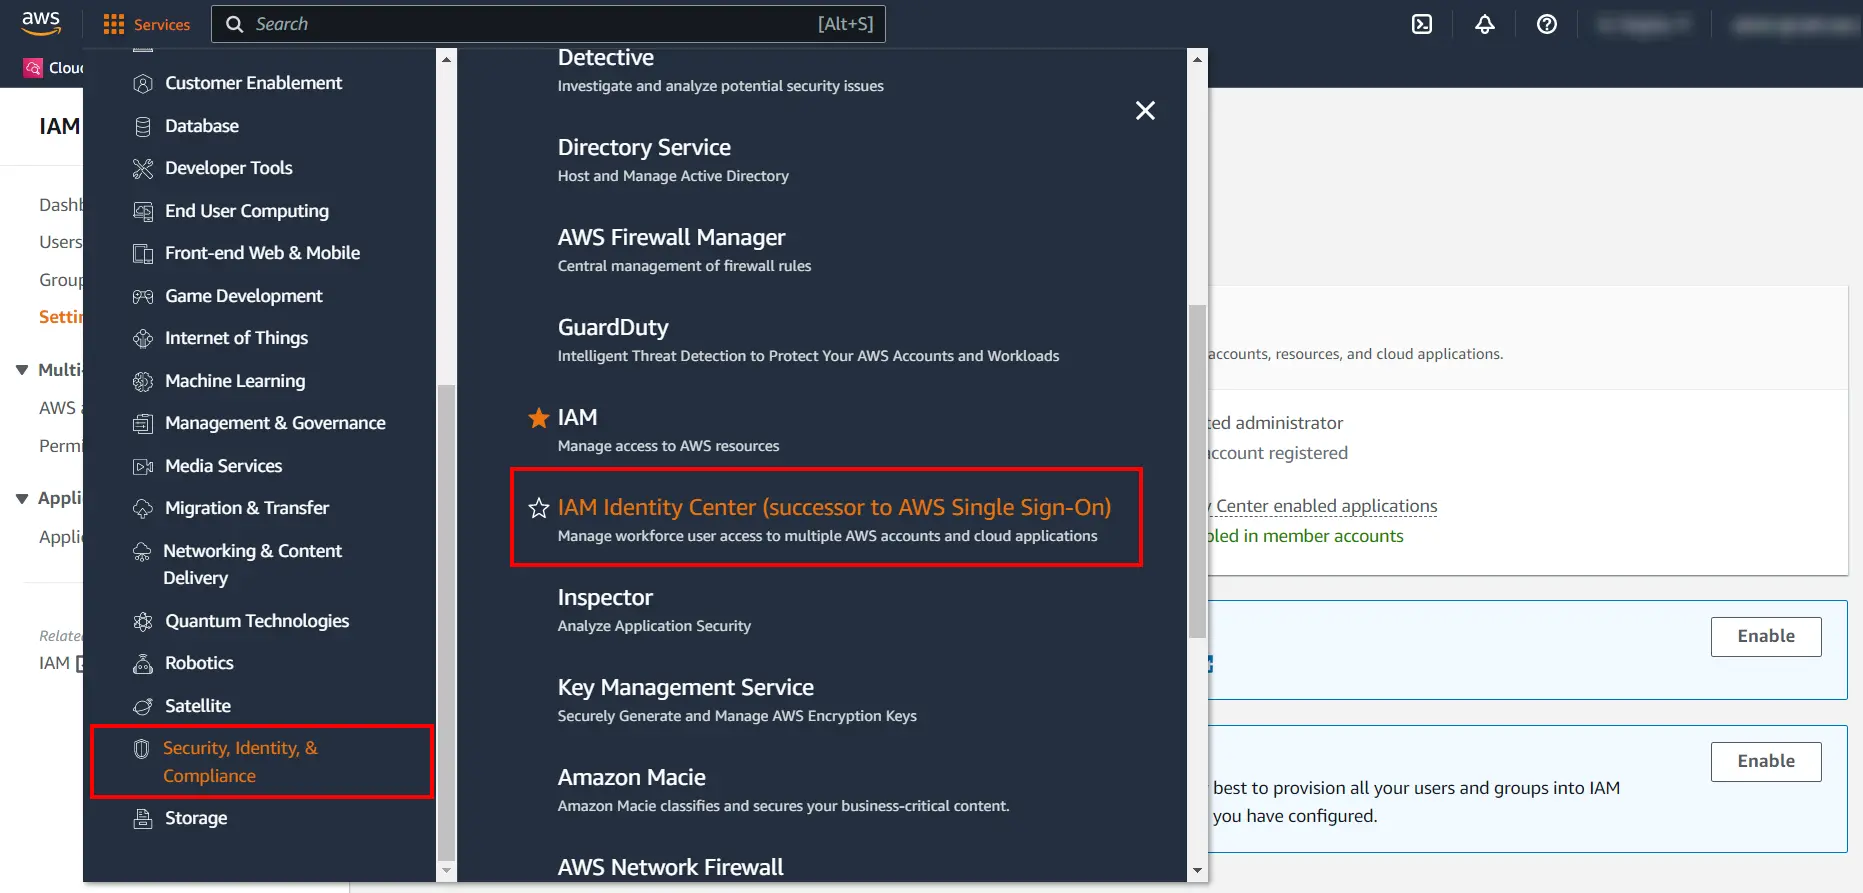
- select IAM Identity Center.
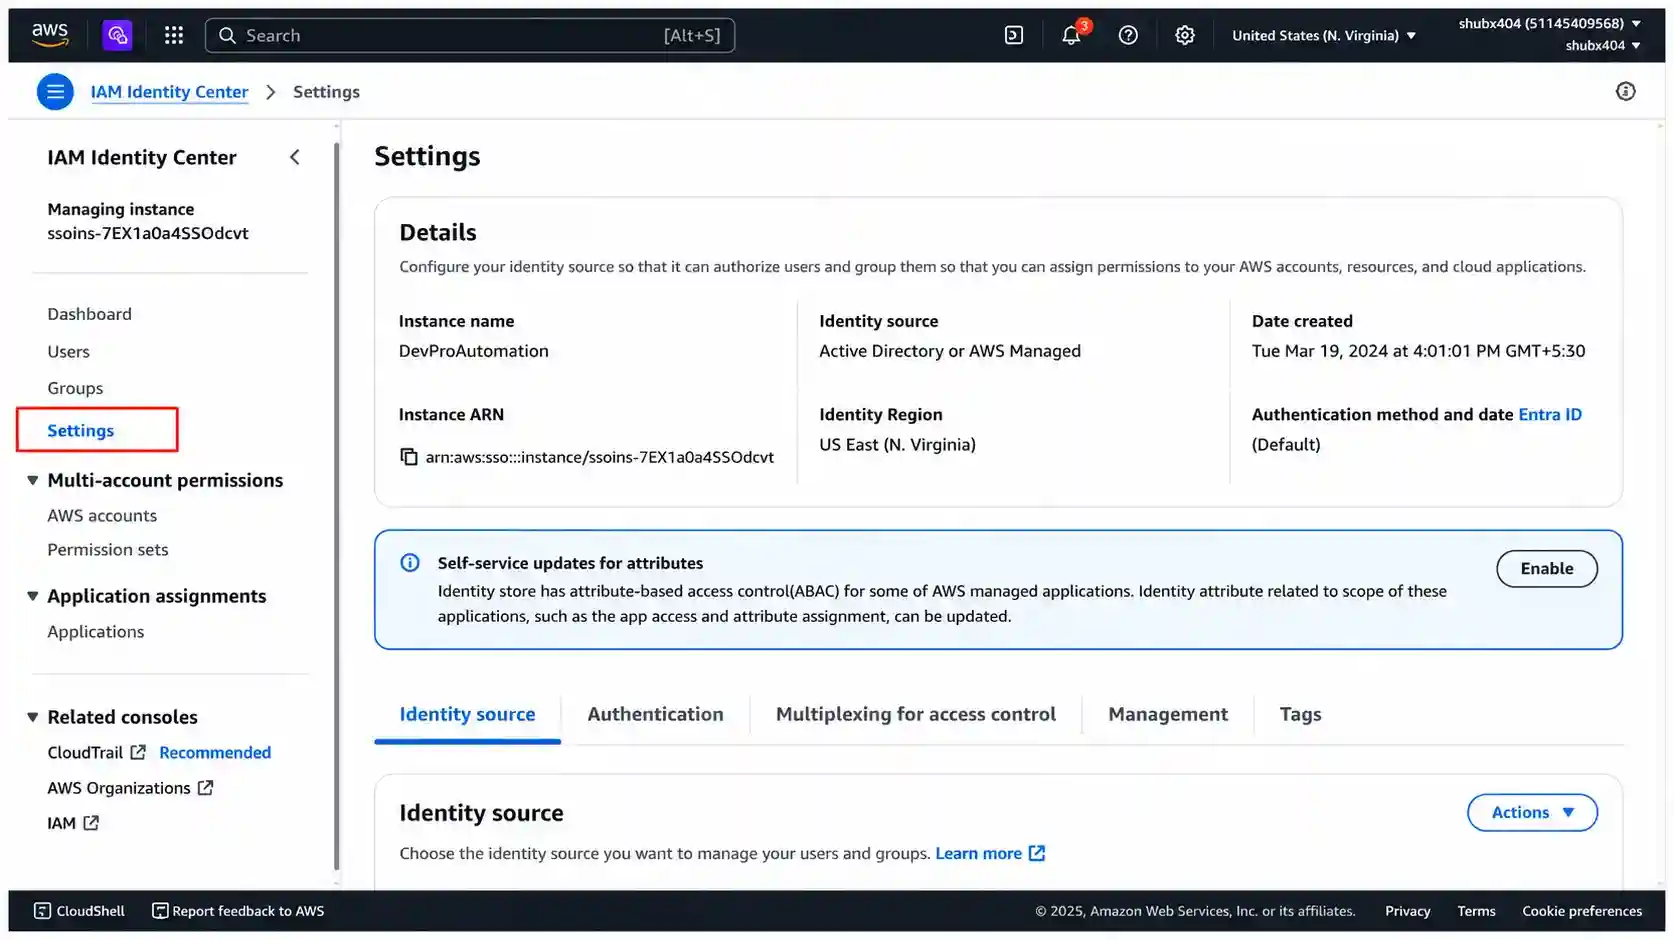
- From the left-side, click Settings.
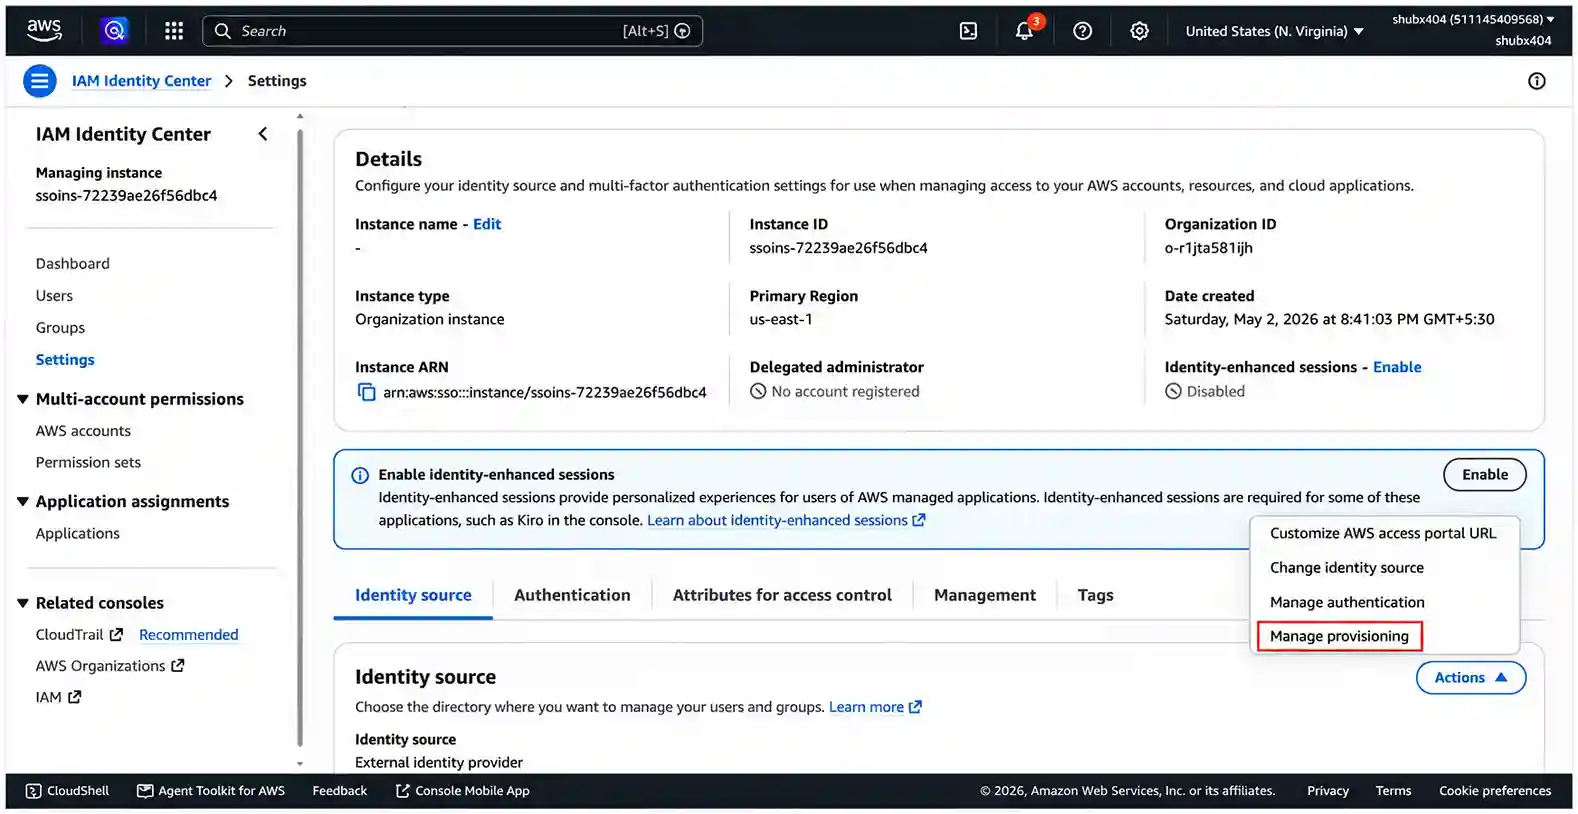
- Navigate to the Identity source tab, click Actions dropdown, and select Manage provisioning.
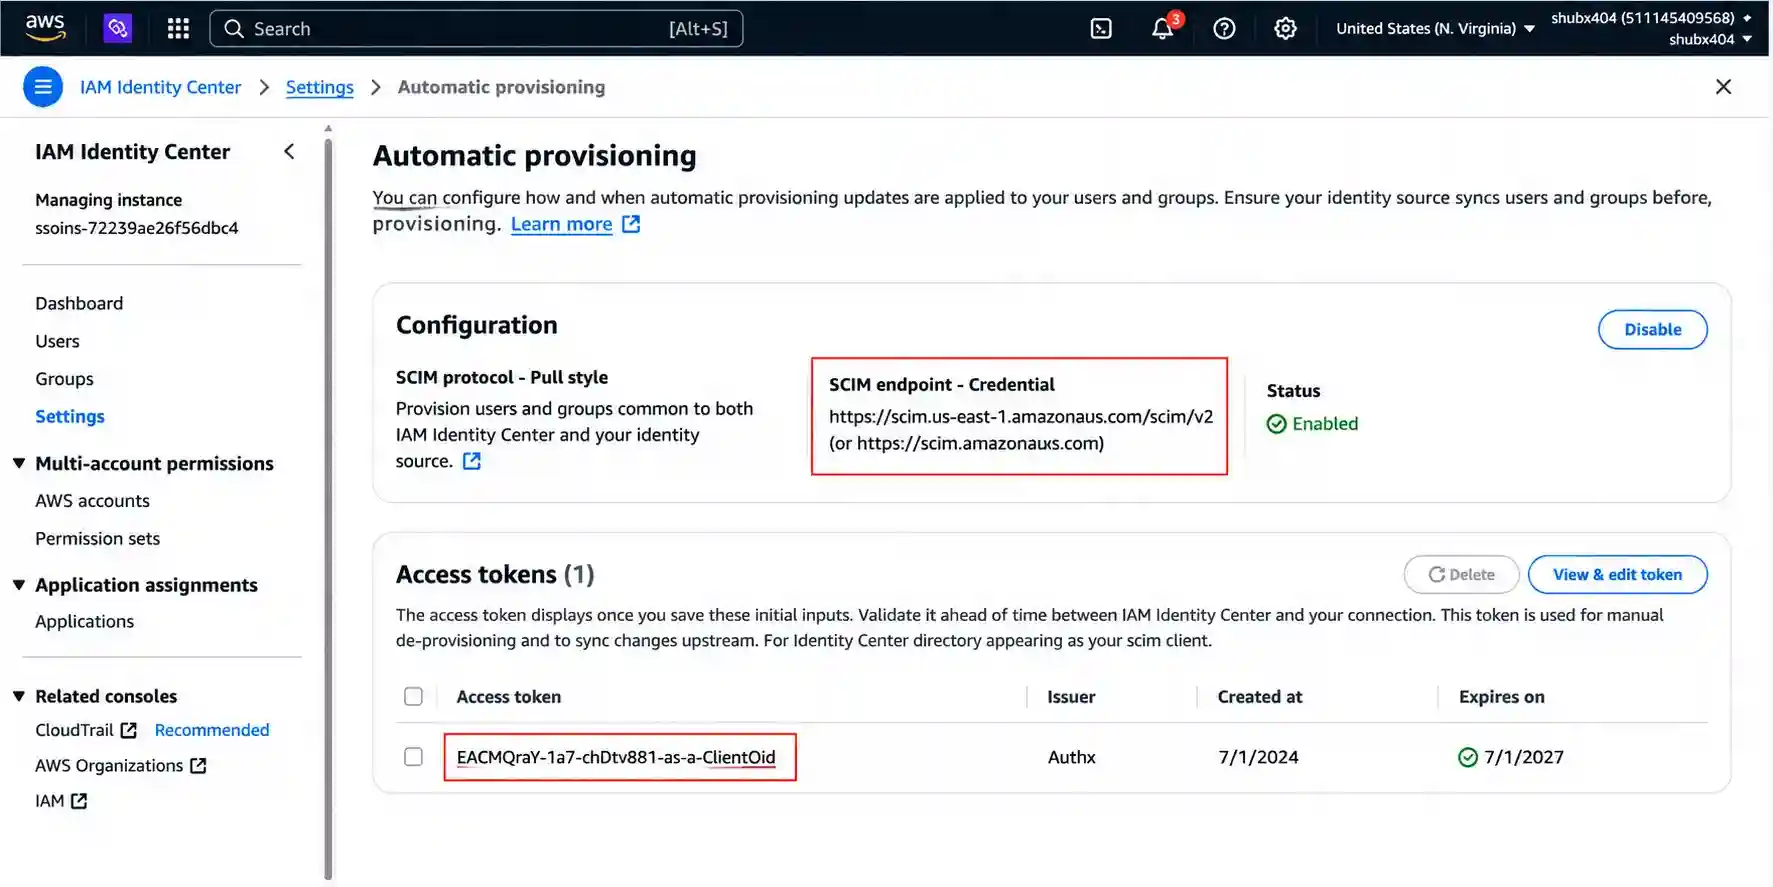
- On the provisioning page, copy the SCIM endpoint and Access token. These details will be required in the next step to configure user provisioning.
2. Configure the AWS SCIM Application in miniOrange
- Log in to miniOrange Admin Dashboard.
- Go to Apps and click Add Application.

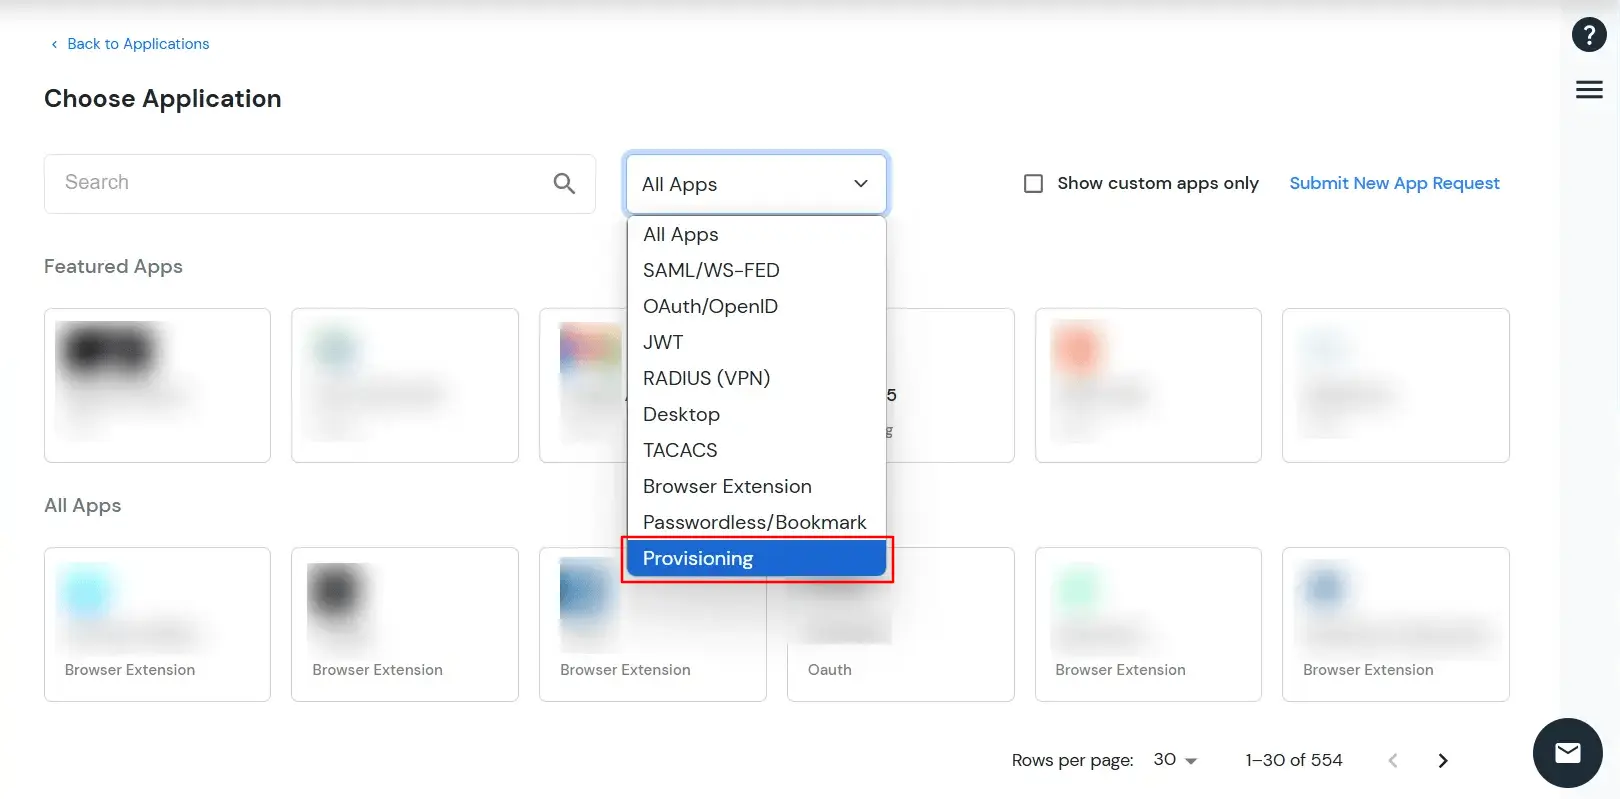
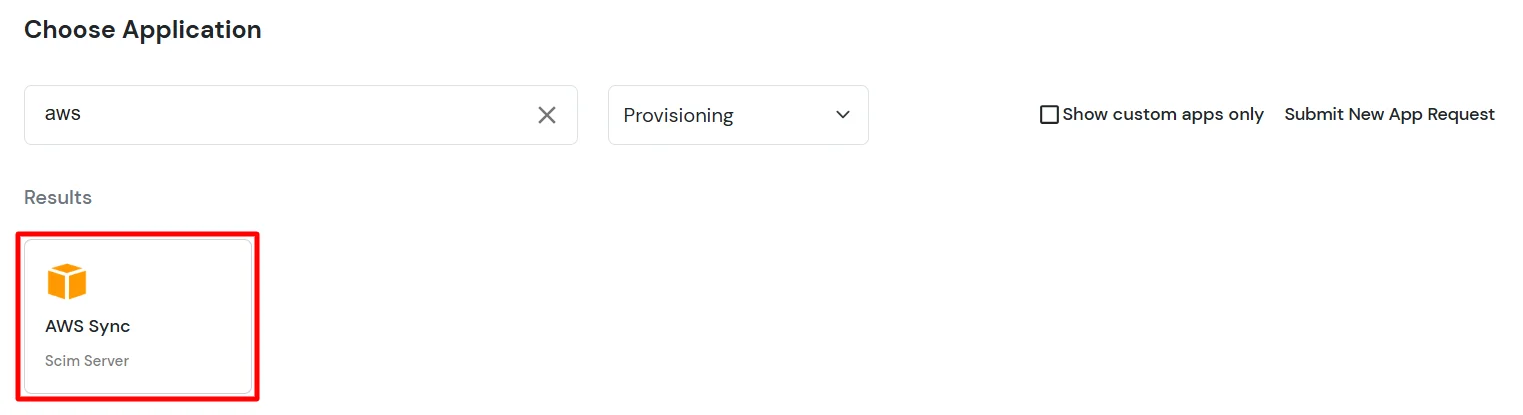
- In the Choose Application section, select Provisioning from All Apps dropdown.
- Search for AWS and select the AWS Sync application.
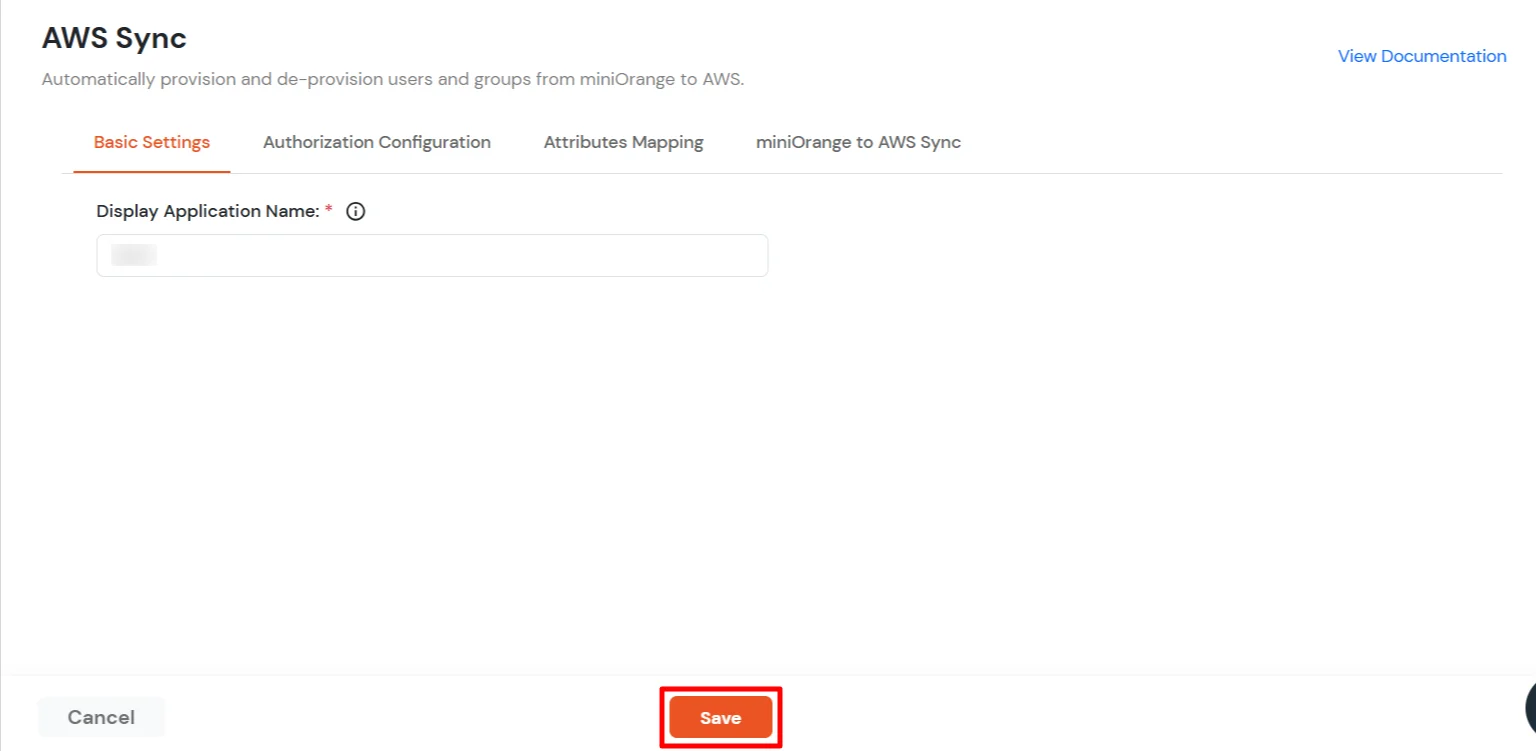
- Under Basic Settings, enter Display Application Name and click Save to add the app.
- In the Authorization tab enter the SCIM Base URL and Bearer Token that you copied in Step 1.
- Click on Test Connection to verify details.
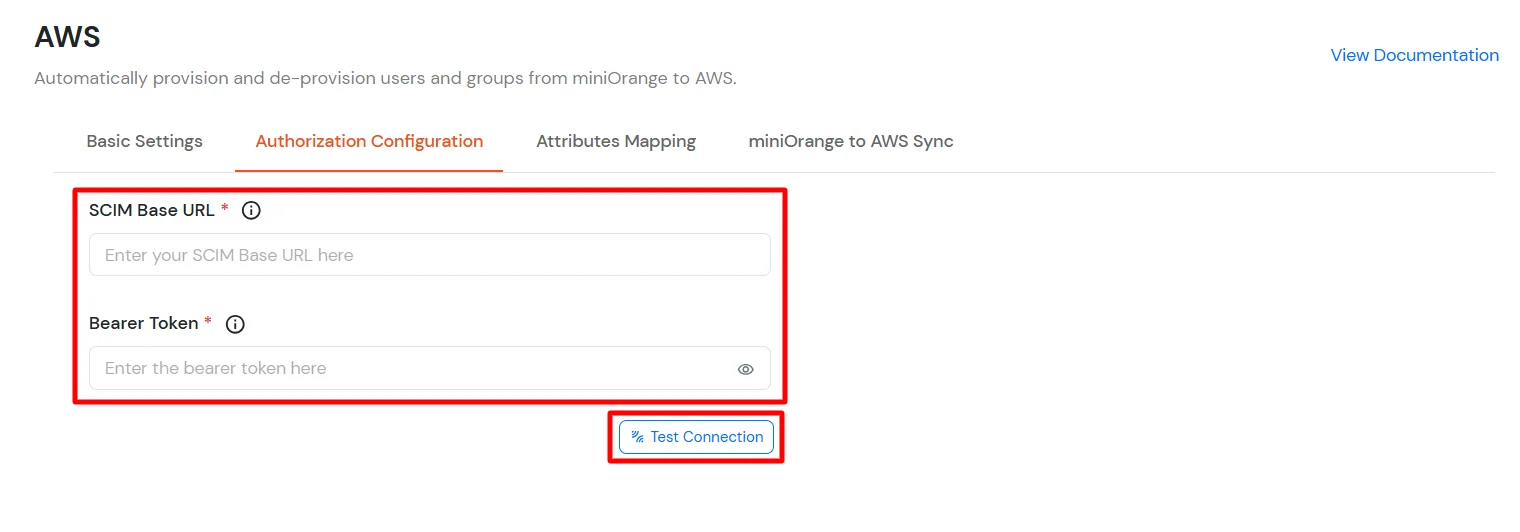
- Click Test Credentials to verify the connection. Once the connection is successfully established, a Connection Successful notification will appear in the top-right corner.
- Then, Click Save & Next to proceed to the Attributes tab.
3. Attribute Mapping
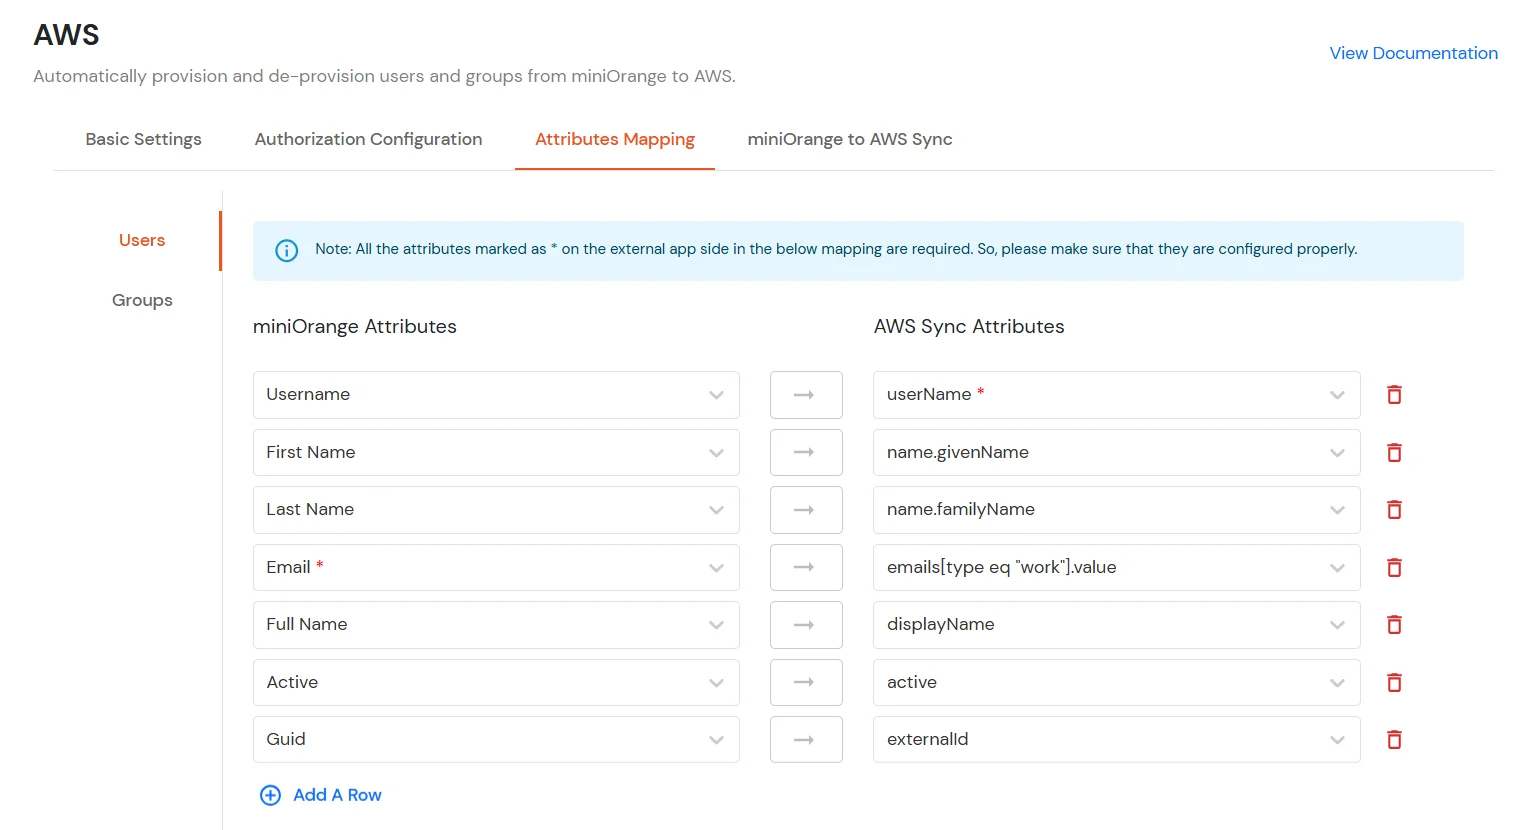
- Under the Attributes tab, you will find two sections: Users and Groups.
- In the Users section, map the required miniOrange Attributes to their corresponding AWS Sync Attributes.
- Once all the required attribute mappings are configured, click Save & Next to proceed.
4. Configure miniOrange to AWS Sync
- In the miniOrange to AWS Sync tab, there are two sections: Users and Groups. Each section contains a list of attributes and their functions when enabled. You can enable or disable them as needed.
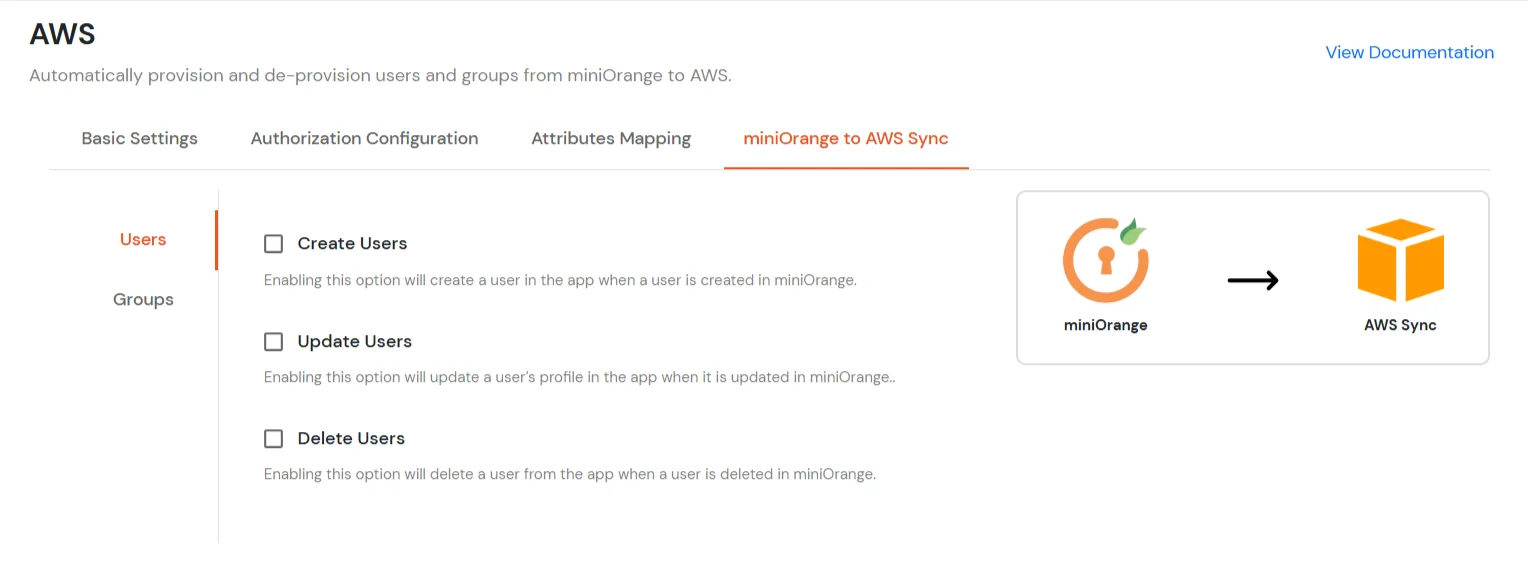
|
Attribute |
Description |
| Users |
Create Users |
Enabling this option will create the user in the selected application upon user creation in miniOrange. |
| Update Users |
Enabling this option will update the user profile in the selected application if updated in miniOrange. |
| Delete Users |
Enabling this option will delete the user from the selected application if the user is deleted from the miniOrange. |
|
Attribute |
Description |
| Groups |
Create Group |
Enabling this option will create the Group in the selected application upon Group creation in miniOrange. |
| Delete Group |
Enabling this option will delete the Group from the selected application if the Group is deleted from the miniOrange. |
| Add/Remove Group membership of User |
Enabling this option will add/remove the Group membership of a user from the selected application if the respective user group membership is updated from the miniOrange. |
| Update Group |
Enabling this option will update the Group in the selected application upon Group updation in miniOrange. |
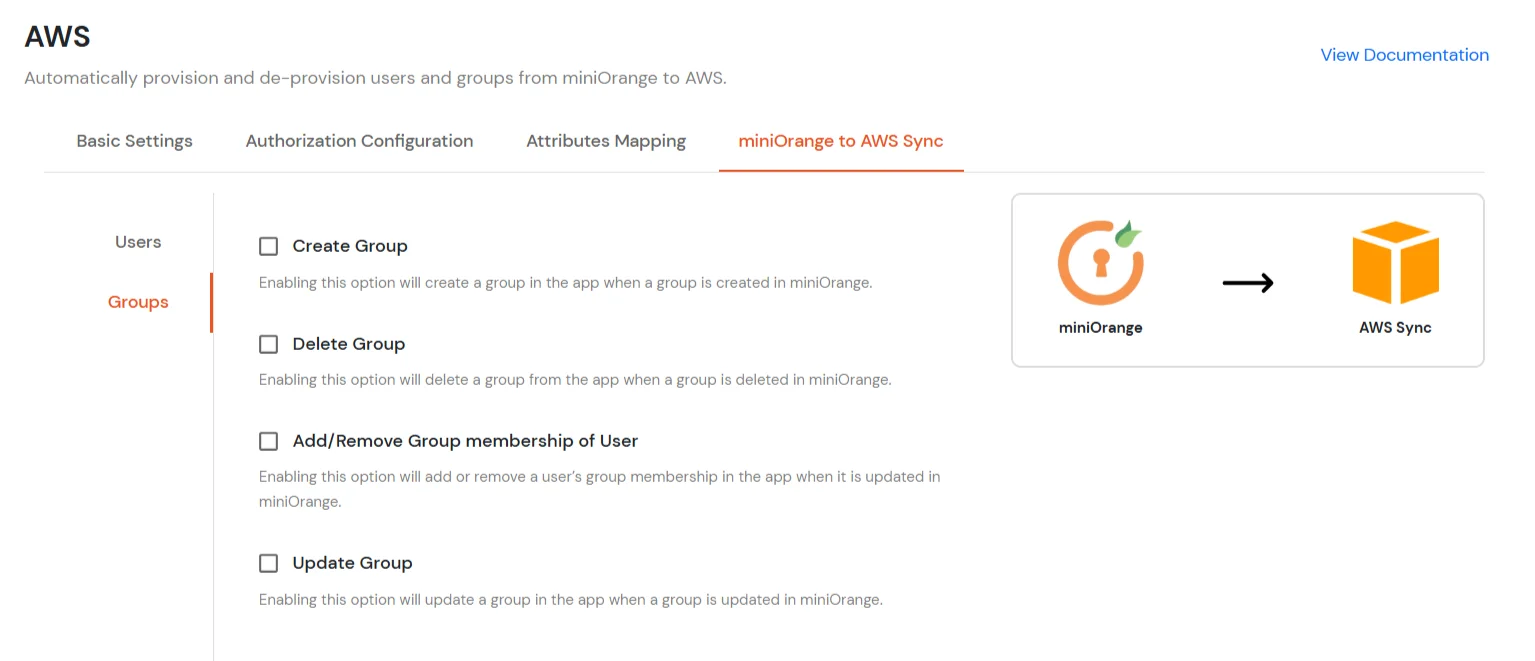
- Click Save to apply these changes.
5. Create Group
To create a group, follow these steps:
- From the left-hand sidebar, navigate to Groups >> Manage Groups. Click the Add Group button.
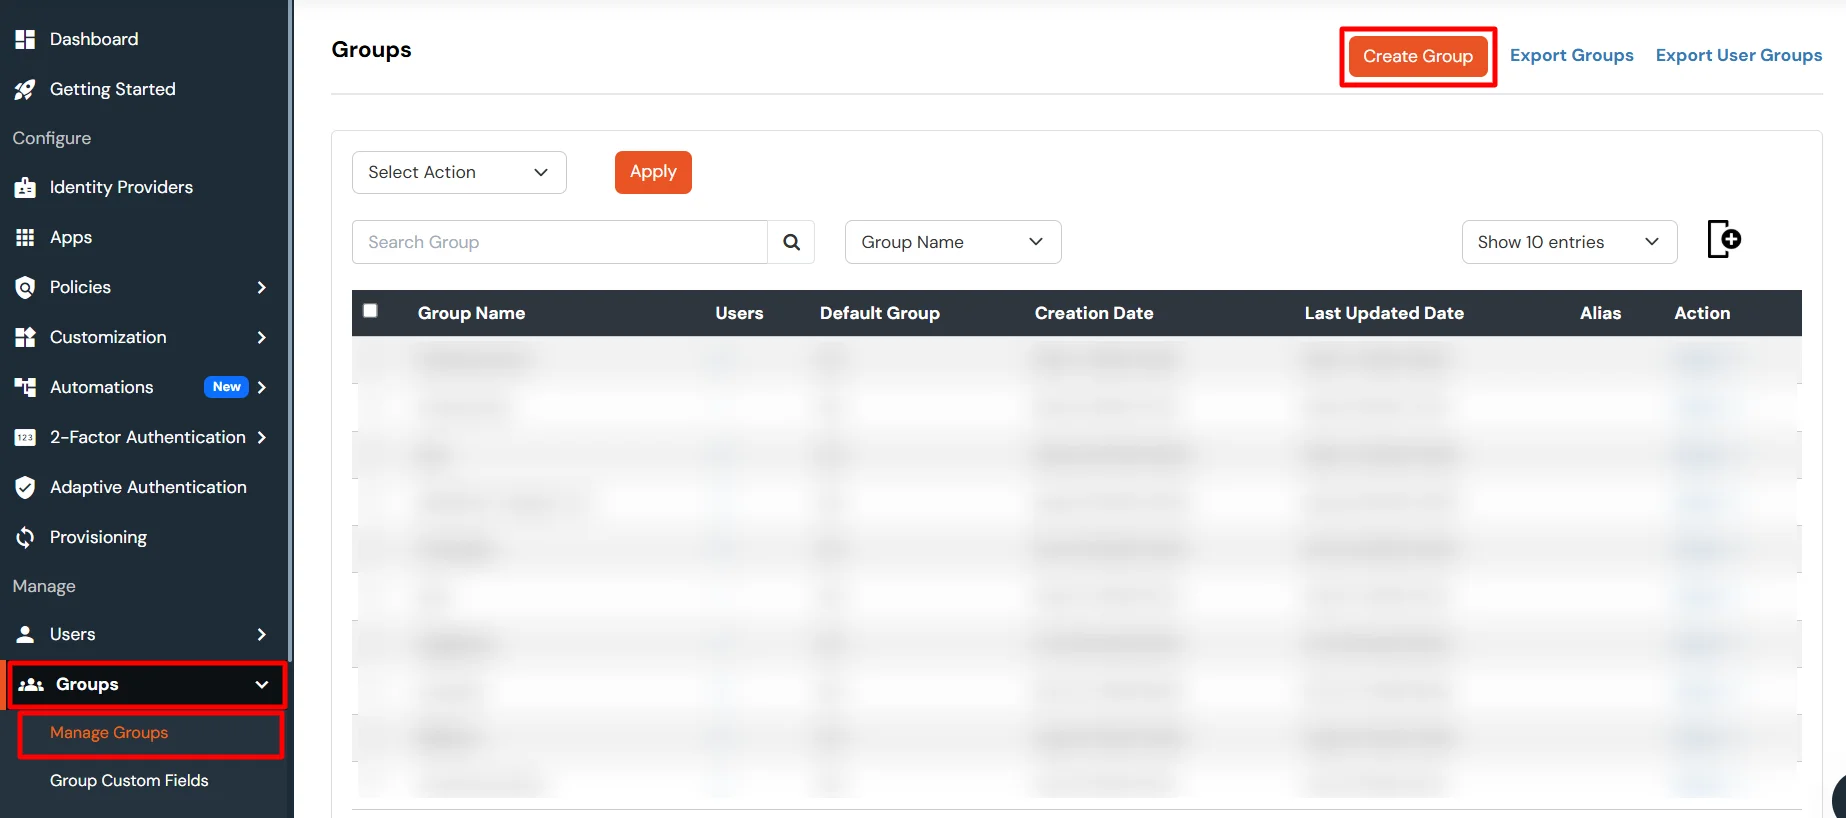
- Enter a Group Name (for example, AWSProvisioning) and click Create Group.
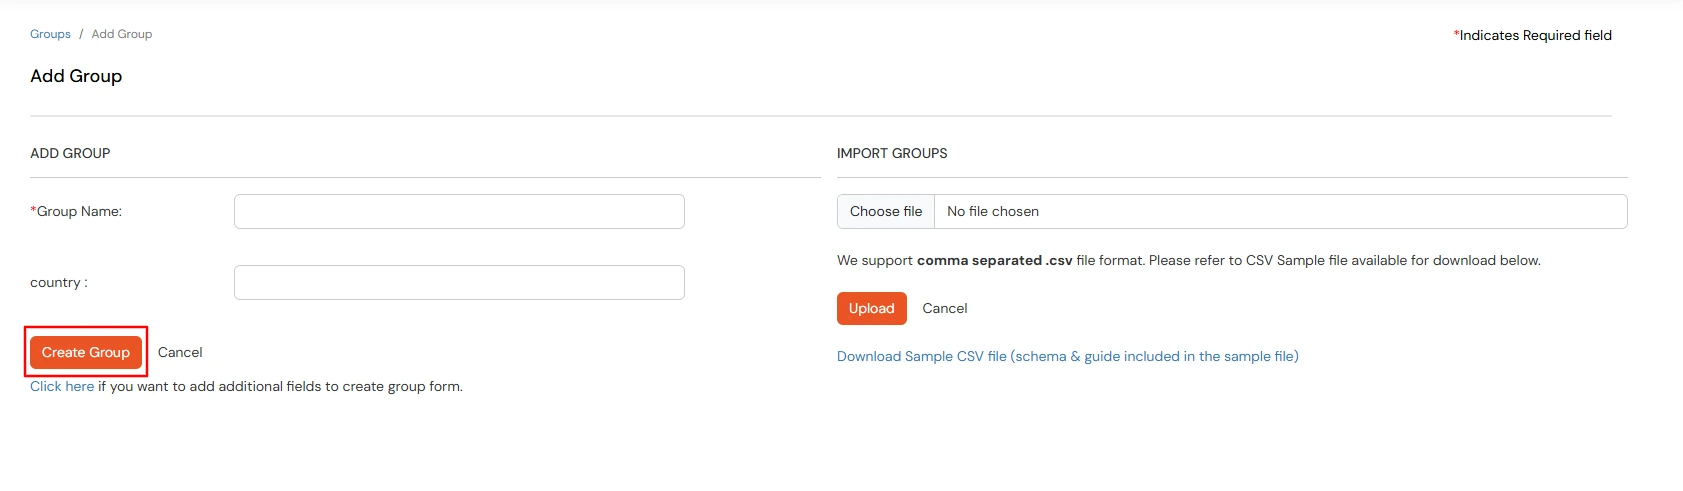
- You will be redirected to the Groups List Screen when you can see the newly created group.
6. App Policy (Provision Group to AWS Sync App)
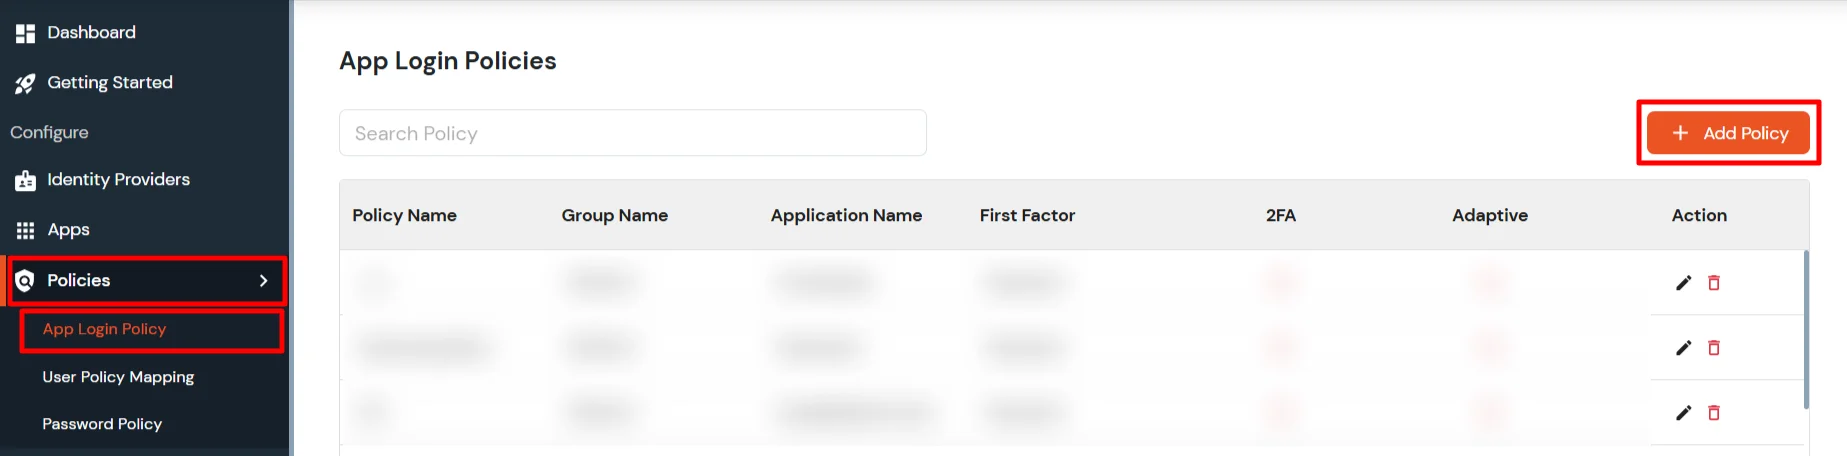
- Navigate to Policies >> App Login Policy.
- Click Add Policy.
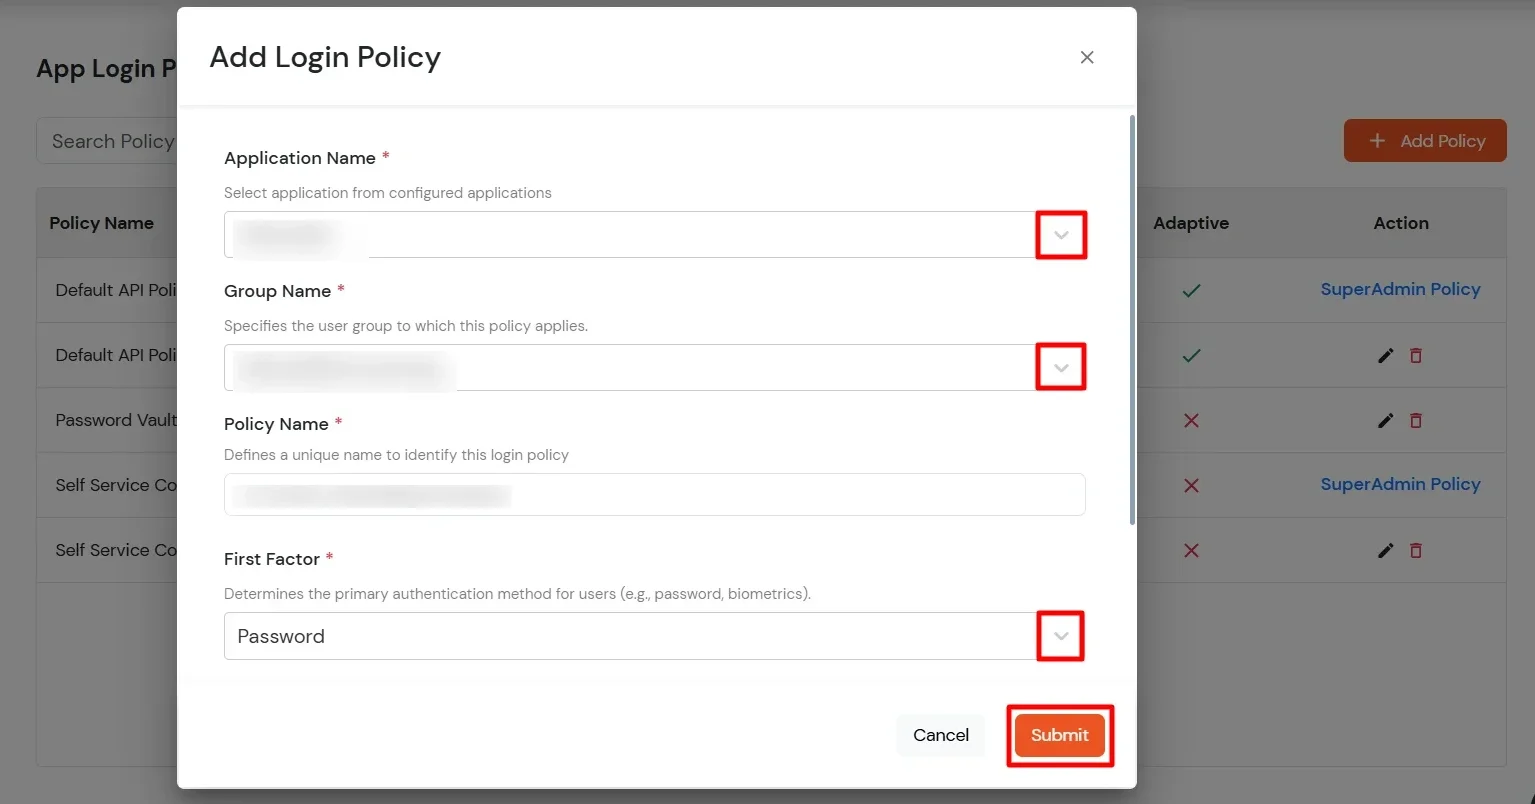
- Select the application that you configured earlier under the Apps tab (for example, AWS).
- Select the group you created. Click Submit to create the policy. Once the policy is created successfully, a success notification will be displayed. The newly created policy will also appear under the App Login Policy section.
- The provisioning configuration is now complete. You can proceed to verify whether user provisioning is working as expected.
7. Verify User Provisioning to AWS
- Navigate to Groups >> Manage Groups. Click Select for the group and choose Assign Users.
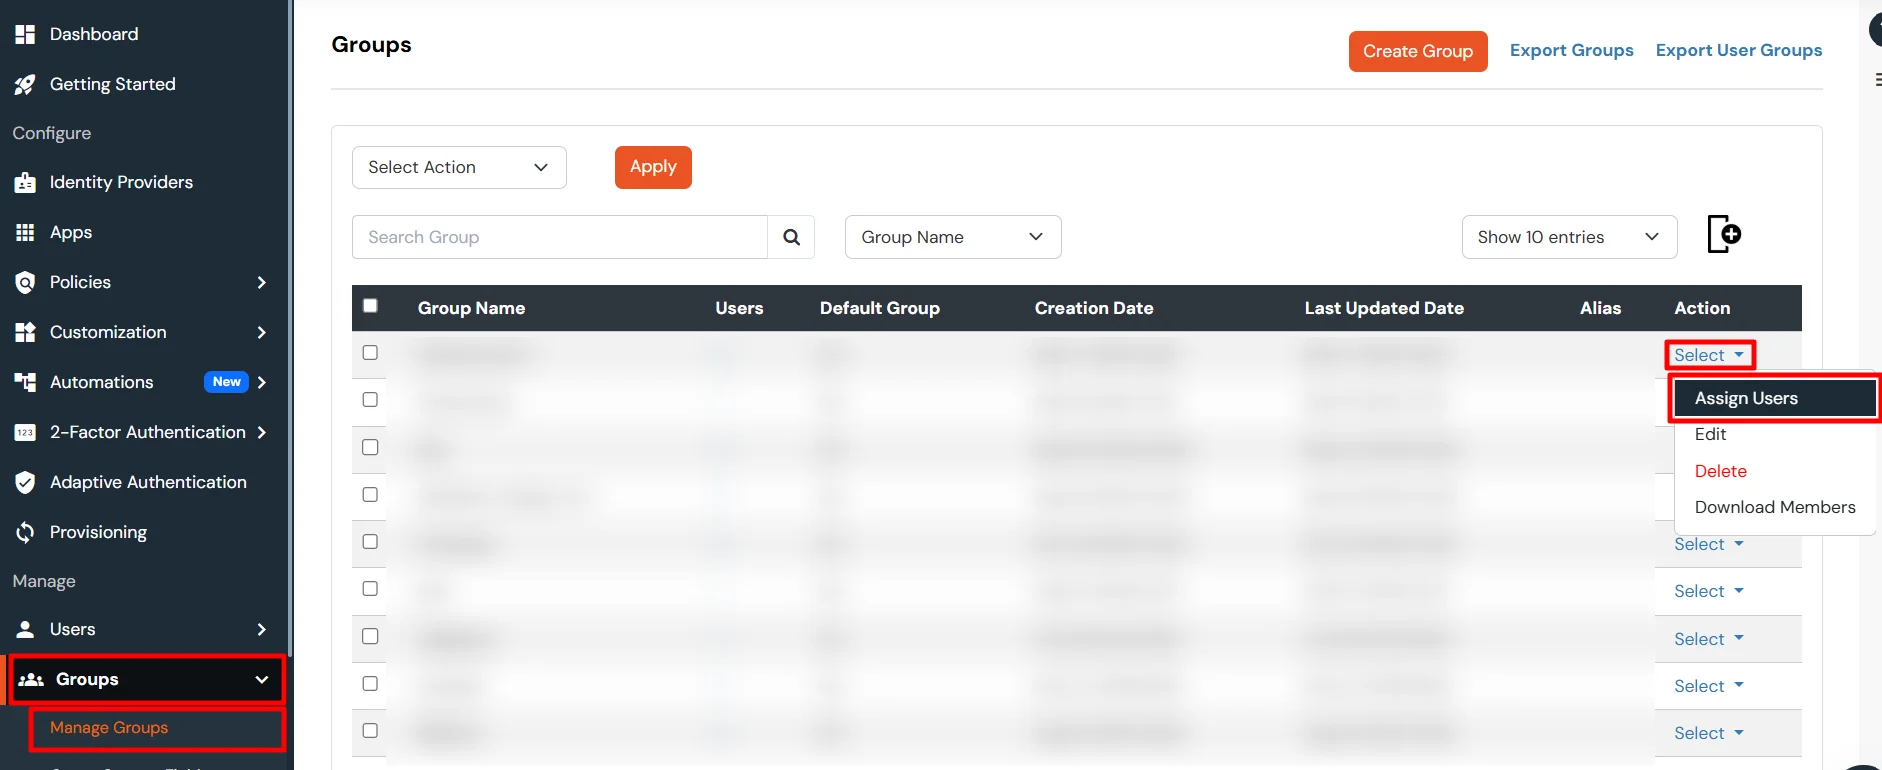
- Ensure that the users you want to provision are already available in the miniOrange User List. If the users are not available, import or create them before proceeding.
- From the user list, select the user(s) you want to provision to AWS. Once the users are assigned to the provisioning group, they will be automatically provisioned to AWS through the configured SCIM connection.

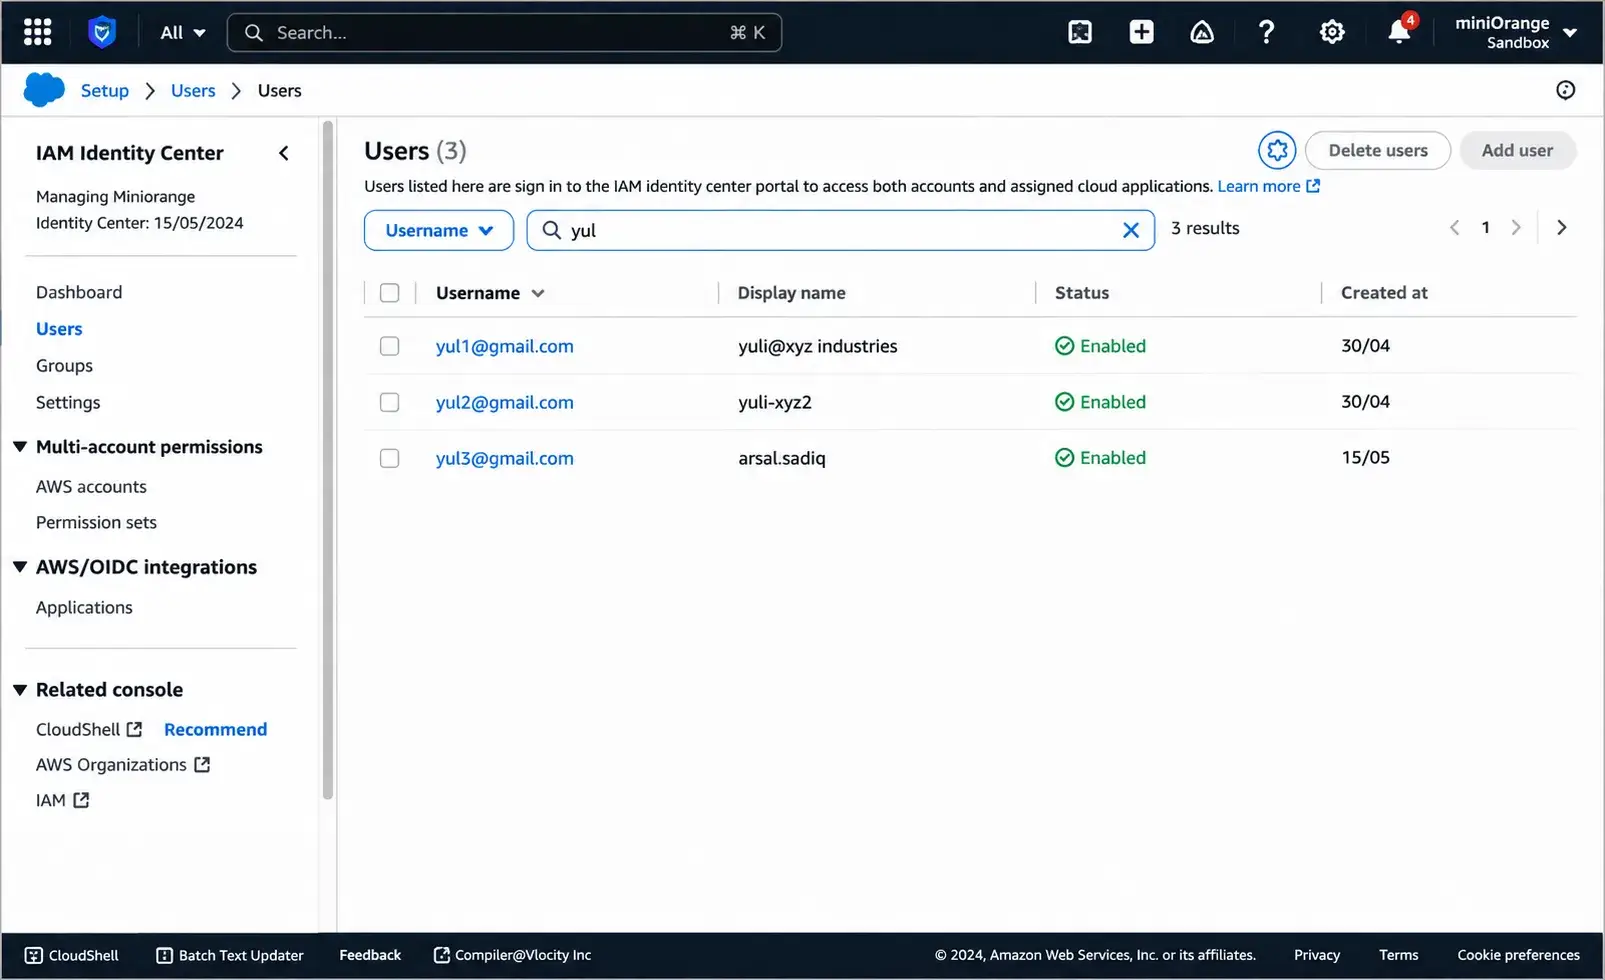
- Verify the users in AWS IAM Identity Center to confirm that they have been created successfully.
Update and Verify a Provisioned User
To verify user update synchronization between miniOrange and AWS:
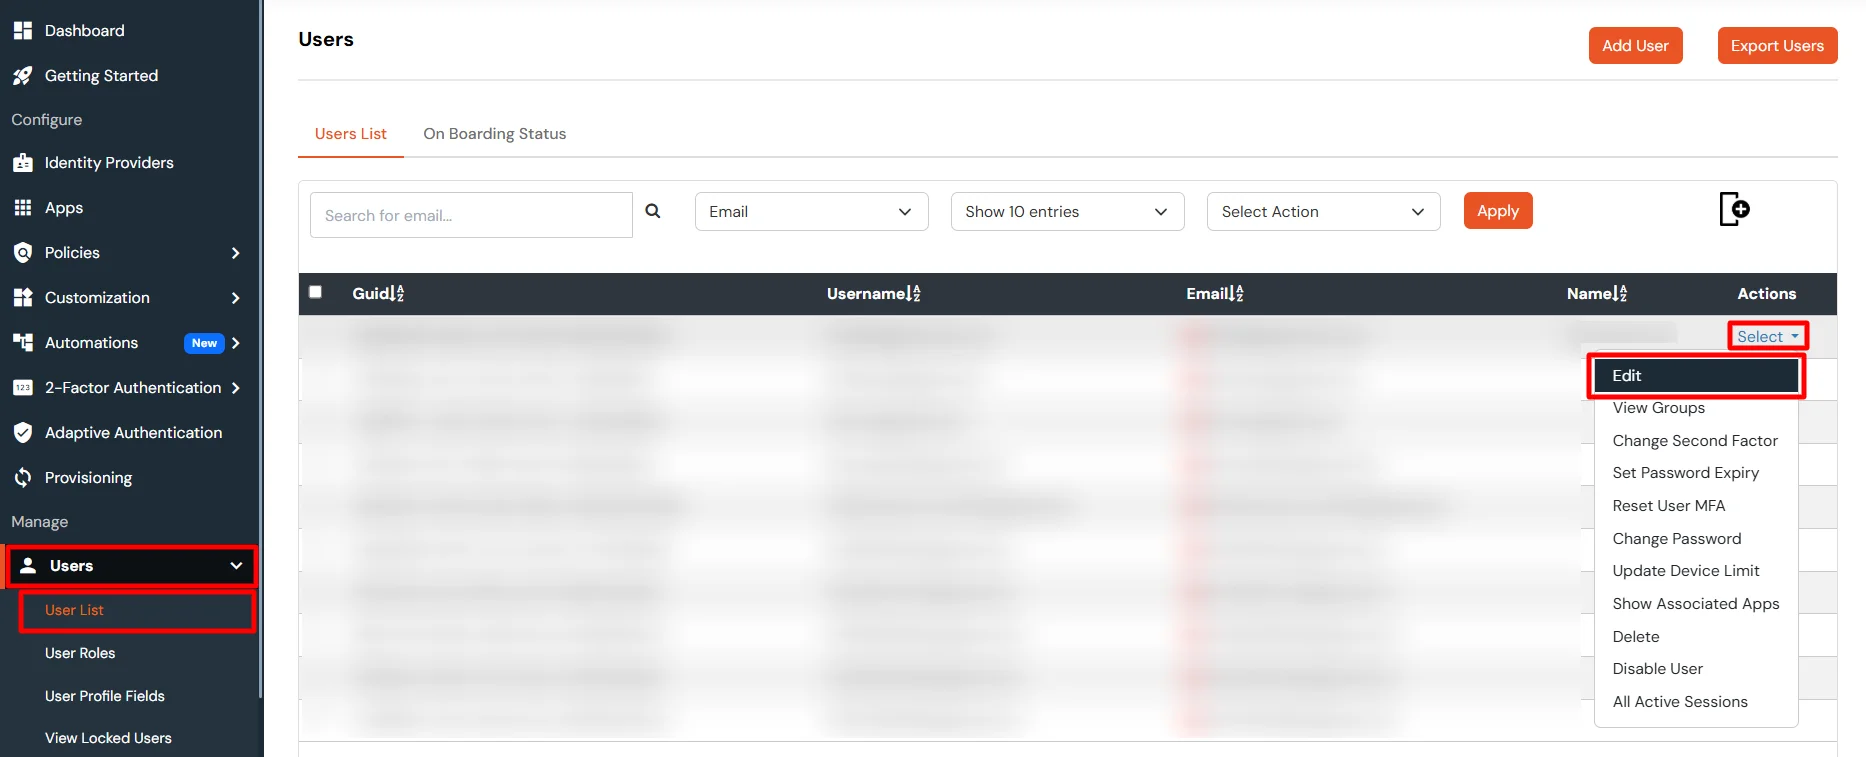
- Navigate to Users >> User List in the miniOrange Admin Dashboard.
- Locate the user whose details you want to modify.
- Click the three-dot menu in the Action column, then select Edit.
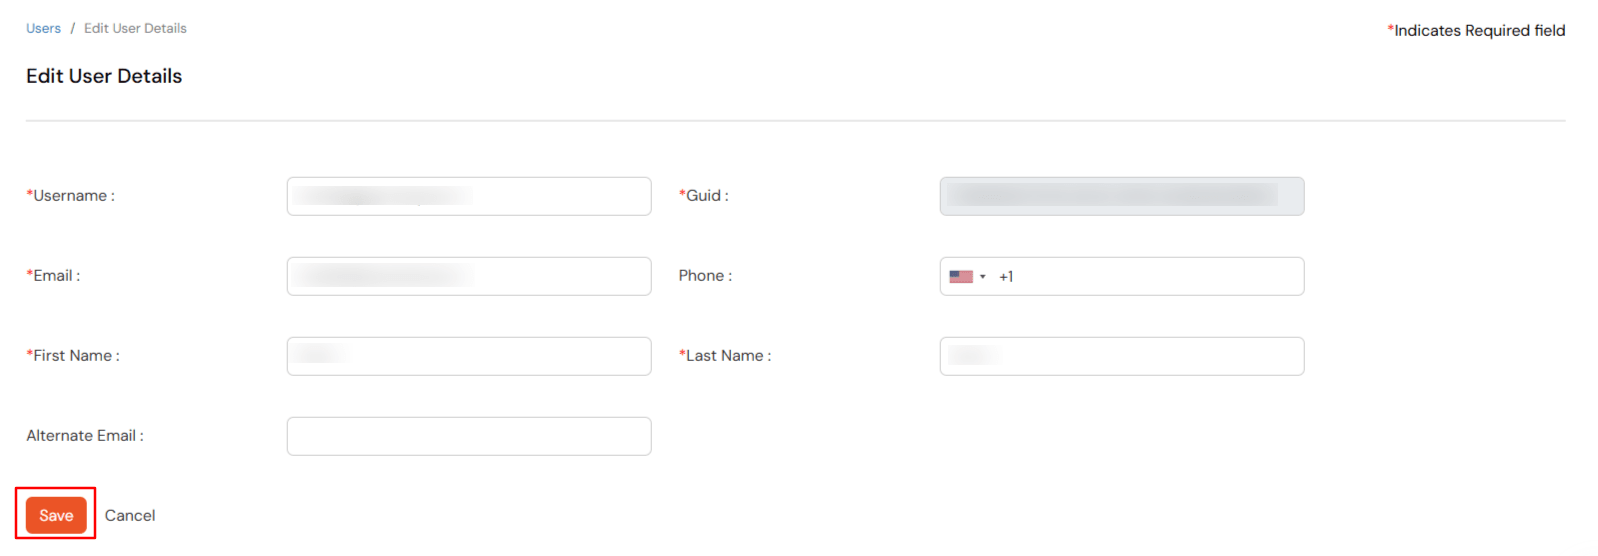
- Update the required user attributes.
- Click Save to apply the changes.
- The updated user information will be automatically synchronized with AWS through SCIM provisioning.
- Verify the user details in AWS IAM Identity Center to confirm that the changes have been synchronized successfully.
- Navigate to Users >> User List in the miniOrange Admin Dashboard.
- Locate the user you want to delete.
- Click the three-dot menu in the Action column, then select Delete.
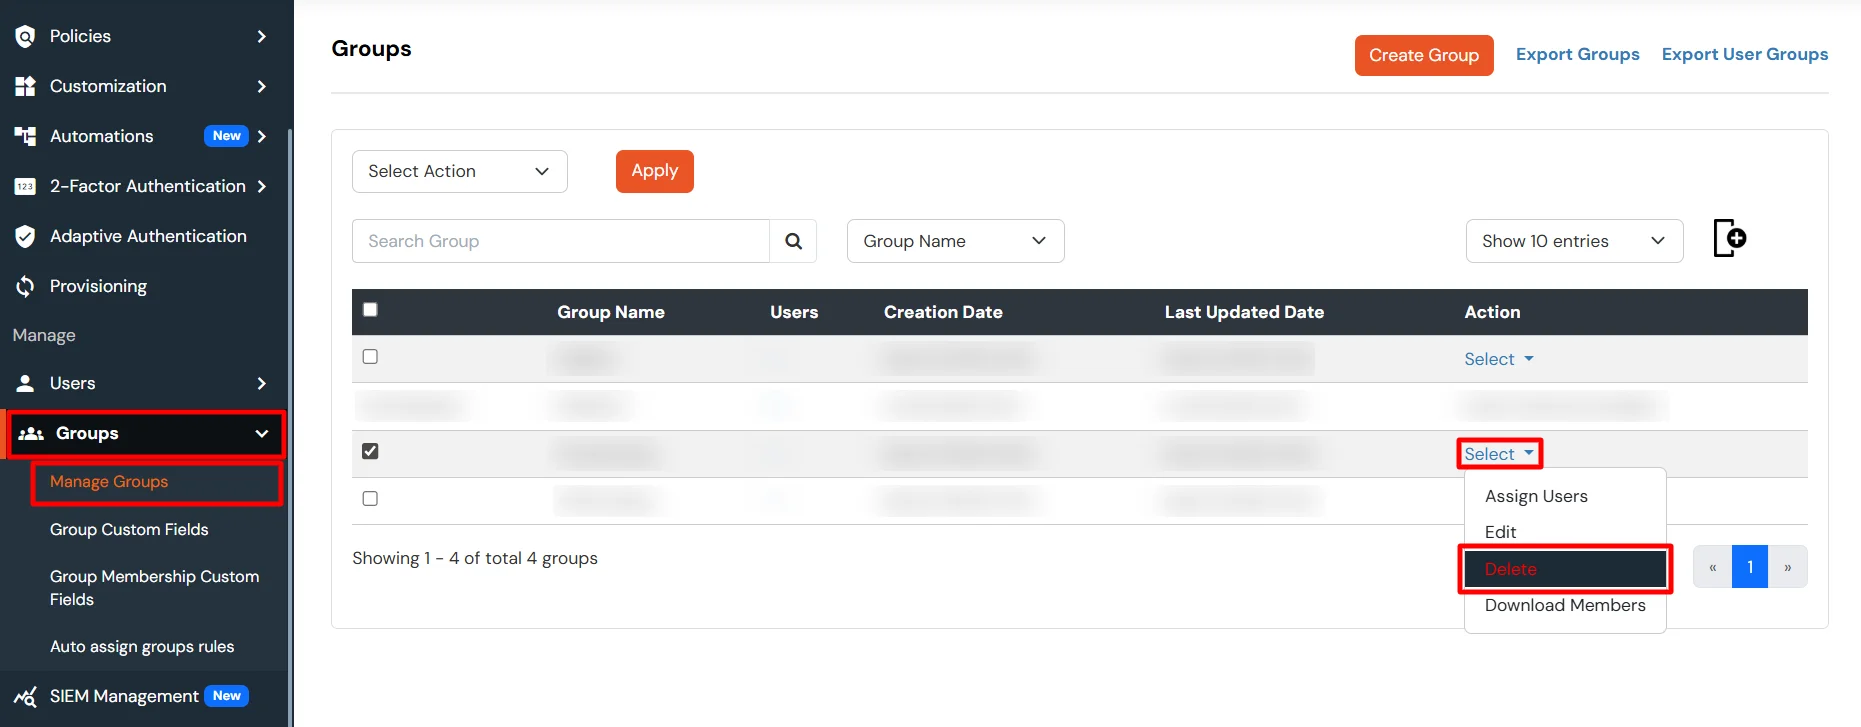
- The user will be automatically removed from AWS through SCIM provisioning.
- Verify the user in AWS IAM Identity Center to confirm that the deletion has been synchronized successfully.
Import AWS Users into miniOrange
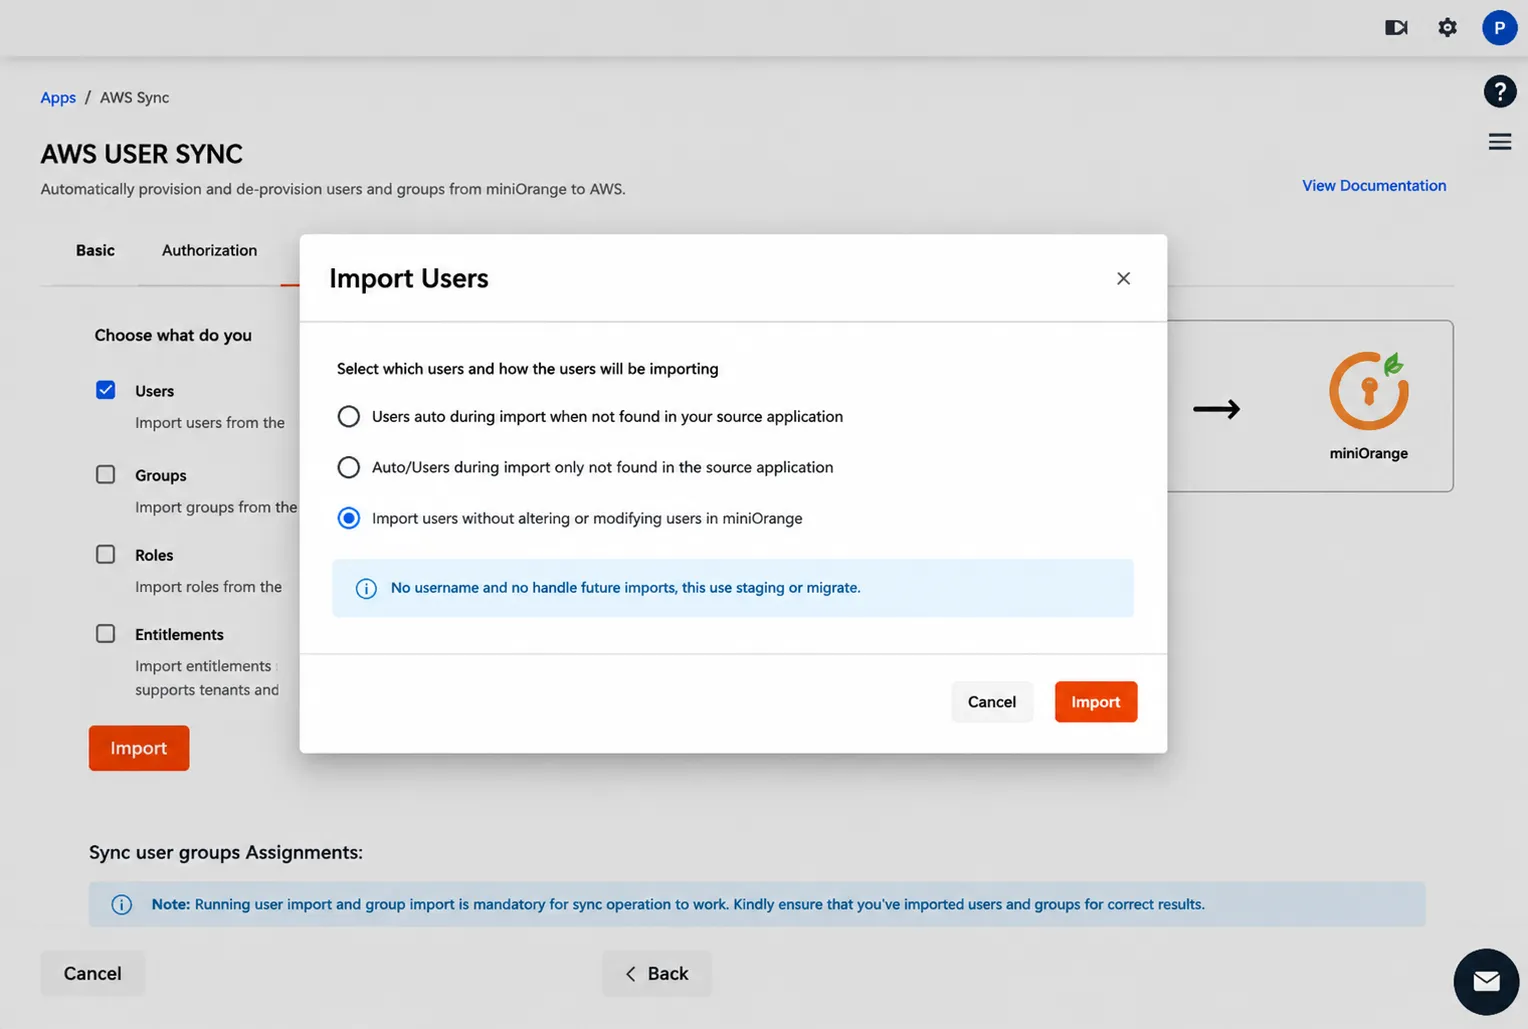
- To sync users from AWS to miniOrange, navigate to the AWS Sync Provisioning application in miniOrange.
- Click on Users to Import. A pop-up window will appear.
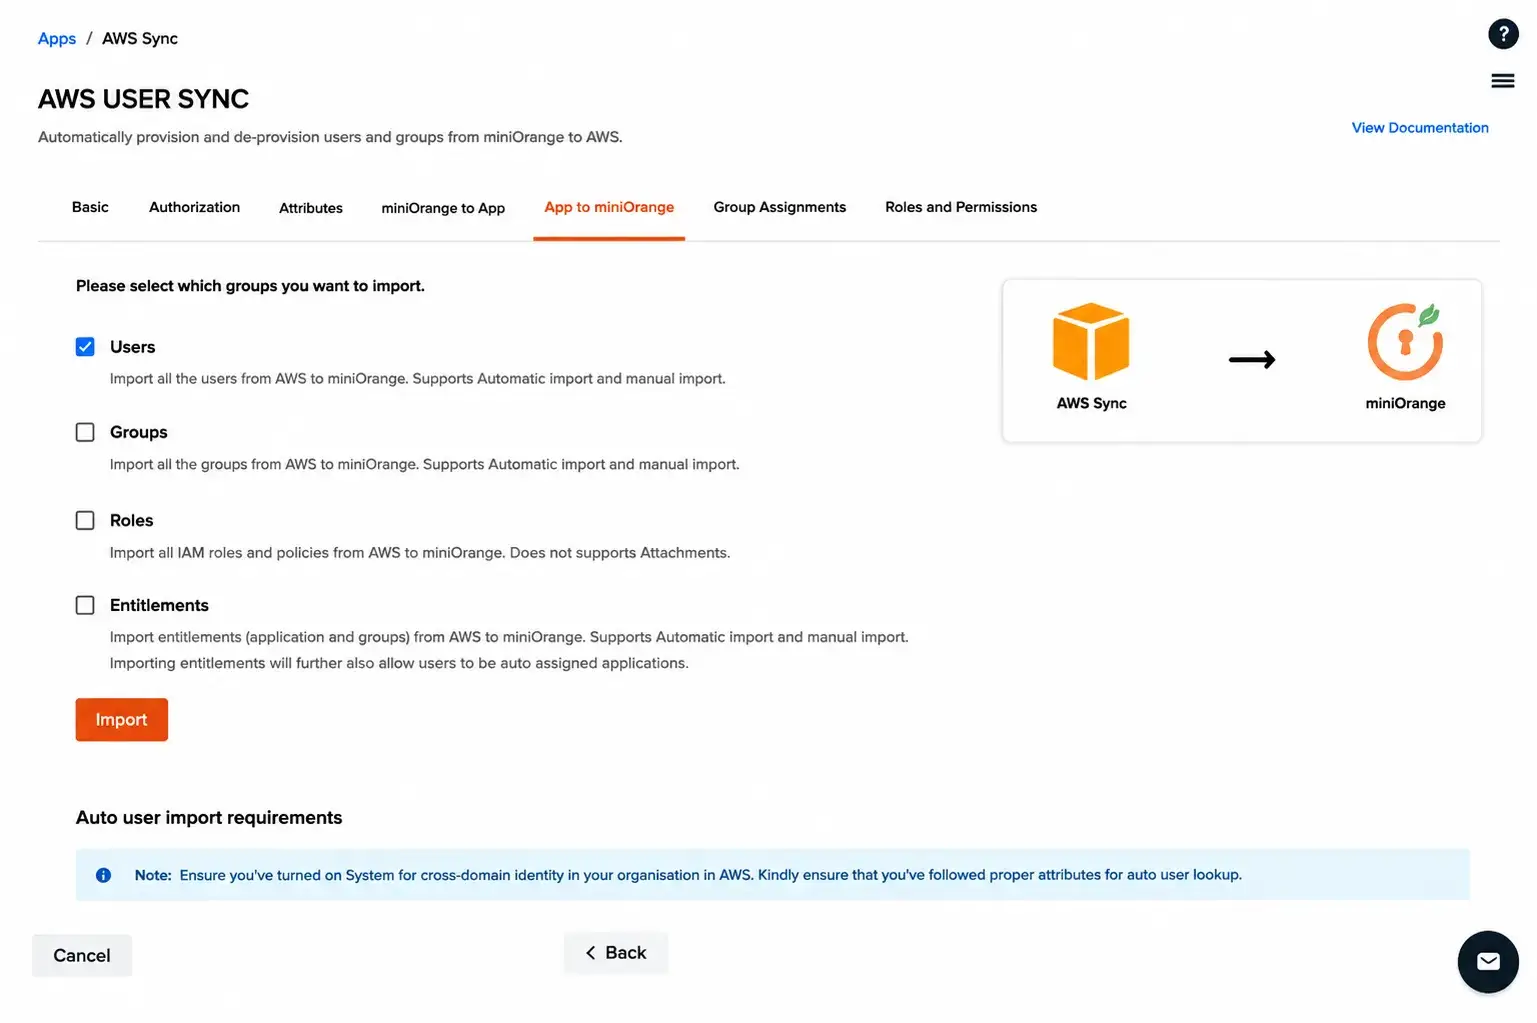
- Select Import users without deleting or disabling users in miniOrange, and then click the Import button.
- This will import and sync the users from AWS to miniOrange.
View Provisioning Reports
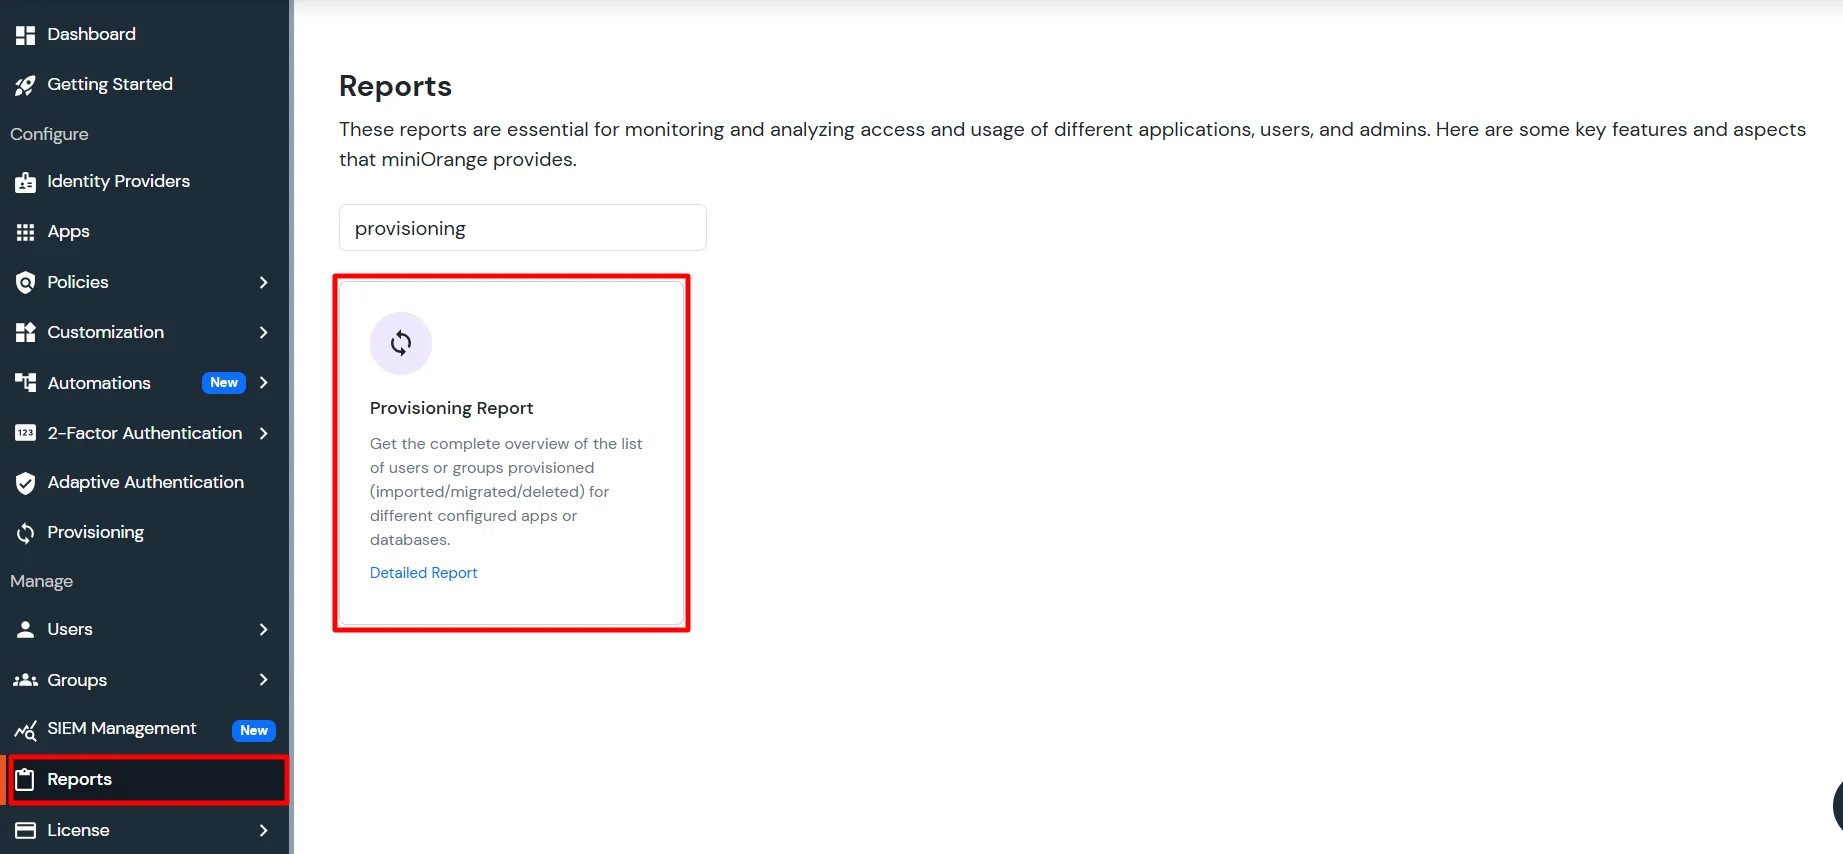
How to access Provisioning Reports?
- Navigate to Reports in the left-hand navigation pane, search for Provisioning, and select Provisioning Report.
- Filter the reports by specifying Enduser Identifier and Application Name criteria. Additionally, choose the desired timespan for the reports. Once done, click on the Search.
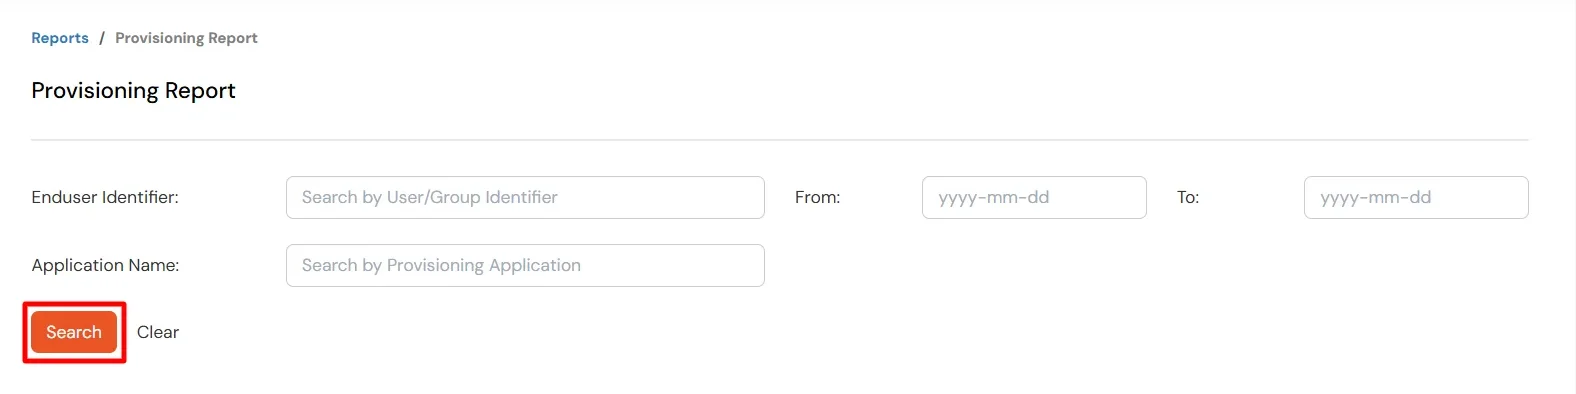
- Alternatively, you can directly click on Search to retrieve all provisioning reports based on time without applying any specific filters.
External References