Hello there!
Need Help? We are right here!
Need Help? We are right here!
Search Results:
×The miniOrange On-Premise Identity Provider (IdP) securely manages and verifies user identities within your local environment for SSO and IAM. This quick-start guide walks you through deploying an instance of miniOrange IAM (v5.0.0) on Linux. Designed for rapid evaluation and testing, this setup uses a pre-packaged Tomcat server.
For architecture, moctl utility commands, and licensing details, use the links in Further References.
Ensure your server meets these basic specs before starting. The miniOrange installer is self-contained and will automatically prompt you to install Java 17, Redis, RabbitMQ, and a default database(PostgreSQL) if they are not already present on your system.
| OS | Any operating system (Linux preferred) with support upto Java 17 (OpenJDK) |
| Hardware | 4 Core CPU | 16 GB RAM | 32 GB Storage |
| JAVA Environment | JAVA_17 |
| Server Access Policies |
|
| Software Dependencies |
|
RADIUS ports 1812 & 1813 are optional, Open them only if you intend to use RADIUS-based Authentication.
If you prefer not to use the bundled internal components, you can connect the IAM to external servers hosting Redis, RabbitMQ, or a custom database (PostgreSQL, MSSQL, MySQL, or Oracle). For compatible external database versions, see the Full Database Support List.
Extract the package and execute the installation script by running the following commands in your terminal:
unzip mo-installer-5.0.0.zip
cd mo-installer-5.0.0
chmod +x *.sh
sudo sh mo-installer.shDuring execution, the installer will detect missing dependencies and prompt you to install RabbitMQ and a PostgreSQL database locally.
If you responded NO to the bundled PostgreSQL,Redis,RabbitMQ installation, you can download and use any external service of your choice.
| Service | Ubuntu/Debian | CentOS/RedHat |
| PostgreSQL | Ubuntu/Debian | CentOS/RedHat |
| MySQL | Ubuntu/Debian | CentOS/RedHat |
| RabbitMQ | Ubuntu/Debian | CentOS/RedHat |
| Redis | Ubuntu/Debian | CentOS/RedHat |
The only requirement: You must manually create a fresh, empty database (schema) inside your database server before continuing with the miniOrange setup wizard.
Example for PostgreSQL:
# Access your database CLI
sudo -u postgres psql

# Create a fresh, empty database
CREATE DATABASE <databasename>;
Note: (Replace <databasename> with your preferred identifier. You will enter this name into the miniOrange setup screen later).
Launch the miniOrange IAM platform by running the service utility. This command initializes all underlying required services automatically.
moctl service startNote: The command line will display initialization progress. It may take a couple of minutes for all background services to fully boot up.
Follow the 3-step on-screen prompts to complete the deployment:

Once you land on the dashboard, verify that all auxiliary microservices are functioning correctly using one of the following methods:
Run the status check utility to ensure key services like apps, idps, and directory are listed as UP:
moctl service statusNavigate to the internal service registry engine at http://<YOUR_SERVER_IP_OR_DNS>:8070 or http://localhost:8070 to verify all components have registered successfully. You should see entries for core components such as APPS, CONFIGSERVER, DIRECTORY, IDPS, LICENSING, and other deployed services listed in the registry.
If any services are unavailable or not registered, restart the platform services and verify their status again:
moctl service restartWorkflows require secure communication over HTTPS.
[Note: The location of the cacerts file depends on your JDK installation.]
sudo keytool -import \
  -alias miniorange-wildcard \
  -file /home/abhishek/Downloads/certificates/domain.crt \
  -keystore /usr/lib/jvm/java-8-openjdk/jre/lib/security/cacerts \
-storepass changeit/usr/lib/jvm/java-17-openjdk-amd64/jre/lib/security/cacerts/usr/lib/jvm/java-17-openjdk/lib/security/cacerts/opt/jdk/jre/lib/security/cacertsTo enable workflow execution, you must register the Workflow module with the Scheduler service. Follow the steps based on your operating system.
/services/linux/scheduler-mq-register.shcd /opt/mo-idp-server/services/linux/sudo ./scheduler-mq-register.shEnsure you have OpenSSL installed on your system:
sudo apt install opensslopenssl req -x509 -nodes -days 365 -newkey rsa:2048 -keyout nginx-selfsigned.key -out nginx-selfsigned.crt \
-subj "/C=US/ST=State/L=City/O=Company/OU=Org/CN=example.com"Command Breakdown:
| Flag | Description |
|---|---|
| -x509 | Generates a self-signed certificate |
| -nodes | No password for the private key |
| -days 365 | Certificate valid for 1 year |
| -keyout | Path to save the private key |
| -out | Path to save the certificate |
| -subj | Set certificate details without prompts |
/C=US/ST=State/L=City/O=Company/OU=Org/CN=example.com| Field | Meaning | Example |
|---|---|---|
| C | Country code (2 letters) | US, IN, DE |
| ST | State/Province | California, Karnataka |
| L | City | San Francisco, Bangalore |
| O | Organization | Acme Corp |
| OU | Department | IT, Engineering |
| CN | Domain name | example.com |
1. Locate nginx.conf
/etc/nginx/nginx.conf2. Edit the Server Block
server {
  listen 443 ssl;
  server_name example.com;  # Replace with your domain

  ssl_certificate     /path/to/nginx-selfsigned.crt;
  ssl_certificate_key /path/to/nginx-selfsigned.key;

  location / {
    # Your application settings
  }
}
3. Restart Nginx
sudo nginx -t # Test configuration
  sudo systemctl restart nginx
Note: Self-signed certificates will show a browser warning because they are not issued by a trusted Certificate Authority (CA). Use only for local development or internal testing.
keytool -genkey -alias onpremssoidp -keyalg RSA -keystore onpremssoidp.jks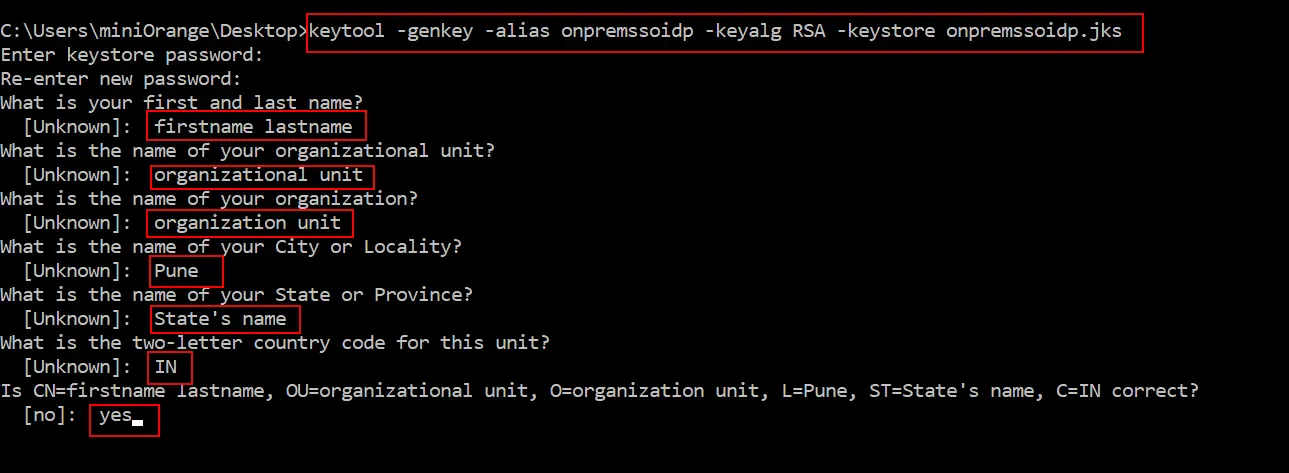
<Connector port="443" protocol="HTTP/1.1" SSLEnabled="true" maxThreads="150" scheme="https" secure="true" clientAuth="false" sslProtocol="TLS" keystoreFile="<JKS Keystore Path>" ciphers="ALL" keystorePass="<Password while keystore generation>"/>Note: Make sure the .jks file has appropriate permissions/run command prompt as Administrator.
Using a certificate from Trusted CAs like LetsEncrypt, GoDaddy, Comodo SSL.
certbot certonly --standalone -d.example.com#:/etc/letsencrypt/live/example.com# ls
cert.pem chain.pem fullchain.pem privkey.pem README<Connector port="443" protocol="org.apache.coyote.http11.Http11NioProtocol"
maxThreads="150" SSLEnabled="true">
<SSLHostConfig>
<Certificate certificateFile="conf/cert.pem"
certificateKeyFile="conf/privkey.pem"
certificateChainFile="conf/chain.pem" />
</SSLHostConfig>
</Connector>keytool -genkey -alias onpremssoidp -keyalg RSA -keystore onpremssoidp.jkskeytool -delete -alias onpremssoidp -keystore onpremssoidp.jksopenssl pkcs12 -export -in <GoDaddyCertificate>.crt -inkey <PrivateKey>.key \
-out <PublicPrivateKeyPair>.p12 -name tomcat -CAfile gd_bundle-g2-g1.crt -caname root<Connector port="443"
protocol="HTTP/1.1"
SSLEnabled="true"
maxThreads="150"
scheme="https"
secure="true"
clientAuth="false"
sslProtocol="TLS"
keystoreFile="<JKS Keystore Path>"
ciphers="ALL"
keystorePass="<Password while keystore generation>
"/>Creating a New Keystore
keytool -genkey -alias server -keyalg RSA -keysize 2048 -keystore your_site_name.jksCreating a CSR on Tomcat Servers
keytool -certreq -alias server -file csr.txt -keystore your_site_name.jksHow to Install an SSL Certificate on Your Tomcat Server
keytool -import -alias server -file your_site_name.p7b -keystore your_site_name.jksConfiguring Your SSL/TLS Connector
<Connector port="443"
  maxHttpHeaderSize="8192"
  maxThreads="100"
  minSpareThreads="25"
  maxSpareThreads="75"
  enableLookups="false"
  disableUploadTimeout="true"
  acceptCount="100"
  scheme="https"
  secure="true"
  SSLEnabled="true"
  clientAuth="false"
  sslProtocol="TLS"
  keyAlias="server"
  keystoreFile="/home/user_name/your_site_name.jks"
keystorePass="your_keystore_password" />The miniOrange core components generate continuous runtime logs. To prevent your server storage from completely filling up and causing service crashes over time, you must configure log rotation.
Please review and implement the configuration steps detailed in our standalone Log Rotation Configuration Guide immediately following your initial setup.
Note: During the miniOrange upgrade to a Java 17 runtime, any custom certificates present in the Java 8 cacerts truststore must be manually exported and imported into the Java 17 cacerts truststore to maintain trusted SSL connections with external systems.
To completely remove miniOrange IAM from your server, navigate to your installation directory and run:
# 1. Stop all active services
moctl service stop

# 2. Run the uninstaller script
sudo sh uninstall.shIf you encounter the error:"keytool error: java.lang.Exception: Key pair not generated, alias <onpremssoidp> already exists"
This indicates that the keystore file already exists. To resolve this, follow these steps:
keytool -genkey -alias onpremssoidp -keyalg RSA -keystore onpremssoidp.jksArchitecture & Operations:
Service Management:
Licensing:
x