Hello there!
Need Help? We are right here!
Need Help? We are right here!
Search Results:
×miniOrange supports Single Sign-On (SSO) for users and administrators across multiple applications. It works with protocols such as SAML, WS-FED, OAuth, OIDC, JWT, and RADIUS, so users can sign in with one set of credentials. This helps improve security, reduce phishing risk, and simplify application access.
miniOrange also provides SSO for mobile and JavaScript framework-based applications using JSON Web Tokens (JWT). This approach lets you set up SSO for apps that do not support SAML 2.0. Users can authenticate through your SAML 2.0-compliant Identity Provider, while JWT tokens are used to complete sign-in in miniOrange. The setup works with applications built in most frameworks and languages, including React.js, Firebase, Cordova, and Angular.js. You can also add password-less app links to the user portal.
miniOrange offers free help through a consultation call with our System Engineers to Install or Setup JWT SSO solution in your environment with 30-day free trial.
For this, you need to just send us an email at idpsupport@xecurify.com to book a slot and we'll help you in no time.


| Field | Description |
|---|---|
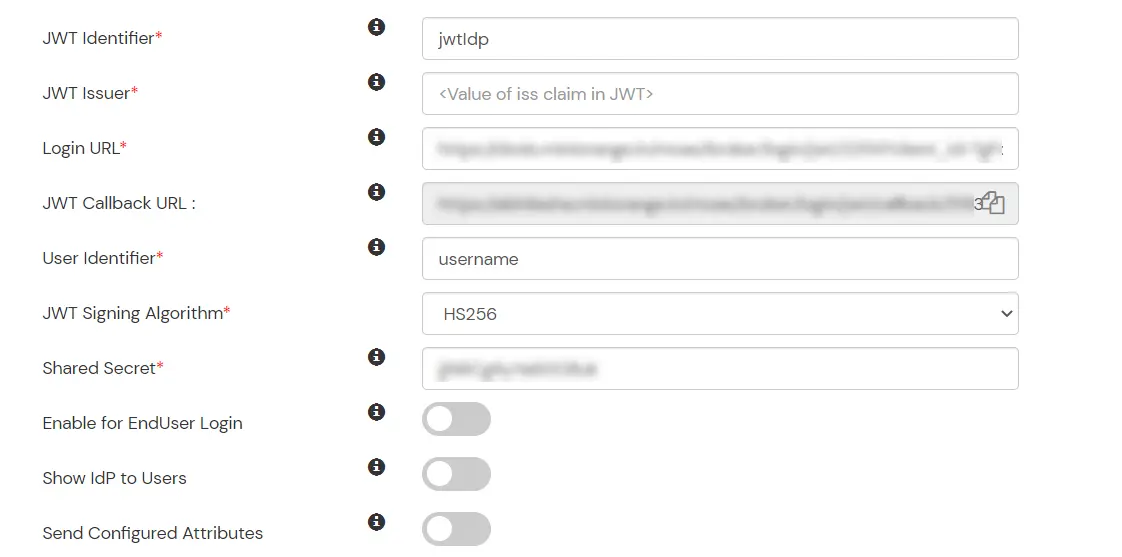
| IDP Name | Enter the IDP Name for your JWT IDP. |
| JWT Callback URL | Copy the JWT Callback URL provided and use it as Callback/Redirect URL in your JWT Provider. This is the URL on which the JWT provider sends the token after successful authentication. (Make sure the token is sent as id_token or jwt_token parameter). |
| JWT Issuer | Enter the JWT Issuer of your JWT Provider. This should be the value of iss claim sent in JWT token by your Identity Provider. |
| Login URL | Enter the SSO Login URL into the Login URL option in the JWT IDP configuration. This is the exact URL that can be used to start the SSO from your JWT provider. This could be different for each provider. |
| Logout URL | Enter the web address where users should be sent after they log out. |
| User Identifier | For User Identifier, enter the claim from your JWT token which can be used to uniquely identify each user. (For e.g. Username, Email, Subject, etc.) |
| JWT Signing Algorithm | Select the signing algorithm used by your JWT provider: RSA256 or HS256. Based on your selection, the following field appears:
|
| Field | Description |
|---|---|
| Domain Mapping | Restrict this IdP to specific email domains. Leave blank to allow all domains, or enter comma-separated values such as example1.com, example2.com. |
| Whitelisted domains | Specify domains allowed for redirect after authentication. Enter multiple domains separated by a semicolon, such as example1.com; example2.com. |
| Enable for EndUser Login | Enable this option to let end users authenticate through this JWT Identity Provider. |
| Show IdP to Users | Enable this option to show this Identity Provider as a login option on the end-user login page. |
| Prompt for User Registration | Enable this option to ask users to complete registration the first time they sign in with this Identity Provider. |